background image

20

1. Mira Elite 2

If you are unsure how electric showers work, please read through the 

Operation Section

before continuing.

Section

9

Commissioning

1.1.

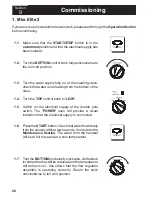
Make sure that the 

START/STOP

 button is in the

outermost

 position and that the electrical supply has

been isolated.

1.2.

Turn the 

BOTTOM

 control knob fully anticlockwise to

the full cold position.

1.3.

Turn the water supply fully on  at the isolating valve,
check that water is not leaking from the bottom of the
case.

1.4.

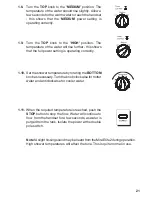
Turn the 

TOP

 control knob to 

'LOW'

.

1.5.

Switch on the electrical supply at the double pole
switch. The 

'POWER'

 neon will provide a visual

indication that the electrical supply is connected.

1.6.

Press the 

START

 button. Check that water flows freely

from the shower within a few seconds. If not refer to the

Maintenance Section

. The water from the handset

will be at full force and at a cool temperature.

1.7.

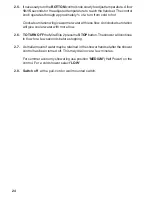
Turn the 

BOTTOM

 knob slowly clockwise. As the knob

is rotated the flow will be reduced and the temperature
will remain cool - this shows that the flow regulator
assembly is operating correctly. Return the knob
anticlockwise to full cold position.

Содержание elite 2

Страница 1: ...1 PUMPED ELECTRIC Maintenance Guide SHOWER Installation Operation THESE INSTRUCTIONS ARE TO BE LEFT WITH THE USER Power Low Low Flow Medium High Temperature Start Stop ...

Страница 2: ...cklist 7 4 Dimensions 8 5 Wiring Diagram 9 6 Specifications 10 7 Installation Requirements 11 8 Installation 17 9 Commissioning 20 10 Operation 22 11 Fault Diagnosis 26 12 Maintenance 28 13 Spare Parts 38 14 Optional Accessories 40 Guarantee Customer Care Policy and How to contact us Back cover ...

Страница 3: ...ndesignedtoprovideallyear roundperformance evenatthehighestflowrateswhicharenecessaryduringthesummer months The Elite 2 has separate controls for power selection and temperature flow adjustment The Elite 2 MUST have its own separate cold water supply from the cistern to ensure correct operation Mira Elite 2 9 8 kW 240 Volts white chrome finish Mira Elite 2 9 0 kW 230 Volts white chrome finish If y...

Страница 4: ...We would recommend a minimum 25 gallon 113 ltr cold storage tank for water supply 1 6 The shower unit must not be fitted where it may be exposed to freezing conditions Make sure that any pipework that could become frozen is properly insulated 1 7 DO NOT operate the appliance if it is frozen Allow the appliance to thaw before usingagain 1 8 DO NOT operate this appliance if water leaks from the pres...

Страница 5: ... plumbing installation must comply with the requirements of UK Water Regulations Byelaws Scotland BuildingRegulationsoranyparticularregulations and practices specified by the local water company or water undertakers The installationshouldbecarriedoutbyaplumberorcontractorwhoisregistered or is a member of an association such as 1 11 3 If the appliance begins to make an odd noise smell or smoke 1 11...

Страница 6: ...eland 2 7 Anyone who may have difficulty understanding or operating the controls of any shower should be attended whilst showering Particular consideration should be given to the young the elderly the infirm or anyone inexperienced in the correct operation of the controls 2 8 When this appliance has reached the end of its serviceable life it should be disposed of in a safe manner in accordance wit...

Страница 7: ... Brochure Section 3 Pack Contents Checklist Tick the appropriate boxes to familiarize yourself with the part names and to confirm that the parts are included 1 Mira Elite 2 1 x Mira Elite 2 Power LOW Low Flow Medium High Temperature Start Stop 3 x Wall Plug 1 x Compression Nut 1 x Olive 3 x Fixing Screws 3 x Rubber Feet ...

Страница 8: ...8 Power Low Flow Low High Temperature Start Stop Medium Dimensions Section 4 270 mm 85 mm 344 mm ...

Страница 9: ... Motor Thermal Trip ThermalCutout Dual Disc Power On Neon On Off SolenoidValve TankConnection Inlet Connector L E N 120 Brown 123 Green 122 Green 121 Blue 124 Black 128 Blue 126 Brown 130 Black 127 Brown 129 Blue 125 Black 132 Blue 131 Orange 96 Red 97 Brown 86 Brown 88 Red 1 5 4 2 3 7 L N ...

Страница 10: ...e ambient temperatures become too high The maximum recommended ambient temperature for the Elite 2 is 30 C 2 4 The following power ratings for the heater tanks are available with their respective voltages Mira Elite 2 9 8 240V 45 Amps Mira Elite 2 9 0 230V 40 Amps 2 5 The motor will absorb approximately 100 Watts maximum power under normal working conditions 3 Standards and Approvals 3 1 The Mira ...

Страница 11: ...f Positioned away from the ball valve witha25mmdistanceup from the base of the cistern This connection will prevent air and debris entering the shower supply 25 mm 1 2 The Elite 2 is suitable for installation within the shower area and is fitted with a pressure relief valve It must be positioned over a water catchment area with the controls at a convenient height The shower fitting should be posit...

Страница 12: ...he supply pipe is trimmed and bent such that the 15 mm inlet connector sits or can be lightly pressed easily on the back of the clamp bracket prior to connection with the pump housing 1 12 To avoid damage to the case when soldered fittings are used pre solder the pipework and fittings before connecting them to the 15 mm inlet compression connector 1 13 Supply pipework MUST be flushed to clear debr...

Страница 13: ...te head is available for any given application Spill over Level 25 mm Minimum Hose Retaining Ring 1 15 When installed in very hard water areas above 200 ppm temporary hardness yourinstallermayadvise the installation of a water treatment device to reduce the effects of limescale formation Mira Elite 2 malfunction due to excessive limescale formation is not covered by the manufacturer s guarantee Yo...

Страница 14: ...ead Loss mm 15 mm Pipe 22 mm Pipe 15 mm Elbow 22 mm Elbow A B A B No Elbows No Elbows x 120 x 20 x 55 x 15 80 MinimumEffective Head x mm Size Quantity Head Loss mm 15 mm Pipe 22 mm Pipe 15 mm Elbow 22 mm Elbow A B A B No Elbows No Elbows x 120 x 20 x 55 x 15 80 MinimumEffective Head x mm Example Based on the diagram Figure X with 15 mm pipework and A 1 5 m B 0 75 m 1 5 0 75 2 25 270 1 1 55 405 ...

Страница 15: ...shower via a double pole switch with at least a 3 mm contact separation The switch can be a ceiling mounted pullcord switch within the bathroom or a wall mounted switch in an adjacent room Suitable ceiling mounted pullcord switches for Mira electric showers include Make Model Rating Ashley CS445N 45 Amp Crabtree 2167 40 Amp MK 3164 WHI 45 Amp Tenby CS7545 45 Amp Volex VX9706 40 Amp 2 4 The minimum...

Страница 16: ...tor and some mechanical noise can be expected in addition to the noise generated by the spray from the handset The type of wall surface will affect the perceived sound levels Stud partition and panel walls have a tendency to resonate whilst solid walls will provide the quietest operation The tone of the pump motor may change when the temperature control knob is adjusted This is quite normal Plumbi...

Страница 17: ...he four cover retaining screws sufficient to remove the cover and the service tunnel Note The cover retaining screws are captive and should remain in the case and service tunnel 1 3 Remove the cover 1 4 Remove the service tunnel 1 5 Determine the direction of the inlet water supply top falling or back inlet Note Make sure that the back inlet does not go directly back into the wall Use a soldered e...

Страница 18: ...O NOT operate the shower if the dust and drip shields are not fitted 1 19 Refit the service tunnel and the cover and tighten the four cover retaining screws 1 20 Fit the shower fittings Refer to seperate instructions 1 9 An installation template is supplied on the internal packaging to help you install the Mira Elite 2 Put the installation template on the wall and mark through the positions of the...

Страница 19: ... must be fitted on to a finished flat and even wall surface small pillars moulded on to the back of the case allow air circulation Fixing Screw Drip Shield Do not operate the shower if the drip shield is not fitted Terminal Block Cistern Fed Cold Water Supply Pipe Captive Cover Retaining Screws Fixing Screw Fixing Screw Rubberfeet can be fitted to the rear of the case if required Dust Shield Do no...

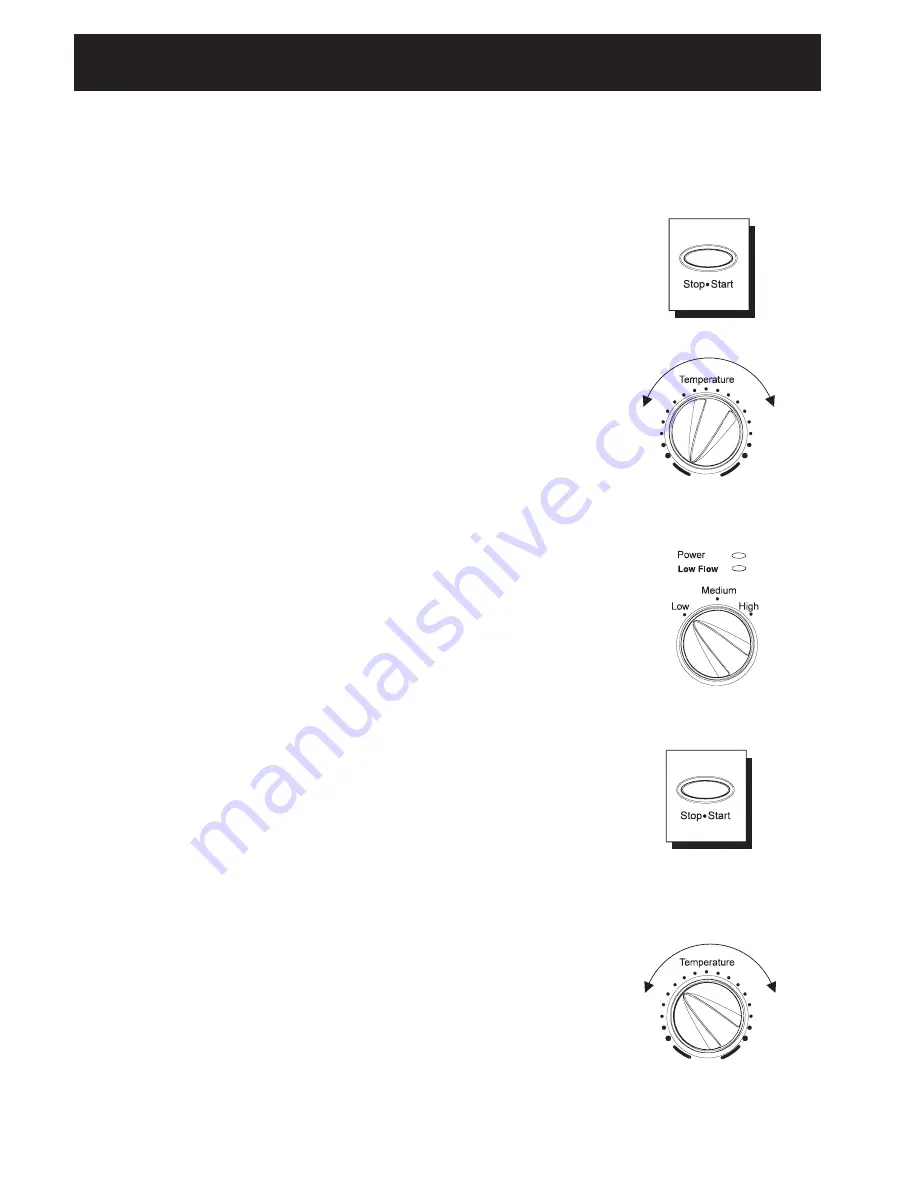
Страница 20: ...e bottom of the case 1 4 Turn the TOP control knob to LOW 1 5 Switch on the electrical supply at the double pole switch The POWER neon will provide a visual indication that the electrical supply is connected 1 6 PresstheSTARTbutton Checkthatwaterflowsfreely fromtheshowerwithinafewseconds Ifnotrefertothe Maintenance Section The water from the handset will be at full force and at a cool temperature ...

Страница 21: ...power at the double pole switch 1 8 Turn the TOP knob to the MEDIUM position The temperature of the water should rise slightly Allow a few seconds for the warm water to reach the handset this shows that the MEDIUM power setting is operatingcorrectly 1 9 Turn the TOP knob to the HIGH position The temperature of the water will rise further this shows that the full power setting is operating correctl...

Страница 22: ...mostatically control the showering temperature and as such cannot react to changes in temperature caused by a change in mains voltage or changes in the cistern fed water temperature 1 5 The temperature of cistern fed water will vary between Summer and Winter and therefore the temperature control knob will need to be adjusted to take account of these seasonal conditions The length of dead leg of th...

Страница 23: ...2 9 0 kW 230 V 9 8 kW 240 V 2 Mira Elite 2 Read the section Important Safety Information first THE SPRAY PLATE HOLES MUST BE KEPT CLEAR The spray plate should be regularly removed and cleaned in descalent Lack of regular spray plate cleaning will lead to poor performance and cause early failure of the Mira Elite 2 2 1 Switch on pullcord or wall mounted switch The POWER neon will provide a visual i...

Страница 24: ...w Anticlockwiserotation will give cooler water with more flow 2 6 TOTURNOFFtheMiraElite2presstheSTOPbutton Theshowerwillcontinue to flow for a few seconds before stopping 2 7 Asmallamountofwatermayberetained intheshowerhandsetaftertheshower control has been turned off This may drain over a few minutes For summer economy showering use position MEDIUM Half Power on the control For a cold shower sele...

Страница 25: ...25 COLD Stop Start Power Low Flow Low High Temperature Start Stop Medium High Medium Low Hotter Cooler Press to Start Stop Operation of the Mira Elite 2 ...

Страница 26: ...ails to operate in any switch position Electrical supply isolated at double pole switch the pullcord Switch on electrical supply via the pullcord Incoming water supply stop valves or isolating valve turned down or off Turn stop isolating valve to fully on position Hose or Handset blocked Clearblockageorrenew No water or very low flow rate Handset sprayplate blocked Remove clean Refer to Maintenanc...

Страница 27: ...ise in water mains supply temperature the power rating may be too high Turn the TOP knob to MEDIUM setting and re adjust temperature knob until suitable temperature is achieved Operation of temperature knob has little or no effect on water temperature Remove Handset and clean Refer to Maintenance in the I O M guide for the fitings If fault still persists contact your installer Handset sprayplate b...

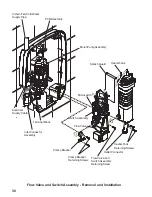
Страница 28: ...here are no user serviceable components beneath the cover of the Elite 2 Only a competent tradesperson should remove the cover 3 Flow Valve and Switch Assembly Removal and Installation WARNING Isolate the electrical and water supplies before removing the cover Mains electricity connections are exposed when the cover is removed 3 1 Unscrew the four cover retaining screws sufficient to remove the co...

Страница 29: ...er tank 3 8 Remove the heater tank from the flow valve and switch assembly 3 9 Remove the microswitches from the flow valve and switch assembly 3 10 Make a note of the positions of the solenoid wires on top of the heater tank Remove the solenoid wires 3 11 Remove the flow valve and switch assembly 3 12 Refit the components in reverse order Make sure that the electrical wires are installed in the c...

Страница 30: ...embly Flow Valve Clamp Bracket Heater Tank Microswitch Clamp Bracket RetainingScrews Heater Tank RetainingScrews Flow Valve and Switch Assembly RetainingScrew OutletConnector Splash Guard Cistern Fed Cold Water Supply Pipe Electrical SupplyCable PCB Assembly Motor PumpAssembly Switch Assembly ...

Страница 31: ...lve switch assembly and heater tank away from the case 4 7 Make a note of the positions of the wiring on top of the heater tank 4 8 Remove the blue wire and associated solenoid wires 4 9 Remove the brown and red wires from one side of the thermal switch and the second brown wire from the other side of the thermal switch Caution Do not press printed disc on the thermal switch as this will make the ...

Страница 32: ...ch Assembly Clamp Bracket Heater Tank Microswitch Clamp Bracket RetainingScrews Heater Tank RetainingScrews Flow Valve and Switch Assembly RetainingScrew OutletConnector Splash Guard Cistern Fed Cold Water Supply Pipe Electrical SupplyCable PCB Assembly Motor PumpAssembly Flow Valve ...

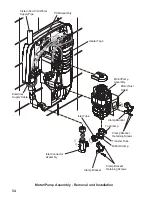
Страница 33: ...motor pump assembly away from the case and the mounting block 5 6 Make a note of the positions of the wiring on top of the motor pump assembly 5 7 Remove the blue wire and the orange wire from the top of the motor pump assembly and remove the motor pump 5 8 Install the transfer inlet tube to the motor pump assembly as follows Fit the transfer tube to the motor pump assembly making sure that the lo...

Страница 34: ...0 V InletConnector Assembly Clamp Bracket Heater Tank Clamp Bracket RetainingScrews Motor Pump Assembly Clamp Bracket Cistern Fed Cold Water Supply Pipe Electrical SupplyCable PCB Assembly Clamp Bracket RetainingScrews TransferTube InletTube TopClamp BottomClamp Motor Dust Shield ...

Страница 35: ...ding wire Caution Do not press printed disc on the replacement thermal switch as this will make the component unserviceable 6 9 Refit the components in reverse order Make sure that the electrical wires are installed in the correct positions In particular the green earth bonding wire must be reconnected above the thermal switch flange 6 Thermal Switch Removal and Installation WARNING Isolate the el...

Страница 36: ...itch Assembly Clamp Bracket Heater Tank Microswitch Clamp Bracket RetainingScrews Heater Tank RetainingScrews Flow Valve and Switch Assembly RetainingScrew OutletConnector Splash Guard Cistern Fed Cold Water Supply Pipe Electrical SupplyCable PCB Assembly Motor PumpAssembly Flow Valve ...

Страница 37: ...nletconnectorassemblytopreventdamage to the connector and unscrew the inlet filter 7 3 Withdraw the inlet filter Clean or renew as necessary 7 4 Refit in reverse order Ensure that the filter is screwed fully home 7 Inlet Filter Cleaning WARNING Isolate the electrical and water supplies before removing the cover Mains electricity connections are exposed when the cover is removed Inlet Filter Cleani...

Страница 38: ...lSwitch 416 43 SplashGuard 41648 Latching Switch 41651 Solenoid Coil Assembly 41652 OutletConnector 41733 Heater Tank 9 8 kW 41750 FlowValve Assembly 41751 Switch Assembly 42855 Cover Assembly 42856 Cover Seal not shown 42858 Component Pack components identified A 42859 ServiceTunnel 42860 Terminal Block Assembly 42861 Transfer InletTubes 42862 Motor Pump Assembly 42864 Motor Dust Shield 42866 Scr...

Страница 39: ... Stop WARN ING DO NO T REMOVE SHIELD 230 V MiraElite2SparePartsDiagram 416 41 428 67 428 68 417 33 A A A A A A B A B B B B B A 428 60 416 43 872 01 872 28 417 51 417 50 428 61 416 51 428 62 405 58 406 27 416 38 428 55 428 59 215 12 416 48 428 64 416 52 ...

Страница 40: ...your Kohler Mira stockists DCV H Anoutletdoublecheckvalve designedtopreventthebackfloworbacksiphonage of potentially contaminated water through shower controls which are fitted with a flexible hose as part of the outlet shower fitting Available as an optional accessory from your Kohler Mira stockists Section 14 Optional Accessories ...

Страница 41: ...41 Notes ...

Страница 42: ...42 Notes ...

Страница 43: ...43 Notes ...

Страница 44: ...L For Customers in Republic of Ireland Modern Plant Ltd Telephone Dublin 01 4591344 Mon to Fri 9am to 5pm Fax Dublin 01 4592329 24 hours Post Otter House NaasRoad Clondalkin Dublin22 To validate the guarantee please return your completed registration card To be free of charge service work must only be undertaken by Mira Showers or our approved agents in Northern Ireland and Republic of Ireland Ser...

Отзывы: