Mio Cyclo 500 series Скачать руководство пользователя страница 22

22

Customising your device

Note: 

Depending on your Mio model, certain setting options may not be available.

There are various customisation options available to enhance your navigation 
and cycling experience. With the Settings menu, you will be able to customise 
your device such as the system settings, sensor settings, user profiles, map 
settings, and more.

• 

To access the Settings menu, tap 

 from the 

Main menu


screen.

• 

Tap 

 / 

 to scroll through the Settings menu screens.

• 

While changing the settings, the check mark ( 

 ) next to the option 

button indicates the setting status.

Example:    

 : on/enabled 


 : off/disabled

• 

When the settings have been changed, tap 

 at the bottom of the 

screen to complete and return to the previous screen.
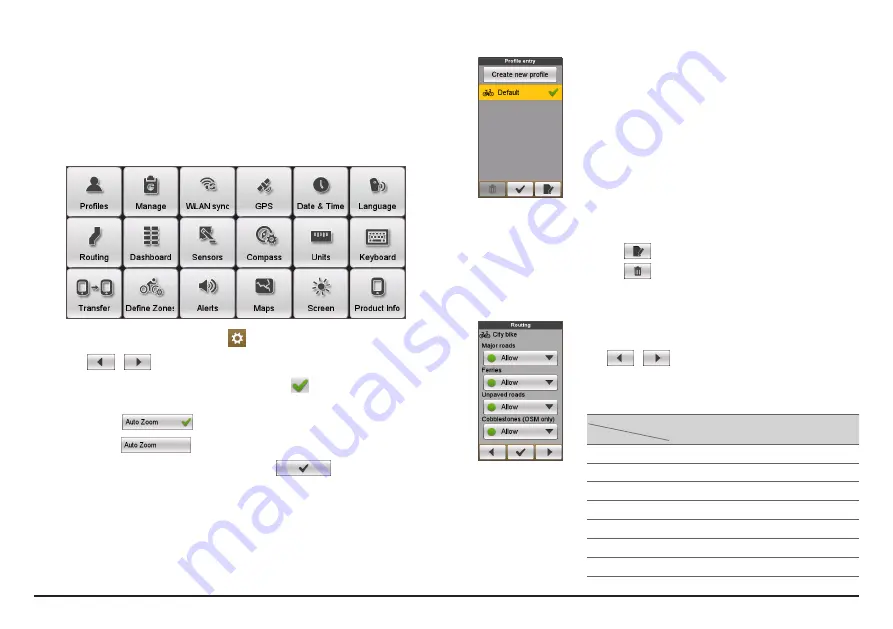
Profiles

The 

Profile entry

 screen displays the existing profile(s). 

• 

You can set up to 6 profiles on the device.

• 

Tap 

Create new profile

 and enter the personal data 

(including Name, Birth date, Weight, Gender, and 
profile Type*) to create a new profile entry.

*

  You can select the profile Type as 

City bike

Mountain 

bike

Race bike

Running

, or 

Indoor

. The system will create 

different routes depending on the profile type (not including 
Indoor). For example, Mountain bike will use unpaved routes 
which will be avoided by using Race bike.

• 

Select an existing profile entry and then do one of the 
following:

• 

Tap 

 to edit the name of the entry.

• 

Tap 

 to delete the entry.

Routing

This setting allows you to set the routing preference by 

selecting 

Prefer

Allow

, or 

Try to avoid

 in each route option.

• 

Tap 

 / 

 to select the desired routing type: 

City bike

Race bike

Mountain bike

Car

, or 

Running

.

• 

The available options may be different depending on 

the selected routing type:

           Routing type

Options

City 

bike

Race 

bike

Mountain 

bike

Car Running

Major roads

V

V

V

V

Cycle routes

V

V

V

Unpaved roads

V

V

V

V

Cobblestone*

V

V

V

V

Highway

V

Ferries

V

Walking routes

V

*

  For OSM only.

Содержание Cyclo 500 series

Страница 1: ...User Manual...

Страница 2: ...l product will deliver the described functionality as presented in this User Manual in all material respects Copyright 2013 MiTAC International Corporation Mio is either a registered trademark or trad...

Страница 3: ...Using MioShare 20 Sharing your route with friends in the trip 20 Using WLAN wireless local area network 20 Customising your device 22 Profiles 22 Routing 22 Transfer 23 Manage 23 Dashboard 23 Define Z...

Страница 4: ...essories To use your device on a bike ensure you use the specific bike mount kit that came with your device Mio may provide optional accessories for specific models Please visit Mio website www mio co...

Страница 5: ...y when it is nearly discharged When recharging make sure that the battery is fully charged Doing so can extend the battery life If you will not use the product for a long period of time over one month...

Страница 6: ...Mio_data You can use Windows File Explorer to copy move the files from the computer to your device A USB Connection screen appears to prevent you from using your device DO NOT delete any files that ar...

Страница 7: ...e Installing the sensors on your bike The cadence speed sensor kit is used for selected models only 1 Follow the instruction below to install the cadence speed sensor kit on your bike a c b d 2 Ensure...

Страница 8: ...rolyte gel usually available in local sports stores to ensure good contact 2 Adjust the elastic strap so it s snug while you are putting it on Ensure that you can take a good deep breath after putting...

Страница 9: ...n menu Settings Screen Auto Power Off Timer Navigating through the screens While the device is turned on and you are navigating through the menu screens press the POWER button briefly to return to the...

Страница 10: ...your device Depending on your settings the icons may be different to provide various information of your device Please note that these icons will not be always displayed during your trip training 1 2...

Страница 11: ...reens Note The screenshots and other presentations shown in the following sections may differ from the actual screens and presentations generated by the actual product The Dashboard provides the exten...

Страница 12: ...by dragging and then moving the map While navigating the map tap to display your current position on the centre of the map Tap to stop navigation Starting navigation Using the Navigate wizard Your de...

Страница 13: ...country b city Postal code c street d house number Once your home location has been set on the device simply tap GO on the screen and you will be directed to Home quickly Editing the Home location 1 O...

Страница 14: ...has all your saved locations 1 Tap Favorite on the Navigate screen and the device will display a list of your previously saved destinations 2 Tap to display more entries if available in the list Tip...

Страница 15: ...nce connected you can find two external mass storage drives on the computer Mio_system and Mio_data 3 Do one of the following To install the track to your device copy paste the gpx file to Mio_data Do...

Страница 16: ...ime mode Assign the desired amount of distance time to ride in the Distance Time field While generating the routes using Time mode you can set the estimated average speed of your trip in the Average S...

Страница 17: ...our target Workout by Distance Workout by Distance is the perfect tool if you want to set how long the workout session should be exactly 1 Tap from the Main menu screen and then select the Distance op...

Страница 18: ...ailable for selected models only Connect the heart rate monitor to the device before you start this workout 1 Tap from the Main menu screen and then select the HR Zone option 2 Complete the following...

Страница 19: ...mation in History includes date time distance average speed cadence heart rate altitude and more For selected models only To view the history data tap from the Main menu screen and then select an entr...

Страница 20: ...com Sharing your route with friends in the trip Note For selected models only Your device features ANT FS ANT File Share technology for exchanging data records between the Cyclo devices within RF ran...

Страница 21: ...network it starts to synchronise data with MioShare automatically Please note that you need to register your device on MioShare before using WLAN to synchronise data Note You may see the landing page...

Страница 22: ...reate new profile and enter the personal data including Name Birth date Weight Gender and profile Type to create a new profile entry You can select the profile Type as City bike Mountain bike Race bik...

Страница 23: ...d LayoutChange screen you can change the layout of the following screens Information screen 1 2 Elevation screen Navigation Compass screen Workout screen History screen Tip The mark next to the option...

Страница 24: ...ted by the system based on the data in your training history Custom You can input the Maximum power value manually 2 Define the heart rate range in Zone 1 6 fields according to your personal training...

Страница 25: ...using the built in electronic compass place the device away from the objects that generate magnetic fields such as electric appliances magnets or high voltage tower This might cause your device point...

Страница 26: ...he device automatically Language You can select the preferred language displayed for the menus and other interface features while operating the device From the Language screen tap on the language you...

Страница 27: ...ls in the same compartment as your Mio its parts or accessories Do not expose your Mio to extreme heat or direct sunlight for prolonged periods Overheating may damage your Mio About your heart rate mo...

Страница 28: ...ion of any traffic law or are involved in an accident Mio is not responsible for any damages of any type In some countries the data information regarding speed limits may conflict with local law and o...

Страница 29: ...Frequency RF audio link equipment cordless audio and in ear monitoring devices EN 301 489 17 Electronic compatibility and Radio spectrum Matters ERM Electromagnetic Compatibility EMC standard for rad...

Страница 30: ...s Agreement including but not limited to multiple translations and multiple media versions Even if you receive multiple versions of this Agreement you are licensed to use only one copy of the Software...

Страница 31: ...and the Documentation and shall not export or re export the Product the Software and the Documentation or any copies thereof or any product utilizing the Product the Software or the Documentation in v...

Страница 32: ...cted or impaired in any way and a valid legal and enforceable provision of similar intent and economic impact shall be substituted therefore ENTIRE AGREEMENT This Agreement sets forth the entire under...

Отзывы: