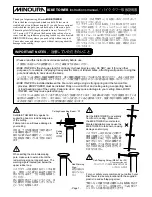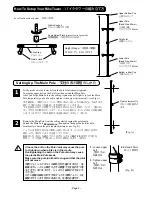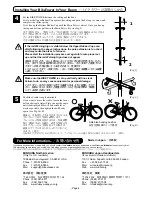
- Page 3 -
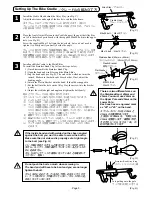
Setting Up The Bike Cradle
/クレードルの組み立て方
1
(Fig. C)
Install the Cradle Hook behind the Alloy Stay. (see Fig. C)
Adjust the distance and angle of the hooks to suit the bike frame.
まずクレードルフックをアルミバーに取り付けます。(図C)
クレードルフックが自転車を傷つけるのを防止するため,アルミバー
の背面に取り付けてください。
2
Place the Angle Adjust Plate onto the Cradle Support, then put the Alloy Stay
on it. Fix these three parts firmly with the supplied M6x20 bolt into the upper
hole. (see Fig. D)
Screw the supplied M6x15 bolt into the lower hole, but you don't need to
tighten it so firmly until you finally decide the angle.
クレードル取り付け枠に角度調整板を重ね,その上にアルミバーを重
ねます。これら3つとも長い方のボルト(M6x20)で取り付けます。
角度調整板の長孔部分には短い方のボルト(M6x15)をねじ込みます。
これは今はまだ本締めしなくても構いません。(図D)
(Fig. D)
(Fig. E)
(Fig. H)
3
Alloy Stay
/アルミバー
Cradle Hook
クレードルフック
M6x20 bolt
/ M6x20 ボルト
M6x15 bolt
/ M6x15 ボルト
Stainless Band Assy is top
ステンレスバンドは上側
Just putting onto the pole
フック部は支柱に当てる
Stainless Band (40mm or 45mm)
ステンレスバンド(40mm または 45mm)
Plastic Bracket
樹脂ブラケット
M6x30 Bolt
M6x30 ボルト
Flat Washer
平ワッシャ
90º
!
!
Install each Bike Cradle to the Main Pillar.
To install the Stainless Band Clip, follow the steps below;
1) Once disassemble the Stainless Band Clip.
2) Open the band and wind it around the Main Pillar.
3) Lap the band ends (see Fig. F). The end with a welded nut must be
inward. Make sure that both ends fit each other. If not, adjust the
bending angle.
4) Attach the Plastic Bracket onto the band. It should be snapped in.
5) Put the bolt into the hole on the Alloy Stay, then screw into the bracket
gently.
6) Adjust the cradle height and angle and tighten the bolt firmly.
組み立てたクレードルを支柱に取り付けます。
ステンレスバンドの取り付けかたは以下の通りに行ないます。
1)いったんステンレスバンドを分解します。
2)バンドを開き,支柱に巻き付けます。
3)ナットが溶接されている側の端が内側になるようにして,
バンドの両端を重ね合わせます(図F)。両方のバンド端がぴっ
たりと重ね合わされていることを確認してください。もし曲がっ
ていたらバンドを曲げ直して調節してください。
4)樹脂ブラケットをバンドにかぶせます。
5)M6x30 ボルトに平ワッシャを通し,クレードル受けの上側の
孔に通してから,樹脂ブラケット中央の孔に静かにねじ込みます。
6)フックの高さや角度を調節したら,ボルトをしっかりとねじ
込みます。
If the inside band end with welded nut has been angled
against the bolt, you won't be able to screw the bolt in.
Make sure the nut side end is properly set at right angle
to the bolt. (see Fig. G)
バンド端は両方ともきちんと重なり合っていなければなり
ません。もしナット側が曲がってしまっているとボルトが
ねじ込めません。
ボルトに対してナットが直角になっていることを確認して
ください。(図G)
Do not push the bolt so much when screwing in.
The band end will have to be bent and you are no longer
tighten the bolt.
ボルトをねじ込むとき,力を入れて押し込まないでくださ
い。ナット側のバンドが曲がってしまい,ボルトがねじ込
めなくなってしまいます。
(Fig. F)
(Fig. G)
!
There are two different sizes on
the Stainless Band; 40mm and
45mm. You must use 40mm on
the Upper Pole and 45mm on the
Lower Pole.
Each one has an engraved mark
as "40" or "45" on the band.
ステンレスバンドには 40mm と
45mm の2種類があります。
上支柱には 40mm を,下支柱には
45mm を使用します(兼用は不可)。
それぞれに「40」または「45」の
刻印で表示しています。


