Minolta MND20 Скачать руководство пользователя страница 4

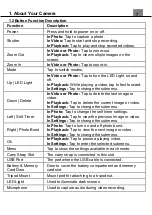
1. About Your Camera 

USB Adaptor Information 

•  Do not expose the adapter to high temperatures or moisture places. Otherwise, it 

may cause fire or electric shock. 

•  Do not attempt to repair, disassemble, change or transform the adapter.
•  Avoid sudden changes in temperature, which may cause condensation on the

adapter’s internal surfaces. Please do not use it immediately in this situation. 

•  Do not touch the plug with wet hands. Otherwise, it may cause electric shock.
•  Do not use the travel voltage converter or AC/DC power inverter. Otherwise, it 

may cause damage, overheating, malfunction or fire to the camera. 

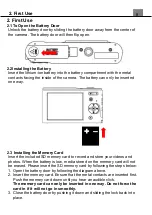
Notes about Opening and Closing the Battery Door 

•  Make sure the camera and your hands are not wet.
•  Make sure that there are no debris inside the battery-chamber or memory card

slot. 

•  Make sure that the battery cover is firmly closed and the security lock is in the

lock position. 

Precautions When Cleaning 

•  Do not puncture the microphone or speaker openings with a sharp implement.
•  If the inside of the camera is damaged, the waterproof performance will 

deteriorate. 

•  Do not use soap, natural detergents, or chemicals such as benzene for

cleaning. 

Do Not Apply Strong Impact to the Camera 

The product may malfunction if subjected to strong shock or vibration. In 
addition, do not touch or apply force to the lens. 

Avoid Sudden Changes in Temperature 

Sudden changes in temperature, such as when entering or leaving a heated 
building on a cold day, can cause condensation to form inside the device. To 
prevent condensation, place the device in a carrying case or a plastic bag 
before exposing it to sudden changes in temperature. 

Keep Away from Strong Magnetic Fields 

Do not use or store this device in the vicinity of equipment that generates strong 
electromagnetic radi

ation or magnetic fields. Doing so could result in loss of 

data or camera malfunction. 

Do Not Point the Lens at Strong Light Sources for Extended Periods 

Avoid pointing the lens at the sun or other strong light source light sources for 
extended periods when using or storing the camera. Intense light may cause 
the image sensor to deteriorate or produce a white blur effect in photographs. 

Turn the Product Off before Removing or Disconnecting the Power 

Содержание MND20

Страница 1: ......

Страница 2: ...pment does cause harmful interference to radio or television reception which can be determined by turning the equipment off and on the user is encouraged to try to correct the interference by one or m...

Страница 3: ...mera strap with care and never place the strap around the neck of an infant or child Wrapping the strap around a neck may cause suffocation Do not subject the LCD screen to impact To prevent the risk...

Страница 4: ...a is damaged the waterproof performance will deteriorate Do not use soap natural detergents or chemicals such as benzene for cleaning Do Not Apply Strong Impact to the Camera The product may malfuncti...

Страница 5: ...e any abnormalities such as excessive heat smoke or an unusual smell coming from the battery immediately discontinue use and consult your retailer After removing the battery from the camera or optiona...

Страница 6: ...To remove ngerprints or other stains that cannot be removed with a blower gently wipe the parts with a soft dry cloth If you wipe with too much pressure or with a rough cloth it may damage the camera...

Страница 7: ...ce 1 About Your Camera 1 Power 2 Shutter 3 Zoom In Out 4 Mode 5 Up Down Left Right 6 OK 7 Menu 8 Carry Strap Slot 9 USB Port 10 Battery and Memory Card Door 11 Tripod Mount 12 LED Light 13 Microphone...

Страница 8: ...e or video In Settings Tap to change the submenu Left Self Timer In Photo Tap to change the self timer settings In Playback Tap to view the previous image or video In Settings Tap to change the submen...

Страница 9: ...he included SD memory card to record and store your videos and photos When the battery is low media stored on the memory card will not be erased Please insert the SD memory card by following the steps...

Страница 10: ...port under the battery door and the larger end in to the included AC adaptor While charging the LED indicator light will light up solid red when finished charging the light will turn off NOTE Please...

Страница 11: ...er Your camera can connect to a computer to transfer photo and video files for viewing and editing you can also use the camera as a webcam Once connected and powered on the camera s screen will show M...

Страница 12: ...oto Mode is explained in the table below 1 Photo Mode 7 Pictures Remaining 13 Exposure 2 Image Size Resolution 8 Memory Card Inserted 14 ISO 3 Scene 9 Battery Level 15 Image Sharpness 4 Anti Shake 10...

Страница 13: ...e meaning of each icon within Video Mode is explained in the table below 1 Video Mode 7 Menu 2 Video Size Resolution 8 White Balance 3 Scene 9 Exposure 4 Video Time Remaining 10 ISO 5 Memory Card Inse...

Страница 14: ...olution 3 1 1 Scene This function adjusts the camera s settings to predetermined values that will produce the best image for that selected scene 1 In Photo Mode press the MENU button 2 Select Scene us...

Страница 15: ...ption Single 3 Photo Burst 4 Press the MENU button to exit the settings menu without making a selection 3 1 5 Self Timer This function determines the time delay before a photograph is captured This se...

Страница 16: ...ode press the MENU button 2 Select Quality using the LEFT or RIGHT buttons and press the OK button to enter the Quality submenu 3 Press the LEFT or RIGHT buttons to navigate the menu and press the OK...

Страница 17: ...tton to exit the settings menu without making a selection 3 1 12 Anti Shake This function enables photo capture in high speed and low light by electronically minimizing motion blur and reducing camera...

Страница 18: ...scene and for it to capture a photo automatically 1 In Photo Mode press the MENU button 2 Select Smile Capture using the LEFT or RIGHT buttons and press the OK button to enter the Smile Capture submen...

Страница 19: ...lues that will produce the best image for that selected scene 1 In Video Mode press the MENU button 2 Select Scene using the LEFT or RIGHT buttons and press the OK button to enter the Scene submenu 3...

Страница 20: ...tion After pressing the SHUTTER button the camera will automatically start recording when it detects motion Video Time Lapse The camera will take a single picture at a set interval for a set length of...

Страница 21: ...ectly if the time on the camera is set correctly 3 2 6 Exposure This function adjusts the frame brightness in your photograph 1 In Video Mode press the MENU button 2 Select Exposure using the LEFT or...

Страница 22: ...tton to enter the Color Effect submenu 3 Press the LEFT or RIGHT buttons to navigate the menu and press the OK button to confirm your selected option Normal B W Black and White Sepia Red Green Blue Su...

Страница 23: ...n to stop the video Power the camera on and press the MODE button to switch to Playback Mode In Playback Mode the following options are available 3 3 1 Delete This function is used to delete photos an...

Страница 24: ...ton to confirm your selected option 90 180 270 4 Press the MENU button to exit the settings menu without making a selection 3 3 4 Slideshow Photographs can be viewed as a slideshow on the camera 1 In...

Страница 25: ...Press the LEFT or RIGHT buttons to navigate the menu and press the OK button to confirm your selected option On Off Set Date Time 3 Press the MENU button to exit the settings menu without making a sel...

Страница 26: ...OK button to enter the Frequency submenu 2 Press the LEFT or RIGHT buttons to navigate the menu and press the OK button to confirm your selected option 50 Hz 60 Hz the default frequency for the United...

Страница 27: ...s setting back to factory default settings 1 In Setup Mode select Restore Default Settings using the LEFT or RIGHT buttons and press the OK button to enter the Restore Default Settings submenu 2 Pres...

Страница 28: ...Sensitivity Auto 100 200 400 LCD Screen 2 9 IPS LCD Assistive Light White LED Constant on off Power Saving Mode OFF 1 Minute 3 Minutes 5 Minutes White Balance Control Auto Daylight Cloudy Florescent...

Страница 29: ...Street 61st Floor New York NY 10005 USA Tel 800 441 1100 www minoltadigital com www elitebrands com Copyright 2022 Elite Brands Inc If you re having difficulties with your camera or would like furthe...

Страница 30: ......

Отзывы: