background image

23

USING THE ZOOM LENS

This camera is equipped with a unique 4.8 - 14.4mm zoom lens. This is equivalent to a
37 to 111mm lens on a 35mm camera. The lens is operated by the controller at the back
of the camera. The effect of the optical zoom is visible on the LCD monitor.

To zoom in on the subject, push
the up key (T) of the controller.

To zoom out, push the down
key (W) of the controller.

The digital-zoom function can
increase the power of the lens.
The digital zoom is activated in
the section 1 of the recording-
mode menu (p. 55).

The zoom lens not only affects how large the subject is in the picture, but it also influences the depth
of field and perspective. Depth of field is the area between the closest object in focus and the fur-
thest object in focus. As the lens zooms in to the telephoto position, the depth of field becomes shal-
lower, separating the subject from the background. Many portraits are taken with telephoto lenses.
Zooming the lens out to the wide-angle position makes both the foreground and background appear
sharper. Usually landscape photographs take advantage of the large depth of field of wide-angle
lenses. Wide-angle lenses also create a strong perspective which gives a sense of depth in the
image. Telephoto lenses compress the space between the subject and background and create a
weak perspective.

Shooting tips

Содержание Dimage X20

Страница 1: ...2550 Kontich Belgium Minolta Schweiz AG Riedstrasse 6 CH 8953 Dietikon Switzerland Minolta Svenska AB Albygatan 114 S 171 54 Solna Sweden Finnish Branch Niittykatu 6 PL 37 SF 02201 Espoo Finland Minol...

Страница 2: ...imaging and DiMAGE are trademarks or registered trademarks of Minolta Co LTD Apple the Apple logo Macintosh Power Macintosh Mac OS and the Mac OS logo are registered trademarks of Apple Computer Inc M...

Страница 3: ...Do not attempt to short or disassemble batteries Do not store batteries near or in metallic products Do not mix batteries of different types brands ages or charge levels Do not charge lithium batteri...

Страница 4: ...exposed The flash has a high voltage circuit which may cause an electric shock resulting in injury The continued use of a damaged product or part may cause injuries or fire Keep batteries or small par...

Страница 5: ...When unplugging the AC adapter do not pull on the power cord Hold the adapter unit when removing it from an outlet Do not damage twist modify heat or place heavy objects on the AC adapter cord A damag...

Страница 6: ...is in contact with people or objects The flash unit discharges a large amount of energy which may cause burns Do not apply pressure to the LCD monitor A damaged monitor may cause injury and the liqui...

Страница 7: ...tion If this equipment does cause harmful interference to radio or television reception which can be determined by turning the equipment off and on the user is encouraged to try to correct the interfe...

Страница 8: ...getting up and running section covers how to prepare the camera for use It contains important information about power supplies and memory cards The basic operation of this camera is covered in the re...

Страница 9: ...White balance 42 Image size and image quality 43 Exposure compensation 45 Toning 46 Portrait 47 Navigating the recording mode menu 48 Customizing key functions 50 Camera sensitivity ISO 51 Flash rang...

Страница 10: ...2 LCD monitor brightness 84 Formatting memory cards 84 Reset default 85 Language 86 Audio signals 86 Shutter FX 87 Volume 87 Auto power off 87 Date and time 88 Date format 88 Video output 88 Transfer...

Страница 11: ...ng the USB DIRECT PRINT menu 103 Printing DPOF files 103 Remote camera system requirements 104 Installing the remote camera driver 104 Connecting the remote camera 106 Notes on remote camera operation...

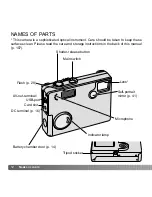
Страница 12: ...surfaces clean Please read the care and storage instructions in the back of this manual p 107 Flash p 28 Indicator lamp Lens Main switch Microphone AV out terminal USB port Tripod socket Battery chamb...

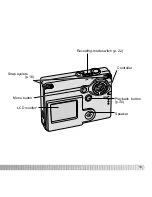
Страница 13: ...13 Recording mode switch p 22 Controller LCD monitor Menu button Speaker Strap eyelets p 16 Playback button p 30...

Страница 14: ...mera should be turned off Slide the battery chamber door toward the front of the camera to release the safety catch 1 Open the door Insert the AA batteries as shown make sure the positive and negative...

Страница 15: ...is not made within three minutes To restore power press the main switch The length of the auto power off period can be changed in the section 2 of the setup menu p 87 When the camera is connected to...

Страница 16: ...AC adapter into the DC terminal 1 Insert the AC adapter plug into an electrical outlet Always turn off the camera before changing between power supplies Always keep the strap in the event that the ca...

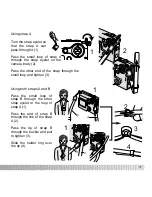
Страница 17: ...end of the strap through the small loop and tighten 3 Using strap A Using both straps A and B 1 2 3 Pass the small loop of strap B through the other strap eyelet or the loop of strap A 1 Pass the end...
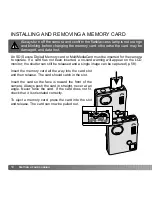
Страница 18: ...and confirm the flash access lamp is not orange and blinking before changing the memory card otherwise the card may be damaged and data lost Insert the memory card all the way into the card slot and...

Страница 19: ...en the card is protected images cannot be recorded If an attempt is made to record or delete an image with the camera the card locked message will appear and the LED lamps near the card slot will turn...

Страница 20: ...ng page Turn the camera on by pressing the main switch near the shutter release button 1 Press the menu button to display the main menu on the LCD monitor 2 1 2 Controller In the recording mode menu t...

Страница 21: ...et the clock and calendar The setup menu will be displayed enter Date Time set Press the right key Enter will appear on the right side of the menu Setup menu section 3 Date Time setting screen Use up...

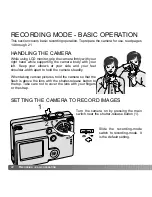
Страница 22: ...h your left Keep your elbows at your side and your feet shoulder width apart to hold the camera steadily When taking vertical pictures hold the camera so that the flash is above the lens with the shut...

Страница 23: ...subject is in the picture but it also influences the depth of field and perspective Depth of field is the area between the closest object in focus and the fur thest object in focus As the lens zooms...

Страница 24: ...n and is more pronounced at the telephoto position of the lens than at the wide angle position Although the warning appears the shutter can still be released If the warning appears place the camera on...

Страница 25: ...ke the picture After the shutter releases the flash access lamp next to the card slot will turn orange and blink indicating image data is being written to the memory card Never remove a memory card wh...

Страница 26: ...with the shutter release button Place the subject within the monitor focus frame Press and hold the shutter release button partway down to lock the focus The focus signal on the monitor will indicate...

Страница 27: ...tain situations In these situations the focus lock function p 26 can be used to focus on another object at the same distance as your main subject and then the image can be recomposed to take the pictu...

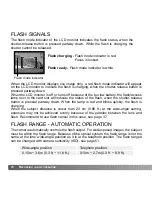
Страница 28: ...ft RECORDING BASIC OPERATION Flash charging Flash mode indicator is red Focus is locked Flash ready Flash mode indicator is white Flash mode indicator When the LCD monitor displays live image only a...

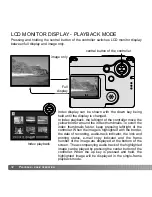
Страница 29: ...nd live image only Full display Live image only LCD MONITOR DISPLAY RECORDING MODE central button of the controller The battery condition and date imprinting indicators can appear on the live image on...

Страница 30: ...ecording Date of recording Lock indicator p 70 Magnification display p 33 Image size display p 43 Image quality indicator p 43 Battery condition indicator p 15 Frame number total number of images Audi...

Страница 31: ...e images on the memory card The images can be scrolled faster by holding the left right keys Controller Press the center button of the controller to delete the file Use the left right keys to highligh...

Страница 32: ...r the lock and printing status e mail copy indicator and the frame number of the image are displayed at the bottom of the screen The accompanying audio track of the highlighted image can be played by...

Страница 33: ...increments Pressing the up key increases the image magnification Pressing the down key decreases the image magnification To scroll the image press the center button of the controller Pressing the cen...

Страница 34: ...4 Camera sensitivity display p 51 RECORDING ADVANCED OPERATION LCD monitor Toning p 46 When the menu button is pressed the main menu appears on the LCD monitor and the basic menu options can be set Th...

Страница 35: ...ck to recording mode Press the central button of the controller to adjust the selected settings Use the controller to highlight the desired menu options Selecting the menu icon while in the main menu...

Страница 36: ...ode is selected in the main menu of the recording mode P 34 The active flash mode is displayed in the top left corner of the LCD monitor When the camera is turned off and auto reset p 52 is active the...

Страница 37: ...for flash portraits at night The camera automatically balances the flash and background exposures When taking portraits ask your subject not to move after the flash burst the shutter will still be ope...

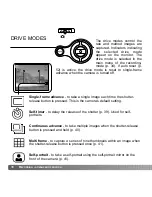
Страница 38: ...self portrait using the self portrait mirror on the front of the camera p 41 Multi frame to capture a series of nine thumbnails within an image when the shutter release button is pressed once p 41 Th...

Страница 39: ...cus and exposure are determined when the shutter release button is pressed do not stand in front of the camera when taking a self timer image Always confirm the focus with the focus signals before beg...

Страница 40: ...cus for the series 1 Press and hold the shutter release button all the way down 2 to begin taking pictures When the shutter release button is pressed and held the camera will begin recording images un...

Страница 41: ...g the self portrait mirror on the front of the camera The camera adjusts its focus not to exceed 1m 3 3 feet and its focal length to wide angle setting automatically Self portrait can be selected in t...

Страница 42: ...iful images even under mixed lighting conditions When the built in flash is used the white balance is set for the color temperature of the flash Preset white balance settings must be set before the im...

Страница 43: ...ormal usage File formats vary with the image quality setting The fine standard and economy settings are formatted as a JPEG file Fine standard and economy files can be recorded as color or monochrome...

Страница 44: ...cene some subjects can be compressed further than others The frame counter indicates the approximate number of images that can be stored on the mem ory card at the camera s image quality and size sett...

Страница 45: ...g key function P 50 The exposure compensation must be set before the image is captured When setting the exposure compensation the amount of compensation is shown next to the exposure compensation icon...

Страница 46: ...will reflect the selected mode This has no effect on the file size When auto reset P 52 is active the toning will be reset to color when the camera is turned off The toning must be set before an imag...

Страница 47: ...et to get the effect of the catchlight in the eye Change the flash mode to flash cancel if it is not necessary The indicator will be displayed on the LCD monitor to indicate the portrait mode is activ...

Страница 48: ...n the desired menu section is displayed use the up down key to scroll through the menu options Highlight the option whose settings need to be changed With the menu option to be changed highlighted pre...

Страница 49: ...set Off YYYY MM DD MM DD hr min Off On Off On Off On Off ISO 200 ISO 100 ISO 64 Refer to the following sections for details on the menu options and their settings Folder name File memory On Off Std fo...

Страница 50: ...ng left right key changes the settings and changes are displayed on the LCD monitor Changes are set automatically after five seconds or when another camera button is pressed 50 RECORDING ADVANCED OPER...

Страница 51: ...selected As the ISO value doubles the camera sensitivity doubles Like grain in silver halide film that increases with speed noise increases with the sensitivity in digital imaging an ISO setting of 6...

Страница 52: ...to Off Exposure compensation p 45 LCD monitor display p 29 Toning p 46 0 0 Ev Full Color When auto reset is active the following functions return to their program setting when the camera is turned off...

Страница 53: ...the indicator lamp glows To stop the recording press the shutter release button or the center button of the controller 2 The recording will automatically stop when the fifteen second limit has elapse...

Страница 54: ...ted in three formats year month day month day year and day month year The date and date format are set in section 3 of the setup menu p 88 The date and time of recording can be printed directly on the...

Страница 55: ...rpolated to the set image size the quality of the images may not be equal to images taken without the digital zoom the greater the power of the digital zoom the lower the image quality At the maximum...

Страница 56: ...n 2 of the recording mode menu p 48 When used with voice memo the audio recording will begin after the image is played back Images can be previewed immediately after they have been captured regardless...

Отзывы: