


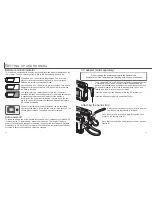


Used for self-portraits, the self-timer will delay the release of the shutter for
approximately ten seconds after the shutter-release button is pressed. The
self-timer drive mode is selected in the basic section of the recording-mode
menu (p. 28).
With the camera on a tripod, compose the picture as described in the
basic recording operation section (p. 23). Focus lock (p.24) can be
used with off-center subjects. Press the shutter-release button partway
down to lock the exposure and focus (1). Press the shutter-release but-
ton all the way down to begin the countdown (2). Because focus and
exposure are determined when the shutter-release button is pressed,
do not stand in front of the camera when taking a self-timer image.
Always confirm the focus with the focus signals
before beginning the countdown (p. 25).
During the countdown, the self-timer lamp on the
front of the camera (3) will start to blink. A few sec-
onds before the exposure, the self-timer lamp will
blink rapidly. The lamp will glow steadily just before
the shutter fires. To stop the countdown, press the
zoom lever. To stop the countdown and
cancel the self-timer, press the main
switch. The drive mode will be reset to
single-frame advance after the expo-
sure.
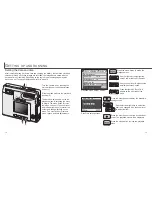
The movie-recording drive mode is selected in the basic section of the
recording-mode menu (p. 28). Movie clips up to approximately thirty-five
seconds in length with audio can be recorded. The movie image is 320 X
240 pixels (QVGA) and recorded at a rate of around 340KB/s.
Approximately one 19-second movie clip can be stored on one 8MB memory card.
Shooting digital video is simple. Frame the picture on the LCD monitor. Press and
release the shutter-release button to begin recording (1); “Rec” will be
displayed during recording. The camera will continue to record until the
recording time is used or the shutter-release button is pressed again.
When recording, the frame counter will countdown the
recording time. Take care not to cover the microphone
while recording. During recording, focus is locked and
the optical zoom is disabled. However, a stepless 2X
digital zoom can be used with the zoom lever.
After recording, a screen will appear
indicating the movie clip is
being saved to the memory
card. Never remove the
memory card or disconnect
the power supply while the
clip is being saved.
32
33
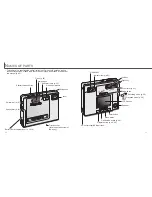
R
ECORDING MODE
Self-timer
1
Recording indicator
Remaining recording time
Movie recording
2
1
Saving to card.
Stand-by
Recording
Maximum recording
time for the next clip.
Содержание DiMAGE image Viewer Utility
Страница 1: ...INSTRUCTION MANUAL E...


