background image

47

46

R

ECORDING MODE

METERING MODES

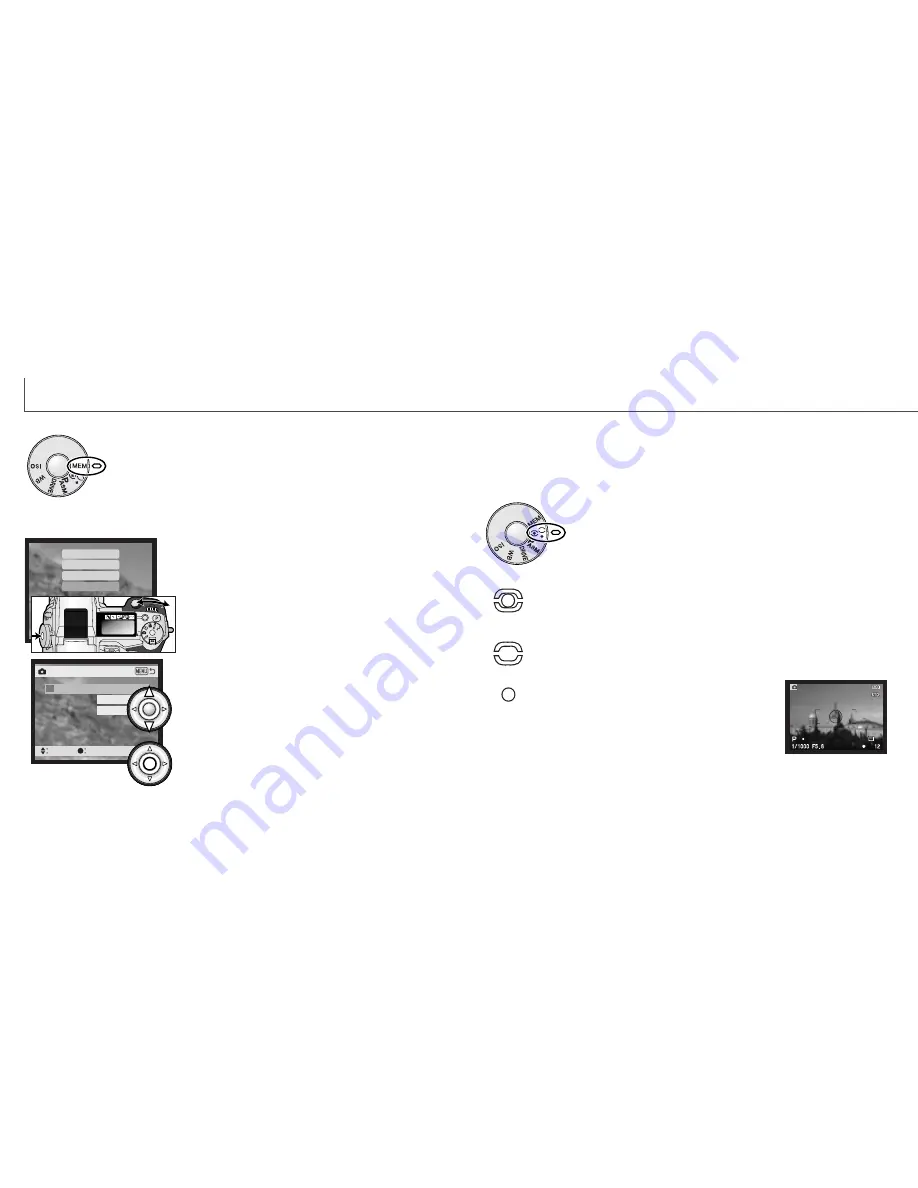
MEMORY - STORING CAMERA SETTINGS

Three sets of camera settings can be saved. This saves time under
frequently repeating conditions by eliminating the need to set the
camera. Except for the spot AEL button, subject programs, data
imprinting, voice memo, and instant playback settings, all recording-
mode camera settings will be saved including the position of the Flex
Focus Point, the custom white balance setting, and changes made
with the function dial and digital effects control. Although the

bracketing drive mode setting can be saved, the type of bracket, exposure, contrast,
color saturation, or filter must be reset.

To save the current camera settings, turn the function
dial to the memory position, and press the function
button (1) to display the memory settings on the
monitor. Turn the control dial to highlight the store-
memory option. Release the function button to open
the store-memory screen.

The icons indicating the metering mode are displayed on the monitors
only. Do not confuse these icons with the focus signals (p. 33). The
metering mode is changed with the function dial (p. 44). When center-
weighted or spot metering is selected, pressing the shutter-release
button partway down will activate the exposure system, but will not
lock the exposure; the spot AE lock button (p. 40) can be used to lock
the exposure, but uses the spot metering area only.

Spot - uses a small area within the image to calculate
the exposure. When this mode is selected, a small
circle will appear in the middle of the live image
indicating the measuring area. The spot allows precise
exposure measurements of a particular object without
being influenced by extremely bright or dark areas
within the scene.

Multi-segment - uses 300 segments to measure luminance and color. This
data is combined with distance information to calculate the camera exposure.
This advanced metering system will give accurate worry-free exposures in
almost all situations.

Center weighted - a traditional metering method in silver-halide cameras. The
system measures light values over the entire image area with emphasis given
the the central region.

Memory  1

Memory  2

Memory  3

Store memory

1

2

Camera settings are saved with the function dial (p. 44).
Initially, each memory location contains the camera’s
original settings. 

Spot metering display

To recall a setting, press the function button and highlight the memory register using
the control dial. Release the function button to apply the memory settings.

Camera settings cannot be deleted from memory by turning the camera off, using the
pro-auto button, or choosing the default function on the setup menu. 

On the store-in-memory screen, use the up/down
keys of the controller (3) to select the memory
register in which the camera settings are to be
saved. Press the central button of the controller (4) to
save the settings; the previous settings will be erased
and replaced by the new ones. A confirmation screen
will open; press the central button of the controller to
close.

Rec.

Store memory

select

enter

1

Store in

1

2

3

3

4

Содержание DIMAGE 7I - SOFTWARE

Страница 1: ...INSTRUCTION MANUAL E ...

Страница 2: ... 100 DiMAGE software CD ROM DiMAGE Viewer instruction manual Camera instruction manual Warranty card This product is designed to work with accessories manufactured and distributed by Minolta Using accessories or equipment not endorsed by Minolta may result in unsatisfactory performance or damage to the product and its accessories Because the performance of alkaline batteries with digital cameras i...

Страница 3: ...ctric shock resulting in injury The continued use of a damaged product or part may cause injuries or fire Keep batteries or small parts that could be swallowed away from infants Contact a doctor immediately if an object is swallowed Store this product out of reach of children Be careful when around children not to harm them with the product or parts Do not fire the flash directly into the eyes It ...

Страница 4: ...t the plug securely into the electrical outlet Do not use if the AC adapter cord is damaged Do not cover the AC adapter A fire may result Do not obstruct access to the AC adapter this can hinder the unplugging of the unit in emergencies Unplug the AC adapter when cleaning or when the product is not in use CAUTION FOR PROPER AND SAFE USE Names of parts 12 Camera body 12 Data panel 15 EVF and LCD mo...

Страница 5: ...ation 73 Autofocus areas and control 74 Flex Focus Point 75 Digital zoom 76 Macro mode 77 Navigating the recording mode menu 78 Electronic keyboard 80 Autofocus modes 81 Image size 82 About the frame counter 82 Image quality 83 About super fine and RAW image quality 84 Image file size and CompactFlash card capacity 85 Flash modes 86 Wireless Remote flash 88 Wireless Remote camera and flash ranges ...

Страница 6: ...em requirements 137 Connecting the camera to a computer 138 Connecting to Windows 98 98 second edition 140 Automatic installation 140 Manual installation 141 Connecting to Mac OS 8 6 143 Auto power save Data transfer mode 143 CompactFlash card folder organization 144 Disconnecting the camera from the computer 146 Windows 98 98 second edition 146 Windows ME 2000 Professional and XP 146 Macintosh 14...

Страница 7: ...y mode switch Display information button p 34 109 Electronic viewfinder EVF p 73 LCD monitor p 16 Menu button Controller DC AV out terminal cover Spot AE lock button p 40 Battery chamber lock p 26 Eyepiece sensors p 34 Magnification button Remote control terminal cover p 53 Access lamp QV Delete button p 37 Dial release Main switch Mode dial 1 The focal length scale on the zooming ring is given in...

Страница 8: ...ent dial p 73 Tripod socket Memory p 46 Metering modes p 47 Exposure modes p 48 Drive modes p 54 White balance p 62 Camera sensitivity p 65 Digital effects button Function dial p 44 Digital effects Controller p 67 NAMES OF PARTS Frame counter p 82 Located on the top of the camera body the data panel shows the status of the camera All icons have been shown for clarity The frame counter cannot excee...

Страница 9: ... can be used as soon as pos sible However it is recommended that the entire manual be read to properly operate the camera and to achieve the best results 2 Flash mode indicator p 86 5 Flash compensation display p 68 9 Sharpness display p 97 8 Contrast compensation display p 70 10 Exposure compensation display p 68 11 White balance indicator p 62 17 Camera sensitivity ISO display p 65 12 Exposure m...

Страница 10: ...rce the lens hood If it does not fit check its orientation To detach the lens hood turn it 90 counterclockwise and remove The lens hood can be reverse mounted when the camera is not is use With one of the large petals to the top slide the hood onto the end of the lens Turn it 90 clockwise until it stops The lens hood can be attached or removed with the lens cap on the camera To detach the lens hoo...

Страница 11: ...traight never at an angle Never force the card If the card does not fit check its orientation TURNING ON THE CAMERA AND DISPLAYS While pushing in the dial release 1 turn the mode dial 2 to the still image recording position Display switch The display switch at the back of the camera controls which display will activate during camera operation Turn the switch to the auto display position A the disp...

Страница 12: ...lash simply pull up the unit by the tabs on each side Icons will appear in the upper left corner of the EVF and LCD monitor see chart below The flash position must be set manually The flash will always fire regardless of the amount of ambient light Always remove the lens hood when using the built in flash The hood may cast a shadow if mounted The camera will automatically control the flash output ...

Страница 13: ...te the image 24 25 BASIC OPERATION Use the left right keys to highlight YES Choosing NO will cancel the operation Press the menu button to return to the recording mode This section covers the basic operation of the camera Please thoroughly familiarize yourself with the operations in this section before moving on to other sections in the manual In quick view images can also be deleted Care should b...

Страница 14: ...e operational The batteries should be replaced as soon as possible This warning automatically appears and remains on the display until the batteries are changed AUTO POWER SAVE To conserve battery power the camera will turn off displays and unnecessary functions if an operation is not made within a certain period The LCD monitor will turn off after thirty seconds The EVF and data panel turn off af...

Страница 15: ...d into the card slot until the card eject lever pops out 4 Insert the card so the face is toward the front of the camera Always push the card in straight Never force the card If the card does not fit check that it is orientated correctly Fold the card eject lever down as shown 5 and close the card slot door To eject a CompactFlash card lift 2 then press 3 the card eject lever The card can now be p...

Страница 16: ...n focus If the focus signal is red the camera was unable to focus on the subject Repeat the previous steps until the signal is white When the focus is set an AF sensor will briefly appear on the live image to indicate the point of focus The shutter speed and aperture value will change from white to black indicating the exposure is locked Press the shutter release button all the way down 2 to take ...

Страница 17: ...be used when a special focusing situation prevents the camera from focusing on the subject Place the subject within the focus frame Press and hold the shutter release button partway down The focus signals will indicate that the focus is locked The shutter speed and aperture value will change from white to black indicating the exposure is locked When the focus is set an AF sensor will briefly appea...

Страница 18: ...nd their formats can be changed in the custom 1 section of the setup menu p 124 Standard display Focus frame Live image only Located on the back of the camera the display mode switch and the display information button control on which monitor the image is displayed and what information is included in the display The three position switch allows the choice between automatic display and setting the ...

Страница 19: ... confirmation screen The camera will return to quick view 36 37 QUICK VIEW QUICK VIEW DISPLAY Once deleted an image cannot be recovered DELETING IMAGES IN QUICK VIEW Use the left right keys to highlight Yes No will cancel the operation To return to the recording mode press the menu button Confirmation screen Press the up key to see the histogram of the displayed image Pressing the down key returns...

Страница 20: ...way key to scroll continuously In the center of the display switch the display information button controls the display format Each time the button is pressed the display cycles through to the next format full display image only index playback Full display Image only Index playback In index playback the left right keys of the controller will move the yellow border to the next or the previous image ...

Страница 21: ... leaving the operator free to concentrate on aesthetic decisions The pro auto button only affects functions in the recording mode The button has a limited affect in the movie mode changes made with the Digital Effects Control and the Movie menu are reset Drive mode p 54 White balance p 62 Metering mode p 47 Exposure compensation p 68 Flash compensation p 68 Focus mode p 81 94 Autofocus area p 74 P...

Страница 22: ...ightness contrast and color p 67 White balance can be changed in all modes except sunset and night portrait p 62 Sharpness can be changed in the sport action sunset and text modes p 97 The metering mode cannot be changed Portrait Most portraits look best at a telephoto setting the longer focal length does not exag gerate facial features and the shallower depth of field softens the background Use t...

Страница 23: ...e p 47 Changes exposure mode p 48 Changes drive mode p 54 Changes between automatic preset and custom white balance p 62 Changes camera sensitivity p 65 Function Dial MEM PASM DRIVE WB ISO Display P A S M 100 200 400 800 Setting Memory resisters or the setting function are select ed with a special menu dis played on the monitors Multi segment Center weighted Spot Program Aperture priority Shutter ...

Страница 24: ...to calculate the exposure When this mode is selected a small circle will appear in the middle of the live image indicating the measuring area The spot allows precise exposure measurements of a particular object without being influenced by extremely bright or dark areas within the scene Multi segment uses 300 segments to measure luminance and color This data is combined with distance information to...

Страница 25: ...osure with the program shift function As described in the basic recording operation p 31 press the shutter release button partway down 1 until the shutter speed and aperture value are displayed The control dial 2 can then be used to shift the shutter speed and aperture combination each combination will give the optimum exposure The built in flash cannot be used with program shift The camera gives ...

Страница 26: ...djusted in fine steps the same shutter speed maybe displayed when the aperture is changed With the camera sensitivity ISO set to auto the shutter speed may not change when the aperture is adjusted The photographer selects the shutter speed and the camera sets the appropriate aperture to ensure correct exposure When S mode is selected the shutter speed on the monitors turns blue Turn the control di...

Страница 27: ...ton 3 turn the the control dial 1 to set the aperture Flash compensation p 68 can also be set with the up down key of the controller 1 3 To set the shutter speed Turn the control dial 1 to set the shutter speed RECORDING MODE To set the aperture value turn the digital effects switch to exposure compensation 2 position While pressing the digital effects button 3 turn the control dial 1 until the co...

Страница 28: ...NG MODE The drive modes control the rate and method images are captured Icons indicating the selected drive mode appear on the data panel and LCD monitor and in the EVF See setting the function dial section on page 44 DRIVE MODES Single frame advance to take a single image each time the shutter release button is pressed Continuous advance to take multiple images when the shutter release button is ...

Страница 29: ... of approximately 7 frames per second image size is changed to 640 X 480 when the digital zoom is used The number of images that can be captured at one time depends on the image quality setting fine 15 frames standard 31 frames and economy 39 frames the number of frames increases with the use of the digital zoom This mode cannot be used with super fine or RAW images p 84 flash illumination or Digi...

Страница 30: ...rexposure and overexposure The exposure bracket is set to 0 3Ev increments but can be adjusted to 0 5Ev or 1 0Ev increments in the custom 2 section of the recording mode menu p 78 Set the contrast color saturation or filter to the desired level the bracket series is from the Digital Effect Control setting to one unit under to one unit over See the Digital Effects Control section on page 67 to set ...

Страница 31: ...nterval between frames can be set at 1 10 15 20 30 45 and 60 minutes The number of images in the series is set with the frames menu option 2 99 frames To capture a series of still images or to make a movie file is selected with the interval mode option Set the drive mode to interval with the function dial p 44 After mounting the camera on a tripod compose the image so that the subject area falls w...

Страница 32: ...is much cooler and requires a different white balance cloudy Office lighting will produce a strong green cast in photographs the fluorescent setting restores the natural color under these condi tions Traditional household light bulbs emit very yellow light which can be corrected with the tungsten setting Auto preset and custom white balance will not change the color of neon signs White balance can...

Страница 33: ...o setting automatically adjusts the camera sensitivity to the light conditions between ISO 100 and 400 When the flash is activated and camera sensitivity is set to auto the ISO value is set between ISO 100 and 200 When any other setting than auto is used ISO will appear on the data panel and ISO and the set value will be displayed on the monitors Photographers can select a specific sensitivity set...

Страница 34: ...al effect switch to the image characteristic to be adjusted Exposure Contrast Color saturation Filter FLASH RANGE AND CAMERA SENSITIVITY Flash range wide angle ISO setting AUTO 100 200 400 800 0 5m 3 8m 1 6 ft 12 5 ft Flash range telephoto 0 5m 3 0m 1 6 ft 9 8 ft 0 5m 2 7m 1 6 ft 8 8 ft 0 5m 3 8m 1 6 ft 12 5 ft 0 5m 5 4m 1 6 ft 17 6 ft 0 5m 7 6m 1 6 ft 25 ft 0 5m 2 1m 1 6 ft 6 9 ft 0 5m 3 0m 1 6 f...

Страница 35: ...t by using a positive Ev setting will soften and can even nearly eliminate shadows 68 69 EXPOSURE AND FLASH COMPENSATION The ambient light and flash exposure can be adjusted before the image is captured to make the final picture lighter or darker Exposure can be adjusted by as much as 2Ev in 1 3 increments p 151 The exposure and flash compensation will remain in effect until it has been reset Adju...

Страница 36: ...ION COLOR SATURATION COMPENSATION High contrast scene Flat scene After compensation After compensation RECORDING MODE Unlike the display on a computer monitor changes to contrast and color saturation can be diffi cult to see in the EVF and LCD monitor To ensure the optimum level of contrast or color satu ration make an automatic bracket p 58 or manual bracket of the scene Shooting tips The overall...

Страница 37: ...color image When the automatic monitor amplification activates the electronic magnification function cannot be used If the real time histogram is used the display will reflect the amplified image and not the final values of the exposure DIOPTER ADJUSTMENT The electronic viewfinder can be tilted between 0 to 90 Simply grip the finder between your fingers and move it to the position desired Always s...

Страница 38: ...e moved to any point in the image area This Flex Focus Point is a powerful tool for off center subjects The Flex Focus Point cannot be used with the digital zoom p 76 Wide focus area AF sensor With the spot focus area cross displayed use the controller s four way keys 1 to move the focus point anywhere within the live image Press the shutter release button partway down to focus the cross will turn...

Страница 39: ...e within focus Because depth of field the area in focus is narrow in close up photogra phy using focus lock with off center subjects can cause minor errors which are exaggerated at high magnifications The variable position EVF makes working in tight spaces and at low levels easy The EVF can be tilted between 0 and 90 Shooting tips MACRO MODE RECORDING MODE DIGITAL ZOOM The digital zoom doubles the...

Страница 40: ...ting has been selected the cursor will return to the menu options and the new setting will be displayed Changes can continue to be made To return to the recording mode press the menu button Please refer to the following sections for descriptions of the menu options and their settings Rec Basic Custom1 Custom2 AF mode Image size Quality Flash mode Wireless Ch Single 2560 X 1920 Standard Fill flash ...

Страница 41: ... release the shutter just before the subject reaches that point there is a slight delay between the time the shutter release button is pressed and the shutter opens Direct Manual focus p 131 can be used with single AF RECORDING MODE ELECTRONIC KEYBOARD The electronic keyboard is used to enter text for imprinting data or for naming new folders The keyboard automatically appears when text needs to b...

Отзывы: