background image

4-2

1. When the Message “XX Tray is EMPTY” Appears

W

h

en

a

M

essa

ge

Ap

pear

s

Ch

a

p

te

r

4

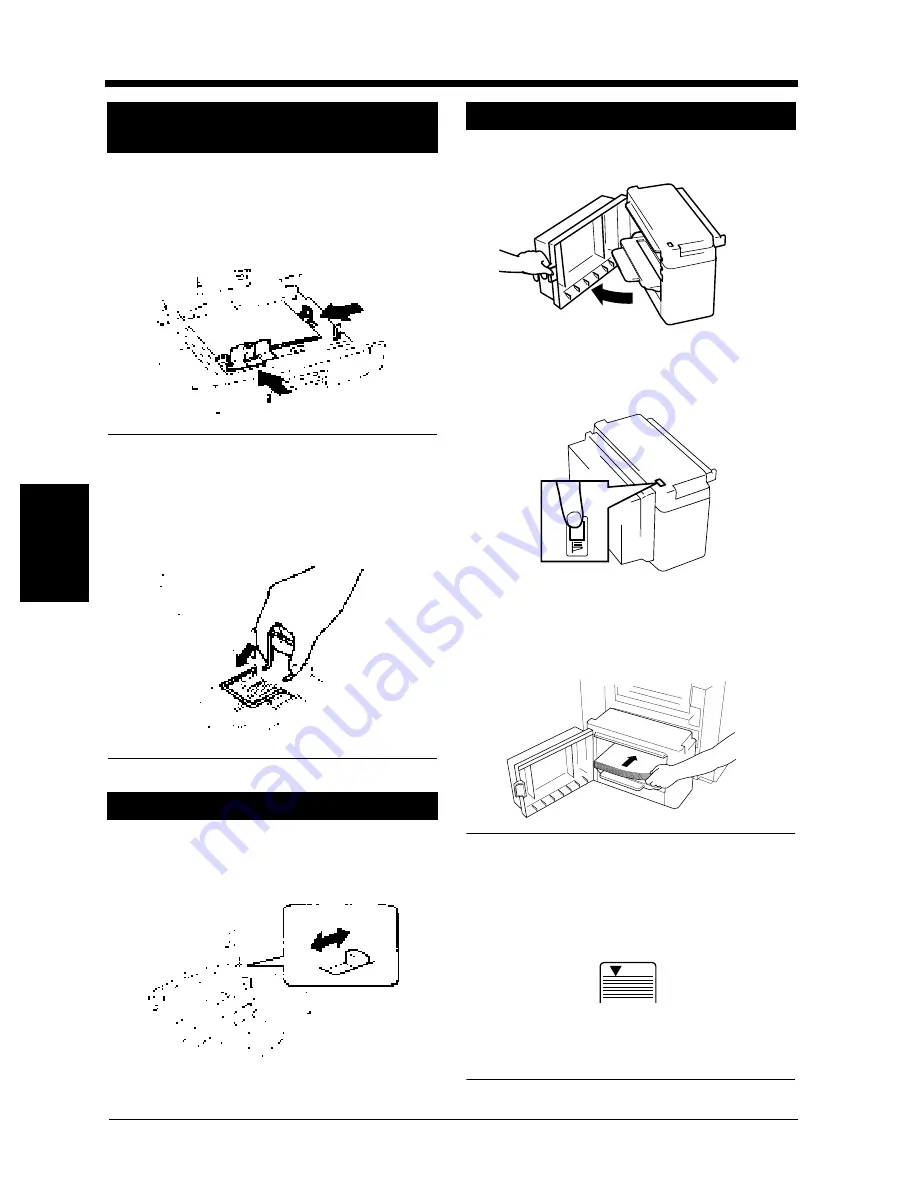
Grasp the tab of the Edge Guide and slide it
to the size of the paper to be loaded. Pressing
the plastic part of the Trailing Edge Stop,
slide it to the size of the paper to be loaded.

NOTE
When loading A3 (11"

∝28

") paper:

Move the Trailing Edge Stop all the way to the
right. Then, pinch the Lever as shown and
remove it from the Stop. Next, fit the Lever into
position as shown.

Flip the Switch, located in the right rear
corner of the Tray, to “Inch”.

Grasping the Door Lock Release Lever,
open the Cassette Door.

When adding paper to a partially loaded
Cassette, press the paper Plate Descent Key
to lower the Paper Plate before opening the
Cassette Door.

Place the paper stack onto the Paper Plate so
that its front side faces up and close the
Cassette Door.
*This causes the Paper Plate to rise

automatically.

NOTES
• Make sure that the leading edge of the paper

stack is pressed tightly up against the Guide
Plate on the take-up side of the Cassette.

• The paper should be loaded no higher than the

(Max. Level Indicator).

• The Paper Plate may not ascend if the Cassette

Door is not closed completely. Be sure to close
the Door completely.

Changing the Paper Size for the
Middle Tray (Universal Tray)

When loading Inch size paper

1

1144O023AA

1138O044AA

1138O606EA

Large Capacity Cassette

1

1154O030AA

1154O031AA

2

1154O032AA

Max.

1145O555KA

1145O555KA

Содержание CF911PE

Страница 1: ...Di 181 CF911PE User Manual...

Страница 2: ......

Страница 3: ...usual odor or noise is detected Should any of these conditions occur immediately turn the printer off unplug the power cord and call your technical representative A fire or electrical shock can result...

Страница 4: ...at the outlet is nearby and clear of the printer and furniture NOTE Locate the Printer in a Well Ventilated Room A negligible amount of ozone is generated during normal operation of this unit An unple...

Страница 5: ...your printer only as described in this documentation For United States Users This printer is certified as a Class 1 Laser product under the Radiation Performance Standard according to the Food Drug an...

Страница 6: ...n r sikkerhedsafbrydere er ude af funktion Undg uds ttelse for str ling Klasse 1 laser produkt der opfylder IEC825 sikkerheds kravene For Finland Sweden Users VAROITUS Laitteen K ytt minen muulla kuin...

Страница 7: ...osition illustrated above Please write down the Model Name and Serial No of your printer here if necessary Model Serial No CLASS 1 LASER PRODUCT LASER KLASSE 1 PRODUKT MINOLTA CO LTD 2 Higashiakatsuch...

Страница 8: ...armful interference to radio communications Operation of this equipment in a residential area is likely to cause harmful interference in which case the user will be required to correct the interferenc...

Страница 9: ...t Type Digital Full Color Printing Machine Product Name CF911PE Options C 101 AD 7 Standards Safety 2 EN 60 950 1992 A1 1993 A2 1993 A3 1995 A4 1997 Safety of information technology equipment includin...

Страница 10: ...mments about Minolta our product or service please let us know Our fax number is 800 237 8087 for U S A and Canada Thank you again This operator s manual explains how to operate the color printer and...

Страница 11: ...e figure below the direction in which the printer paper is fed as indicated by the arrow is called the feeding direction Width and Length When the size of the paper is described side A is referred to...

Страница 12: ...x Terms and Symbols for the Type of Printer Paper...

Страница 13: ...ow Your Printer 1 System Overview 2 1 2 Printer Parts and Accessories 2 2 3 Turning ON and OFF 2 5 When the unit is turned ON 2 5 Continuous Printing Precautions 2 6 Chapter 3 Printing Procedures 1 Pr...

Страница 14: ...Contents xii Contents Chapter 6 Miscellaneous 1 Specifications 6 1 2 Care of the Unit 6 4 Cleaning 6 4 3 Paper Size Table 6 5 4 Index 6 6 5 About this Manual 6 8...

Страница 15: ...Safety Notes Chapter 1 Chapter 1 Safety Notes...

Страница 16: ......

Страница 17: ...elow Be sure to allow a clearance of 150 mm 6 or more at the back of the printer as there is a ventilation duct A place away from a curtain or the like that may catch fire and burn easily An area wher...

Страница 18: ...e unit operation For a comfortable healthy and safe operating environment it is recommended that the room be well ventilated Moving If you need to transport the unit over a long distance consult your...

Страница 19: ...If an adhesive containing solvent e g spray glue is used to paste prints the toner on the prints can melt The color prints have a toner layer thicker than the normal black and white prints When a colo...

Страница 20: ...1 4 2 Precautions for Use Safety Notes Chapter 1...

Страница 21: ...Getting to Know Your Printer Chapter 2 Chapter 2 Getting to Know Your Printer...

Страница 22: ......

Страница 23: ...w 1144O184AA 1144O003AB Duplex Unit AD 7 Option Automatically turns over one sided prints to produce two sided prints System Overview Large Capacity Cassette C 101 Option Holds up to 1 000 sheets of A...

Страница 24: ...m the unit Manual Bypass Tray Use for manual feeding of printer paper into the unit Upper Lower Tray Holds up to 500 sheets of paper p 4 1 Middle Tray Universal Holds up to 250 sheets of paper p 4 1 F...

Страница 25: ...rinter Parts and Accessories Getting to Know Your Printer Chapter 2 Inside the Unit Toner Hopper Lid Open when adding toner p 4 3 Operate these parts to clear misfed sheets of paper p 4 6ff C4119O005A...

Страница 26: ...Options Large Capacity Cassette Cassette Release Lever Use to release the cassette from the unit when it is necessary to clear a misfeed Paper Plate Descent Key Press to lower the paper plate Cassette...

Страница 27: ...the printer enters the print ready mode the indicator will turn green However the printing operation cannot be performed even if data from the computer is sent at this time A warm up time of approxima...

Страница 28: ...imately 40 seconds to maintain optimal performance of the color printer Wait a moment when this condition occurs Full color or monochrome printing Every 24 prints for continuous printing and 48 prints...

Страница 29: ...Printing Procedures Chapter 3 Chapter 3 Printing Procedures...

Страница 30: ......

Страница 31: ...Refer to the following manuals for the procedure about a printing and or function settings PrintStation Manager Reference Manual PrintStation Manager Configuration Reference Manual Raster Image Proces...

Страница 32: ...3 2 1 Printing Function Settings Printing Procedures Chapter 3...

Страница 33: ...When a Message Appears Chapter 4 Chapter 4 When a Message Appears...

Страница 34: ......

Страница 35: ...Max Level Indicator Slide the Tray out Load the paper stack into the Tray so that its front side the side facing up when the package was unwrapped faces down Then slide the Tray back in NOTES Up to 2...

Страница 36: ...partially loaded Cassette press the paper Plate Descent Key to lower the Paper Plate before opening the Cassette Door Place the paper stack onto the Paper Plate so that its front side faces up and cl...

Страница 37: ...ut the message shown on the left is displayed and you can no longer start a new print cycle Follow the procedure described below to replenish the toner Replenishing Toner Open the Front Door Example Y...

Страница 38: ...stops falling in approx 60 seconds tap the Bottle a few times to ensure that all the toner falls into the Hopper Making sure that the toner has emptied completely turn the Bottle counterclockwise and...

Страница 39: ...ed following the procedure applicable to where the misfeed occurred There is a jam XX Manual Bypass Tray p 4 8 Paper Trays p 4 8 V911LcSrt Misfeed in the unit p 4 6 Duplex Unit p 4 10 Large Capacity C...

Страница 40: ...Press down Guide Plate and pull out the sheet of paper Close the Left Door Open the Front Door Turn Lever to the left Press Guide Plate turn Knob and pull out the sheet of paper Grasp Lever and slide...

Страница 41: ...es to the Transfer Film gently disengage the leading edge of the paper and remove it being careful not to damage the Transfer Film Press down on the Roller and remove any sheet of paper that is inside...

Страница 42: ...isfeed message on the Control Panel Unload the paper stack from the Manual Bypass Tray Then open the Left Door Pull out the sheet of paper Raise the Guide plate turn knob and pull out the sheet of pap...

Страница 43: ...the Door Lock Release Lever open the Cassette Door and remove the sheet of paper Close the Cassette Door Slide the cassette away from the main unit Remove the sheet of paper Slide the Cassette back ag...

Страница 44: ...XX Appears When a Message Appears Chapter 4 Grasping the Lock Release Lever open the Duplex Unit Open the Misfeed Removal Guide and remove the sheet of paper Close the Duplex Unit Duplex Unit 1 C4119...

Страница 45: ...left appears when the Fuser Oil is running out You can still make prints but it is recommended that you replenish the Fuser Oil as soon as possible The fuser oil is empty When No Fuser Oil the messag...

Страница 46: ...y has run out of paper Load the Tray with correct paper size p 4 1 There is a jam A paper misfeed occurs Clear the misfeed sheet Paper in Duplex Unit There is paper in the duplex unit Remove paper fro...

Страница 47: ...Troubleshooting Chapter 5 Chapter 5 Troubleshooting...

Страница 48: ......

Страница 49: ...driver set on the lighter side Check the printer driver setting Refer to the Raster Image Proces sor Reference Manual Is No Toner displayed on the message display Replenish the toner p 4 3 Is the pap...

Страница 50: ...e warm up mode After the main switch is turned ON it takes approximately nine minutes until printing can be performed Please wait The printer power is not supplied Check the connection cable and conne...

Страница 51: ...Chapter 6 Miscellaneous Chapter 6 Miscellaneous...

Страница 52: ......

Страница 53: ...InvoiceL Manual Bypass A3 Wide L 305mm 457mm A3L B4L A4L A4C B5L B5C Tray A5L A6L 8 1 4 13 L 210mm 330mm 12 18 L 11 17 L LegalL LetterL LetterC InvoiceL Crosswise 148mm to 297mm 5 3 4 to 11 3 4 Length...

Страница 54: ...Paper Plain paper 60 to 90g m 16 lbs to 24 lbs Recycled paper Paper Size A4C Letter C Capacity 1 000 sheets 80g m 21 1 4 lbs Power Source Supplied from the printer Power Consumption 30W or less Dimens...

Страница 55: ...to 99 prints A4C A5L LetterC InvoiceL Up to 2 prints A3L A4L 11 17 L LegalL LetterL 2 sided Up to 2 prints A4C A5L LetterC InvoiceL Up to 2 prints A3L B4L A4L 11 17 L LegalL LetterL Book 99 prints Pow...

Страница 56: ...eaning Turn the Printer Power Switch OFF when cleaning Wipe the surface of the Housing clean with a soft cloth dampened with mild home detergent Wipe the inside of the Front Door clean with a soft dry...

Страница 57: ...ch Size Metric LEDGER 11 17 279 mm 432 mm 11 14 11 14 279 mm 356 mm COMPUTER 10 1 8 14 257 mm 356 mm 10 14 10 14 254 mm 356 mm 9 1 4 14 9 1 4 14 236 mm 356 mm LEGAL 8 1 2 14 216 mm 356 mm FOOLSCAP GOV...

Страница 58: ...Cassette pp 2 1 2 4 4 2 4 5 4 9 6 2 Left Door p 4 8 Length p ix Lengthwise p ix LOAD IN ANY TRAY p 4 1 Lower Tray pp 2 2 4 1 M Manual Bypass Tray pp 2 2 4 8 Message Appears p 4 1 Middle Tray pp 2 2 4...

Страница 59: ...pecification p 6 1 Storage p 1 3 Supplies p 1 2 Symbols p ix T Toner Bottle p 4 3 Toner Hopper pp 2 3 4 3 Toner Hopper Lid pp 2 3 4 4 Toner near empty p 4 3 Transfer Film p 4 7 Transfer Fusing Unit p...

Страница 60: ...nder the copyright laws Document number 4119 77xx 01B 2nd Edition Warranty Trademark Credits CF911PE and Minolta are trademarks or registered trademarks of Minolta Co Ltd Cluster Printing PrintLink Pr...

Отзывы: