


5
NOTE: If you feel that you do not have enough electrical wiring
knowledge or experience, have your fan installed by a licensed electrician.
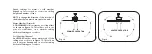
1. Wiring the Fan (Figure 11):
• With electrical power still disconnected, remove the existing wall plate
and switch.
• Make wiring connections to terminal block as shown in Figure 11.
– Green/yellow wire from motor and green/yellow wire from
hanger bracket to the terminal to green/yellow (earth/ground).
– Blue fan motor wire to the N terminal to blue (neutral).
– Orange fan motor wire to the L1 terminal to orange (to light).
– Brown fan motor wire to the L terminal to brown (hot supply).
– Blue wire from terminal to biue wire leading to ceiling outlet box (N).
WARNING: Check to see that all connections are tight, including ground,
and that no bare wire is visible at the wire connectors, except for the
ground wire. Do not operate fan until the blades are in place. Noise and
fan damage could result.
2. Installing Wall Control :
• With electrical power still disconnected, remove the existing wall
plate and switch.
• Make wiring connections to terminal block as shown in Figure 11.
– Brown wire from wall control unit to terminal brown wire (L).
– Orange wire from wall control unit to terminal black wire (L1).
– Brown wire from wall control unit to terminal brown wire leading to
ceiling outlet box.
• Attach wall control unit to outlet box using the two screws provided.
• Attach wall plate to the switch control front.
• Restore electrical power.
WARNING: To avoid possible fire or shock, make sure that the electrical
wires are completely inside the outlet box and not pinched between
the wall plate and the wall.
ELECTRICAL CONNECTIONS