background image

            MINITECH  

CNC Mini-Mill User's Guide 


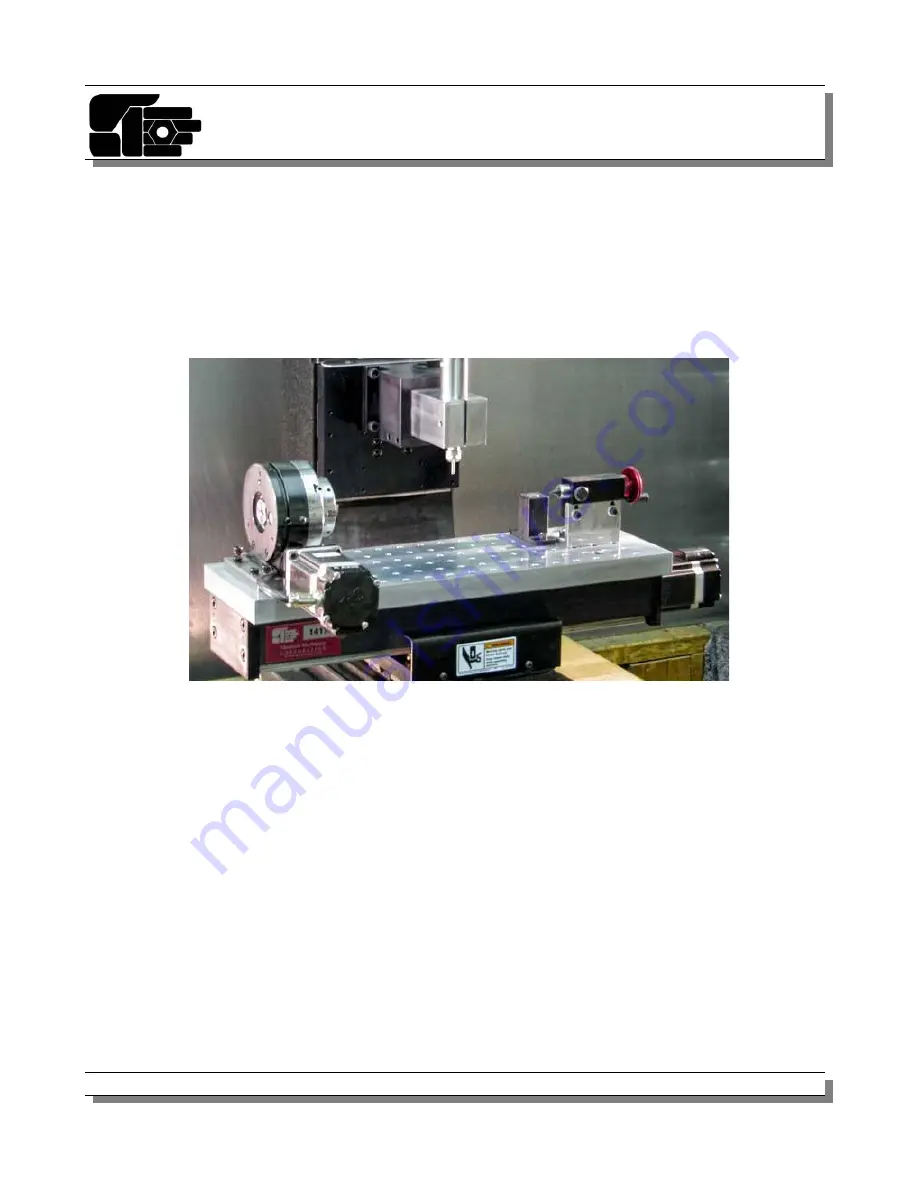
Rotary Table and Tailstock

The rotary table and chuck are the 4th axis of the machine referred to as the A-axis. This part 
is used for cutting round objects or indexing.  There are three alignments to be made to the 
4th axis. It is normally mounted vertically on the left or right of the table parallel to the x axis. 
There are other orientations of the A axis which are useful, but the setup process for other 
configurations is similar and should be obvious if you can make it through this one.

Run Out

The properties of concern are the concentricity of the rotary table and chuck, and the 
parallelness to the X axis. Setup the rotary table, chuck, and indicator with a straight round 
bar as shown in figure 20. To measure concentricity of the rotary setup make sure the round 
bar is properly fixed in the chuck. Rotate the A-axis 360 degrees, and note the change on the 
dial test indicator at the chuck and about an inch away from the chuck. The run out on the 
pictured setup was about 0.002” at about two inches out. If your run out is larger than you 
required part tolerances contact the manufacturer and this can possibly be adjusted.

© 2012 Minitech Machinery Corp.                                                                                                                        25

 Rotary Table and Tailstock

Содержание Mini-Mill Series

Страница 1: ...Minitech CNC Mini Mill User s Guide Minitech Machinery Corporation 6050 Peachtree Parkway Suite 240 205 Norcross GA 30092 P 1 800 662 1760 P 770 441 8525 F 770 441 8526 www minitech com ...

Страница 2: ...10 Controller DCPower Supply Connections 11 Stepper Motor Connection 13 Milling Basics Types of Work 14 Spindle Mechanism 14 Cutting Tools and Standard Accessories 14 Operating Instructions 15 The CNC Milling Machine Parts of the machine 17 Aligning the machine tool 18 Maintenance Work Site 30 Cleaning 30 Coupler Adjustment 30 Lubrication 31 Service and Support Mechanical Drawings 33 2012 Minitech...

Страница 3: ...ponsibilities for errors or omissions Neither is any liability assumed for damages resulting from the use of information contained herein All terms mentioned in this guide are known to be trademarks or device marks are listed below Minitech cannot attest to the accuracy of this information Use of a term in this book should not be regarded as affecting the validity of any trademark or service mark ...

Страница 4: ...replacement as provided above In no event will Minitech be liable for any damages including lost profits lost savings or incidental or consequential damages arising out of the use or inability to use such product even if Minitech or any authorized dealer has been advised of the possibility of such damages or for any claim by any party other than the original purchaser The foregoing warranty is in ...

Страница 5: ...aged to try and correct the interference by one or more of the following measures Reorient the receiving antenna Relocate the computer with respect to the receiver Move the computer away from the receiver Ensure that the expansion slot covers are in place when no board is installed Use properly shielded cables and connectors Plug the computer into a different outlet so that the computer and the re...

Страница 6: ...ine Read the owner s manual carefully Learn its application and limitations as well as the specific potential hazards 4 Ground All Power Connections All the AC plugs are equipped with a three pronged plug Make certain the receptacle is properly grounded 5 Keep Guards In Place Never remove the safety shield Use it for the protection of flying debris 6 Remove Adjusting Keys And Wrenches Form a habit...

Страница 7: ...ervicing and when changing accessories such as end mills and cutters 19 Avoid Accidental Starting Make sure spindle switch is off before plugging in power cord 20 Use Recommended Accessories Consult the instruction guide Use of improper accessories may be hazardous 21 Check That All Holding Locking And Driving Devices Are Tightened At the same time be careful not to over tighten these adjustments ...

Страница 8: ... also recommended that you first setup your computer system and software prior to installing the machine The minimum requirements for the Mini Mill are Processor 1Ghz CPU Memory 512 USB 1 1 or 2 0 Operating System Windows 2000 Windows XP Windows Vista or Windows 7 Software Mach3 Version R3 042 040 with Minitech Screen Sets 2012 Minitech Machinery Corp 8 ...

Страница 9: ...move the machine from the box Note Some Mini Mills have only mounting straps that need to be removed 3 Once the machine is unsecured from the plywood base it can then be pulled out of the box and placed on a bench or desktop Do not lift machine by the stepper motors This should be within a five foot distance from the computer system you want to control your new Mini Mill Remove any items from your...

Страница 10: ...is item Do not attempt to connect the interface cable while either the computer or Mini Mill is powered on This may cause electronic failure to These electronic components For your safety and the integrity of the equipment turn all devices off prior to making any interface connection Setup the computer to be used with the machine and install the controller software Refer to the CNC Stepper Motor C...

Страница 11: ...pply must be connected to a properly grounded receptacle for your safety NOTE Do not attempt to make any connections to the controller while the power supply is plugged in or turned on Unplug the power supply and make sure the power switch is in the off down position 1 Connect the supplied AC cable One end goes to the wall outlet the other goes into the receptacle marked AC IN 2 Connect the interf...

Страница 12: ...f is down A light illuminates when power is on Emergency Stop This cuts the power to the stepper motors in case of a failure Press this when you want the stepper motors to shut off BACK AC IN Connect the power cord from your wall outlet into this connector It supplies the AC power for the controller 2012 Minitech Machinery Corp 12 ...

Страница 13: ...have made the right connections review the following diagram Make sure the correct axis is connected to the corresponding axis port on the controller box Problem Solving To check to see if AC power is getting to the controller power supply turn it on and the red light switch should come on If it does not check the fuse on the back side of the power supply If it is blown replace it with the same po...

Страница 14: ...Spindle Mechanism It is important to note that you can overload the spindle motor The many variables involved in machining such as materials being machined size and shape of end mill sharpness can lead only to one rule to follow Common Sense Heavy cuts at low RPM will make the motor run hotter than light cuts at high RPMs In normal operations the spindle motor will run warm to the touch but not ho...

Страница 15: ...st materials to the surface of the mill s table top The table top supports several 1 4 20 tapped holes separated at one inch centers for modular placement of parts For additional hold downs it may be necessary to purchase a small manual vise This can be fitted with bolts to secure it to the table Mini Mill Operating Instructions Minitech machines are among the finest tools that can be purchased fo...

Страница 16: ... a start reference point from which to begin the job 7 A good rule to follow is if the tool chatters reduce the spindle speed and increase the feed rate 8 It takes a long time to accumulate the knowledge tools and fixtures required for many different types of applications Try not to become discouraged by starting with a job that is too complex or by using materials that are extremely difficult to ...

Страница 17: ...he Machine Figure 6 is a photograph of the Minitech Mini Mill 3 This particular model is a 4 axis vertical CNC milling machine There are three linear axis X Y and Z and one is rotational A The figure illustrates the machine axis and their direction of movement 2012 Minitech Machinery Corp 17 ...

Страница 18: ... understand the nuances of your machine you will need a set of tools The list of recommended tools is below Dial test indicator with 0 0005 increments A steel parallel bar that is accurate and uniform A steel round bar with center drill hole in end that is accurate and uniform Hex key set Shim material rolling papers A micrometer with 0 0005 increments With careful attention to detail and the proc...

Страница 19: ...able is pretty flat but not perfect 7 7 Move the Y axis so that the tool is at the front of table set the indicator then move the Y axis and note changes in height Figure 8 Measuring table flatness across x and y Alignment There are six degrees of freedom that need to be accounted for in aligning the machine table They are the pitch roll and yaw Pitch is the how perpendicular the machine bed is al...

Страница 20: ... dial test indicator along the parallel bar noting the change in pitch 3 Do the same for the roll Figure 9 Measuring pitch and roll of table 4 If for any reason the table must be removed or replaced it is important the table is properly installed to insure accuracy This will require the loosening and or removal of sixteen slide screws and the four screws which attach the table to the lead nut Figu...

Страница 21: ...soft snug Figure 12 shows the pattern 2 Make a second tightening pass to snug the screws down tight Exclude the lead nut screws from final tightening screws 1 4 They will be done in the following steps 3 Once screws 5 20 are tight jog the table left and right a few times in the X direction This will help to seat everything before the lead nut is tightened Once done make final tightening of the lea...

Страница 22: ... put your parallel bar on the table and indicate off of it 2 Orient your test indicator as shown in figure 12 and zero it 3 Rotate the spindle in a half circle motion from left to right and check the indicator 4 Adjust the spindle in a clockwise or counter clockwise direction until the head is perpendicular this is shown in figure 13 5 The indicator needle should give the same reading at each end ...

Страница 23: ...cle motion from front to back 8 To adjust for this figure 16 you will need to shim between the spindle and the mounting plate as shown in figure 17 9 Once done spin the spindle in a complete circle and check the indicator ideally the needle should not move re shim or readjust as needed 2012 Minitech Machinery Corp 23 Figure 12 Figure 14 Figure 13 ...

Страница 24: ...MINITECH CNC Mini Mill User s Guide 2012 Minitech Machinery Corp 24 Figure 15 Figure 16 Figure 17 ...

Страница 25: ... through this one Run Out The properties of concern are the concentricity of the rotary table and chuck and the parallelness to the X axis Setup the rotary table chuck and indicator with a straight round bar as shown in figure 20 To measure concentricity of the rotary setup make sure the round bar is properly fixed in the chuck Rotate the A axis 360 degrees and note the change on the dial test ind...

Страница 26: ...ont left This will help to insure that the mounting plate is level 2 To check the A axis pitch indicate at the bar at the chuck face by moving the indicator lever overtop of and in front of the bar Then slowly move the Y axis toward the front of the machine and as the indicator drags over the bar note the highest point on the indicator as in the figure 3 Repeat this process an inch or two down the...

Страница 27: ...e bar is sloping down and on the left if it is sloping up as in After the pitch is adjusted the yaw of the rotary table needs to be aligned This is done with the same setup and method but on the side of the round bar rather than the top The method is described below 1 To check the A axis yaw indicate at the bar at the chuck face by moving the indicator lever below and behind the bar Then slowly mo...

Страница 28: ...curate You will need the same setup to align the tailstock to the center of the rotary axis This time you will make use of the center hole drilled in the end of the round bar The center hole is visible in figure 24 To align the tailstock follow the steps below 1 Move the tailstock tip into the center hole at the end of the round bar with the dial test indicator set on the bar Probably best even cl...

Страница 29: ...obe 4 Press the Page UP key on your key board and raise the tool about above the Probe Make sure the Green light goes Off This is the Probing Start Position and you need to press Set under the Probing Start Position 5 Next use the Jog commands from the Main Screen to move the tool to your Fixture Home coordinate This is usually the center of the rotary table or a known start location for your part...

Страница 30: ...ebris occurs You can also remove the table top by unscrewing the four bolts exposed at each ends of the table This allows you to gain access to the many places of debris accumulation and the lead screw assemblies of the X and Y axes Note The table top and spindle mount are the only parts you should remove without damaging or misaligning the machine Do not remove any other parts for cleaning Examin...

Страница 31: ... face is a set of thrust bearings Make sure the thrust bearings have no play in between the coupler and the motor face 9 If there is any spacing between the thrust bearings loosen the coupler s set screws and push coupler onto the motor so there is no spacing 10 Re tighten coupler by tightening both set screws a little at a time until both become tight Do not tighten one all the way and then the o...

Страница 32: ...eturn of a component is necessary please include the above information in a note with the defective part Do not return any components hardware or courseware without prior authorization from Minitech This authorization will take the form of a Return Merchandise Authorization RMA number issued by the Minitech technical support representative When returning products to Minitech write the RMA number c...

Страница 33: ...MINITECH CNC Mini Mill User s Guide Drawings of the Machine Components 2012 Minitech Machinery Corp 33 ...

Страница 34: ...MINITECH CNC Mini Mill User s Guide Drawings of the Machine Components 2012 Minitech Machinery Corp 34 ...

Отзывы: