background image

OPERATING GUIDE

.


34


Changing a field setting. Allow change means you can change it. (This doesn’t 
give an automatic right to view the value, the allow view value must also be set). 
Deny change means you cannot change it. 

Using a function. allow access means you can use it. deny access means you 
cannot use it. 

3.  Select the desired permission and click 

Apply

29.  Network Settings  

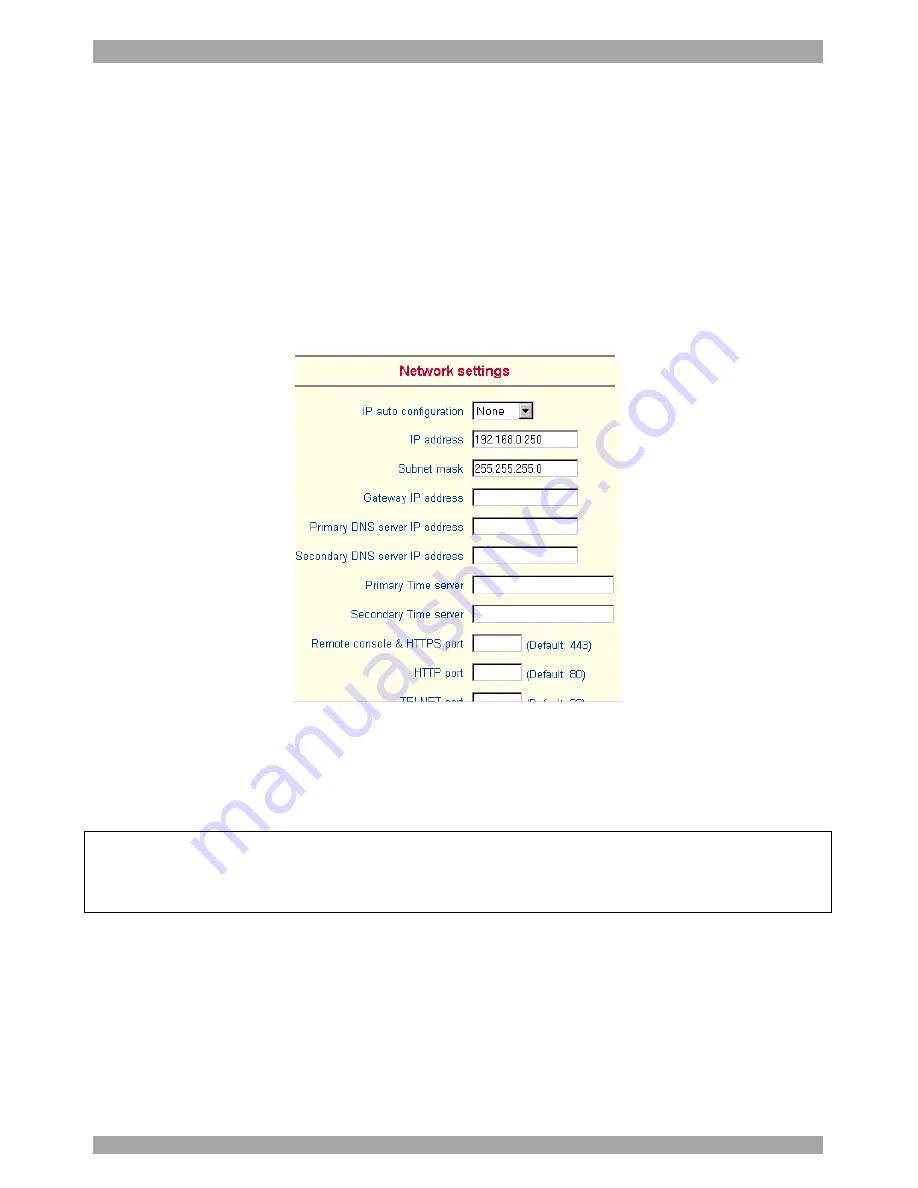
From the Smart 16 IP Menu choose Network Settings. The Network Settings 
appear. See Figure 23. 


Figure 23 The Network Settings 

In the Network Settings panel you can change the network parameters. 

The initial IP configuration is usually done directly at the host system. However 
you can also connect to the Smart 16 IP using its pre-configured IP settings.  

Warning! 

Changing the network settings of Smart 16 IP may result in losing the 

connection. If you remotely change the settings ensure that all values will give 
you access to the Smart 16 IP.  

IP auto configuration 

Choose between the 3 options. 

None

 – no IP auto configuration. In this case type a static IP address in the 

appropriate settings below. 

DHCP

 - When selected, Smart 16 IP will contact a DHCP (Dynamic Host 

Configuration Protocol) server in the local sub-net to obtain a valid IP address, 

Содержание 5UM20114

Страница 1: ...5 9666 minicom minicom com North American HQ Linden New Jersey Tel 1 908 4862100 info usa minicom com European HQ Dübendorf Switzerland Tel 41 1 823 8000 info europe minicom com Customer support support minicom com 5UM20114 V1 6 7 05 Smart CAT5 Switch 16 IP Operating Guide ...

Страница 2: ...trol buttons toolbar icons 11 14 Mouse synchronization 14 15 Mouse synchronization limitations 15 16 Single mouse mode 16 17 Remote Console Settings 17 18 Telnet Console 19 19 Status via IPMI 20 20 Event Log via IPMI 20 21 File transfer Virtual Floppy 20 22 Power Control 20 23 Keyboard Mouse Settings 22 24 KVM Settings 24 25 KVM Port Settings 26 26 Video Settings 28 27 User Group Management 30 28 ...

Страница 3: ...7 Defaults 60 47 The Ports settings 60 48 The Time settings 62 49 Users 63 50 Security 64 51 The OSD HELP window F1 64 52 Scanning computers F4 65 53 Tuning F5 65 54 Moving the label F6 65 55 Using the Control software 66 56 Upgrading the Smart 16 IP firmware 72 Appendix A Smart 16 IP Video modes 79 Appendix B Key codes 80 Appendix C Disabling mouse acceleration 82 Appendix D USB SUN Combo keys 84...

Страница 4: ... If operation of this equipment in a residential area causes radio frequency interference the user and not Minicom Advanced Systems Limited will be responsible Changes or modifications made to this equipment not expressly approved by Minicom Advanced Systems Limited could void the user s authority to operate the equipment Minicom Advanced Systems Limited assumes no responsibility for any errors th...

Страница 5: ...software from Minicom s Website www minicom com Connect Smart 16 IP to the same subnet as your computer Run the Device Setup program and assign a Network configuration to the unit 3 Configuration via DHCP server If you activate DHCP Smart 16 IP will try to contact a DHCP server in the network to which it is physically connected If a DHCP server is found it may provide a valid IP address gateway ad...

Страница 6: ...ries Communications Hyperterminal 2 When prompted enter a name and click OK The Connect To box appears See Figure 1 3 Fill in the connection details In the Connect using box select the Serial port to which the Null modem cable is connected and click OK The COM 1 properties box appears See Figure 2 Figure 1 Connect To box Figure 2 COM 1 Properties box 4 Set the port settings to the following values...

Страница 7: ...rt 16 IP after an incorrect IP access configuration has been activated Page 44 has more information on IP access control 8 Confirm the settings Smart 16 IP resets the configuration B Use a crossover Ethernet cable to connect the Smart 16 IP to the computer back to back Set the IP address of the computer to 192 168 1 20 and type 192 168 1 22 into the Address box of the web interface to carry out th...

Страница 8: ...may be the reason 6 Smart 16 IP Video Modes Smart 16 IP recognizes a limited number of common video modes When running X Window on the host system don t use any custom modelines with special video modes If you do Smart 16 IP may not be able to detect these Use any standard VESA video mode Refer to Appendix A on page 79 for a list of all known modes You can adjust up to 4 Custom Video Modes if your...

Страница 9: ...X like operating systems To access the remote host system using a securely encrypted connection you need a browser that supports the HTTPS protocol Strong security is only assured by using key length of 128 Bit We recommend the following browsers Microsoft Internet Explorer version 5 5 or higher with Windows 98 ME 2000 and XP Netscape Navigator 7 0 or Mozilla 1 0 with Windows 98 ME 2000 and XP Lin...

Страница 10: ...our Smart 16 IP Server Power Status Always on Firmware Version installed on your Smart 16 IP Device management self contained or connected to a management device Users all currently logged in users and IP addresses Note when connected through a proxy server the IP address will be that of the proxy server RC Remote Control open Exclusive Exclusive mode Idle time since last activity 11 Remote Consol...

Страница 11: ... To solve this problem adjust the remote system keyboard to the same mapping as your host one Alternatively use the Soft Keyboard that is part of the Remote Console applet The Remote Console window is a Java Applet that tries to establish its own TCP connection to Smart 16 IP The protocol that is run over this connection is not HTTP or HTTPS but a protocol called RFB Remote Frame Buffer Protocol C...

Страница 12: ...l buttons toolbar icons The control buttons toolbar icons have the following functions Sends the hotkey combination to the remote system Auto adjust Adjusts the screen to the best video quality Sync mouse Synchronizes the host and remote mice Necessary when using accelerated mouse settings on the host system There is generally no need to change mouse settings on the host Discussed on page 16 Click...

Страница 13: ...e automatically However depending on your particular JVM and your browser machine settings this is not always possible A typical example is a German localized system that uses a US English keyboard mapping In this case you have to change the Local Keyboard setting manually to the right language KVM keys Each key represents a port See page 26 to define hotkeys to switch to each port The keys also a...

Страница 14: ...Video settings From the Options menu choose Video Settings The Video Settings box appears See Figure 8 Figure 8 The Video settings The parameters have the following functions Brightness Brightness control Contrast Red Green Blue RGB contrast control Clock Sets the horizontal frequency for a video line this depends on the video mode Different video cards may require different values The default set...

Страница 15: ...access rights A user who has permission to change the Video Settings can also change the Clock and Phase parameters and use the reset buttons Hint Always press the Auto Adjust video button before operating the computer The screen should be inside the borders of Remote Control window If the video doesn t synchronize properly or there is a lot of incoming traffic reset all modes and synchronize vide...

Страница 16: ...Mouse drivers disrupt the synchronization process Ensure these are not on the host system 3 For Windows XP and 2003 Server For Windows XP and 2003 Server deactivate Enhanced pointer precision To do so From the Control Panel select Printers and Other Hardware Click the Mouse icon The Mouse Properties box appears See Figure 9 Select the Pointer Options tab Figure 9 Pointer tab The Motion section sli...

Страница 17: ... to the Double Mouse Mode where remote and host mouse pointers are visible and need to be synchronized There is also the Single Mouse mode In this mode only the client mouse pointer is visible Single Mouse mode needs a Sun Java Virtual Machine 1 3 or later Select the mode in the remote console see Figure 6 From the Options menu choose Mouse Handling Mouse Mode Single Mouse Mode Or press from the C...

Страница 18: ...Optimizes the speed of the remote screen depending on the number of parallel users and the bandwidth of the connection line Automatic Detection The encoding and the compression level is determined automatically from the available bandwidth and the current content of the video image Pre configured Choose the connection method Manually Compression For low bandwidth connections 1 is the lowest and 9 ...

Страница 19: ...tomatically The download is about 15 Mbytes JRE provides a stable and identical Java Runtime Environment across different platforms The Remote Console software is optimized for this JRE version and offers wider range of functionality when run in SUN s JRE Tip The software is on the Marketing Documentation CD So if you have a slow Internet connection pre install the JRE on your administration machi...

Страница 20: ...evice connected to serial port 1 Connect any serial device which offers terminal access via its serial port and access it using the Telnet interface Set the Serial settings see page 37 according to the requirements of the device Connect to Smart 16 IP in the usual way required by the Telnet client e g in a UNIX shell telnet 192 168 1 22 The IP address has been replaced by the one that is actually ...

Страница 21: ... 16 IP the complete repository has to be read what may take 1 or 2 minutes After reading all entries Smart 16 IP displays them with their time sensor and description in accordance with the filter settings You have the choice between several pre settings i e last day last week or an exact declaration of the start and the end date Once you change the filter settings click Update to update the shown ...

Страница 22: ... are as follows Reset This is similar to pressing the reset button directly on the remote system Pressing the reset button will result in a cold start of the system This might damage open files and the file system itself Power short press A short press on the ATX button is normally caught by the running operating system that tries to initiate a controlled shut down Do this to switch off the system...

Страница 23: ...a KVM port If no assignment exists the option is disabled The lower half offers controls for switching each port of the external power control directly Select the appropriate port and decide whether to power it off or on If IPMI is enabled the power control functions are performed over IPMI requests This may take a few seconds If IPMI is disabled the power control functions are performed through t...

Страница 24: ... Press to display the current values for the selected KVM port Without pressing alterations will NOT be made to the chosen port Keyboard Model Choose the keyboard model for the chosen port Select Generic 106 key PC when connecting to computers with a Japanese OS USB Mouse Type Not active in the system leave at default state Auto Mouse speed When Mouse Acceleration on the Host computer is enabled c...

Страница 25: ...nd such a switch This option detects the rescaling and compensates for it so that the mouse synchronization works Do not select this option for the Smart 16 IP it may disrupt the normal mouse synchronization Click to apply changes If the keyboard or mouse seems to react irrationally click to reset the keyboard and mouse emulation It is like disconnecting and reconnecting the keyboard and mouse con...

Страница 26: ... the Remote Console Number of Ports To set the number of ports the KVM uses 1 Choose a number in the Number of Ports Drop down list 2 Press The number of rows chosen appears in the KVM Port Settings list See Figure 17 Duration of Pause Define the pause time for KVM and Remote Console Button Keys in milli seconds represented by the symbol in all hotkeys and button keys Default configuration This is...

Страница 27: ...ther The sign means the keys are pressed sequentially Lshift means the left Shift key The sign inserts a pause with a definable duration Add more than one pause if necessary See Appendix B on page 80 for a list of key codes 3 Press Apply at the bottom of the page The settings are saved Smart 16 IP uses separate mouse synchronization settings see page 14 and video settings see page 13 for each port...

Страница 28: ... power option for each port The following screen appears Figure 18 Power option Select the Serial port to which Power switch is connected From the drop down list select the outlets connected to the Power switch Appending a socket Click to add the socket to the end of the list it will be last to be powered on off Inserting a socket To insert a socket in the list 1 In the currently included socket l...

Страница 29: ... 16 IP is active and passing through the incoming signal from the host system Use this option to switch off the local monitor connected to Smart 16 IP when accessing sensitive information on the Host computer Noise filter Define how Smart 16 IP reacts to small changes in the video input signal A large tolerance needs less network traffic and leads to a faster video display but small changes in som...

Страница 30: ...aximum number of custom video resolutions is 4 Figure 20 Custom Video Modes window Custom Modes Handling switch custom modes off or use in addition to the standard video resolutions or use exclusively Only With Only you can force a special video mode for Smart 16 IP To change the parameters for a mode choose the number and press Update X Resolution Visible number of horizontal pixels Y Resolution ...

Страница 31: ...nd groups Each user or group can have different access capabilities The Smart 16 IP is factory set with a supervisor user called super with the password smart Change the super user password immediately after accessing the Smart 16 IP Figure 21 The User Group Management settings Existing user Select an existing user for modification or deletion Once selected click to see the user information New us...

Страница 32: ... to create a new user Delete User button To delete a user 1 Select a user in the Existing users Drop down list 2 Click the Lookup button The complete user information appears 3 Click the Delete User button Note The factory set supervisor user super cannot be deleted but it can be renamed Modify User button To modify a user 1 Select a user in the Existing users Drop down list 2 Click the lookup but...

Страница 33: ... delete a group 1 Select a group in the Existing groups Drop down list 2 Click the Delete group button Modify Group To modify an existing group select the group in the Existing group control The group s name field can be modified Finally click the Modify group button Copy Group To create a group with the properties of an existing group 1 Select a group in the Existing group Drop down list 2 Type a...

Страница 34: ...s he belongs to When one user creates a new user he can alter his access rights A user can change another user or group s access rights if he stands higher in hierarchy The super user stands at the top of the hierarchy and can change everybody s access rights A user can never give more access rights than he himself has but he can always reduce the access rights To change access rights 1 From the D...

Страница 35: ...twork Settings panel you can change the network parameters The initial IP configuration is usually done directly at the host system However you can also connect to the Smart 16 IP using its pre configured IP settings Warning Changing the network settings of Smart 16 IP may result in losing the connection If you remotely change the settings ensure that all values will give you access to the Smart 1...

Страница 36: ...IP address of the primary Domain Name Server This may be left empty however Smart 16 IP won t be able to perform name resolution Secondary DNS Server IP address This address will be used in case the Primary DNS Server can t be contacted Primary Time Server IP address of the primary NTP Network Time Protocol compliant timeserver Smart 16 IP will synchronize its own absolute time with the timeserver...

Страница 37: ...address of the DSL router which is dynamically assigned by the provider Since the administrator doesn t know the IP address assigned by the provider Smart 16 IP connects to a special dynamic DNS server in regular intervals and registers its IP address there The administrator can contact this server as well and pick up the same IP address belonging to his card The administrator has to register a Sm...

Страница 38: ...rd Check time Smart 16 IP card registers itself in the Dynamic DNS server at this time Check interval Interval for reporting again to the Dynamic DNS server by Smart 16 IP Smart 16 IP has its own independent real time clock Ensure the time setting is correct by configuring a timeserver see page 35 Smart 16 IP registers itself to the Dynamic DNS server slightly different from the time configured To...

Страница 39: ...er ISP to which you can dial in The connection is established using the Point to Point Protocol PPP Before connecting to Smart 16 IP configure your console computer accordingly For instance on Windows based operating systems you can configure a dial up network connection which defaults to the right settings like PPP Serial line speed Most modems today will support the default value of 115200 bps F...

Страница 40: ...it is not interfering with the IP settings of Smart 16 IP and your console computer The default value will work in most cases IPMI over Serial Check to use this serial port for IPMI 1 5 over serial See page 47 for more information Passthrough access to serial port via Telnet Connect an arbitrary device to the serial port and access it assuming it provides terminal support via telnet Select the app...

Страница 41: ... option gives access to the ATX power and reset functions of a single connected system You can change the duration of each button press To do so click Change button press durations The box below appears Adjust the time as desired Figure 28 Button Press Durations box External Power Option To configure the External Power Option connected to Serial port 2 click change external power switch option The...

Страница 42: ... SPC and have the privileges to switch power for each port ePowerSwitch 4 port Using this switch switch power for more than one system connected to Smart 16 IP through a KVM switch ePowerSwitch Slave This also refers to the Minicom DX Power Switch S 8 port Both switches are cascadable to up to 4 power switches with 8 ports Smart 16 IP must be connected to the first switch of the cascade via a seri...

Страница 43: ...er protocol for any encrypted network traffic between itself and a connected client When connecting Smart 16 IP reveals its identity to a client using a cryptographic certificate This is the same for all Smart 16 IPs and won t match the network configurations applied to the card by its user The certificate s underlying secret key is also used for securing the SSL handshake Hence this is a security...

Страница 44: ...l network name differ the browser will pop up a security warning when the card is accessed over HTTPS Organizational unit Specifies which department within an organization Smart 16 IP belongs Organization Locality City State Province Organization to which Smart 16 IP belongs location Country Use the 2 letter ISO code e g DE for Germany Challenge Password Confirm Some certification authorities requ...

Страница 45: ...ontrol settings apply to the LAN interface only Enable IP Access Control Enables access control based on IP source addresses Default policy Controls arriving IP packets that don t match any of the configured rules They can be accepted or dropped ATTENTION If you set this to DROP and you have no ACCEPT rules configured access to the Web front end over LAN is disabled To enable access change the sec...

Страница 46: ...lace a rule Enter the rule number IP Mask and set the policy Then press Delete a rule Enter the rule number and press Anti Brute Force Settings Anti Brute Force Settings lets you block access to a specific user for a fixed amount of time if a predefined number of unsuccessful login attempts by this user occurred Max number of failed logins insert a maximum number or leave it blank to disable Anti ...

Страница 47: ... Smart 16 IP failed Login trial at Smart 16 IP succeeded Denying access to a particular action Server was reset Server was powered on off From the Smart 16 IP Menu choose SNMP settings The SNMP Settings appear See Figure 32 Figure 32 SNMP settings You can change the following parameters Enable SNMP Agent When checked Smart 16 IP will answer to SNMP requests If a community is blank you cannot perfo...

Страница 48: ...l be notification about other security violations like trying to perform an action via Web front end for which a user has no permission Enable Host Traps When checked Smart 16 IP will send SNMP traps whenever the host is reset powered down or powered up Trap destinations Enter IP addresses to which the traps will be sent For every IP address set an according community so that your management clien...

Страница 49: ...ost system supports IPMI V1 5 and has an Intel EMP Emergency Management Port usually COM2 connector you can connect IPMI through serial port 1 on Smart 16 IP Please note Set the EMP port to Always enable and switch off the Restricted Mode The BMC should accept a null username and a non null password account as login Passwords are 4 16 characters long Use a null modem cable for connection IPMI over...

Страница 50: ...ddress of the LDAP server containing all the user entries If you use a name configure a DNS server in the network settings Base DN of User LDAP Server Specify the distinguished name DN where the directory tree starts in the user LDAP server Type of external LDAP Server Set the type of the external LDAP server This is necessary since some server types require special handling Also the default value...

Страница 51: ...indow Under Maintenance features click Update Firmware The Update Firmware window appears See Figure 35 Figure 35 Update Firmware window 2 Locate and upload the firmware file from your client system In case of any errors the upload will be aborted After a smooth upload the Update Firmware panel appears showing the current firmware version number and the uploaded firmware version number 3 Press the...

Страница 52: ...pports direct connection functionality Ensure that firmware of all units is updated to the latest version See the User Guide of each IP unit to update the firmware To set up the direct connections 1 Scroll down the Maintenance window to Maintenance Features See Figure 36 Figure 36 The Maintenance Features 2 Click Direct SmartIP Links The Direct Connection Links page opens See Figure 37 Figure 37 T...

Страница 53: ...ted from the network Green Powered on but no user is logged in Orange A user is logged in Red User is working with the remote console Note If the state of one device changes there may be a delay of some seconds until icon colors reflect the true situation especially where the network link of this device is going down To connect to an IP unit Click the desired icon on the Home page The Login page o...

Страница 54: ...OM www minicom com G I E R V F RESET SM ART CAT5 MINICOM PHANTOM A ctivity System OK MX IP Figure 39 Direct connections link scenario Access the Datafile for support Click the link to access the Smart 16 IP data file The file contains support information which will help us to troubleshoot your problem Include modify custom HTML code You can modify the HTML code of the Home page to include customiz...

Страница 55: ...e TCP port numbers 443 or 80 are open for incoming TCP connections Q 6 Cannot connect to Smart 16 IP A Check if the network connection is working ping the IP address of Smart 16 IP If not check network hardware Is Smart 16 IP powered on Check if the IP address of Smart 16 IP and all other IP related settings are correct Also verify that all the IP infrastructure of your LAN like routers are correc...

Страница 56: ...y access and control of server resources EMP offers operating system independent fundamental remote management access regardless of the server s current state or network availability HTTP Hypertext Transfer Protocol the protocol used between web browsers and servers HTTPS Hyper Text Transfer Protocol Secure secure version of HTTP IPMI Intelligent Platform Management Interface MIB Management Inform...

Страница 57: ...so the place to adjust various settings as explained below 40 The keyboard hotkeys To switch to the next computer forwards press Shift then Release Shift before pressing To switch to the next computer backwards press Shift then Release Shift before pressing Note With a US English keyboard you can use the key of the alphanumeric section or of the numeric keypad With a Non US English keyboard only u...

Страница 58: ...e up and down use the Up and Down arrow keys To jump from one column to the next when relevant use the Tab key To exit the OSD or return to a previous window within the OSD press Esc 43 Selecting a computer To select a computer 1 Navigate to the desired computer line 2 Press Enter The selected computer is accessed A Confirmation label appears showing which computer is accessed Note When the OSD is...

Страница 59: ...ne on the word GENERAL press Enter The General settings window appears see Figure 42 Figure 42 The General Settings window From this window you can do the following Security The OSD comes with an advanced password security system that contains 3 different security levels Each security level has different access rights to the system These levels are as follows Administrator Status A The Administrat...

Страница 60: ...fferent access levels these are explained on page 63 Activating password protection By default OSD access is not password protected Only the Administrator can password protect the OSD or disable password protection To do so 1 In the General settings window navigate to the Security line 2 Press the Space bar to toggle between Security On and Off The password box appears 3 Type the Administrator s p...

Страница 61: ...t setting 1 Navigate to the Serial port line 2 Toggle between the options using the Space bar Changing the Keyboard language The keyboard is preset to US English this can be changed to French FR or German DE as follows 1 Navigate to the Keyboard language line 2 Toggle between the options using the Space bar Editing the Switch name You can substitute up to 18 characters in the line A space constitu...

Страница 62: ...ursor at the beginning of the line Keep the Space bar depressed until the line is erased Keyboard KB The Smart 16 IP operates with Windows Linux HP UX Alpha UNIX SGI DOS Novell MAC USB or Open VMS By default the keyboard mode is set to PS for Intel based computers For the other systems set the KB column as follows U1 for HP UX U2 for Alpha UNIX SGI Open VMS U3 for IBM AIX To change the setting 1 O...

Страница 63: ...h the Switch is connected press Tab to jump to the HKEY column 2 Toggle between the options using the Space bar 48 The Time settings In the Settings window navigate to the Time line and press Enter The Time settings window appears see Figure 44 Figure 44 Time settings window Scan SCN Label LBL Time out T O SCN In the SCN column change the scan period LBL In the LBL column change the display period...

Страница 64: ...n the SCN column displays the screen for 999 seconds Typing 000 the computer screen is skipped 49 Users In the Settings window navigate to the Users line and press Enter The Users settings window appears see Figure 45 Figure 45 The Users settings window There are 3 different access levels These are Y Full access to a particular computer V Viewing access only to a particular computer No keyboard mo...

Страница 65: ...an only be 1 Administrator password 1 Supervisor password and 6 User passwords To change a user name or password 1 Navigate to the desired line and column 2 Type a new user name password User authentication is done solely via the password there is no security significance to the names By default the User Profile settings are full access 51 The OSD HELP window F1 To access the HELP window press F1 ...

Страница 66: ... Navigate to the computer you wish to adjust 2 Press F5 The screen image of the selected computer appears together with the Image Tuning label 3 Adjust the image by using the Right and Left Arrow keys 4 When the image is satisfactory press Esc Note Picture quality is relative to distance The further away a remote computer is from the Smart 16 IP the lower the image quality and the more tuning need...

Страница 67: ...re system requirements Pentium 166 or higher computer 16Mb RAM Windows 98 and later Free Serial port Connecting the RS232 Serial cable To run the software connect the RS232 Serial cable to the computer containing the software and to the Smart Switch See the Installation Guide Installing and running the Control software Note The system must be fully connected BEFORE running the Control software Fai...

Страница 68: ...rrect Com port will result in the software running in demo mode Once Setup is complete the Control window appears See the figure below Figure 48 The Control window Computer icons Icon Meaning Computer is connected and switched on Computer is switched off or unconnected Computer that you are presently connected to Connected and switched on computer with a Local Workstation attached and presently be...

Страница 69: ...View menu From the View menu choose to display All computers or only active switched on computers The Legend The toolbar Selecting a computer To select a computer Click on the computers icon The system switches to that computer The connected icon appears with a red background Control and monitor the selected computer from the keyboard and mouse connected to the Smart Switch The toolbar buttons The...

Страница 70: ...ave or Save As will have no affect on the OSD To change the OSD settings you must press or choose Write Configuration from the File menu after making changes The changes will then be sent to the Smart system Manager and the OSD will reflect these changes Renaming a computer To rename a computer 1 Type the new name in the box below the computer icon 2 Click to send the new name to the system Or cli...

Страница 71: ...operties box appears See Figure 52 Figure 52 The Computers Properties box Here you can edit all the data that can be edited in the OSD This includes Scan times Timeout Confirmation label display time Keyboard type mode User access Password mode Autoskip mode and Switch System hotkey These features are explained in the OSD section above To edit a setting 1 In the Computer List select the desired co...

Страница 72: ... load a saved configuration From the File menu choose Open Reminder All changes done with the Control software are only reflected in the OSD AFTER pressing The factory default settings To revert to the factory default settings On the toolbar press There is no need to press Password protection When the Smart system is password protected the Control software behaves in exactly the same way as the OS...

Страница 73: ...rt 16 IP system Each User has a Profile that defines the access level to different computers There are 3 different access levels These are Y Full access to a particular computer V Viewing access only to a particular computer No keyboard mouse functionality N No access to a particular computer The Administrator defines the desired access levels of each User Profile This is done in the Setting box B...

Страница 74: ...3 or later Windows 2003 Server Connecting the Smart 16 IP System To update the firmware the Smart 16 IP system must be connected and switched on Connecting the RS232 Serial cable To run the software connect the RS232 Serial cable to the computer containing the software and to the Smart 16 IP Switch See the Installation Guide Installing the software To install the Update software 1 Insert the Marke...

Страница 75: ... boxes in the Update window Button or Box Function Selects all RICCs Unselects selected RICCs Starts firmware download Displays the firmware version number Displays the hardware version number Cancels selected function System time Displays download status Name of Update file 2 From the Options menu choose Com Port The Com Port box appears See Figure 55 ...

Страница 76: ...Switch Unit box check the OSD option See Figure 54 3 Click The version number appears in the Switch box The H W Version button is grayed out as there is no hardware relevant to the OSD The Smart 16 IP Manager version number To verify the Smart 16 IP version number 1 Open the Smart CAT5 Switch Update program 2 In the Switch Unit box check the Smart Switch Manager option 3 Click The firmware version...

Страница 77: ...mware Download the latest firmware for your system from www minicom com Updating the firmware Warning Never switch off any computer connected to the Smart 16 IP system during the updating process To update the firmware 1 Open the Smart CAT5 Switch Update program 2 In the Smart CAT5 Switch Update window check the appropriate option in the Switch Unit box or the desired RICC 3 From the File menu cho...

Страница 78: ...he Windows directory Reset Reset the software for the Smart 16 IP Manager or RICCs when for example the unit hangs or when the mouse fails to work properly Resetting is done via the Serial port and avoids the need to shut down the computer NOTE The Reset function does not affect the parameters of the unit settings Resetting the Switch or RICC units To reset the Switch or RICC units 1 For the Switc...

Страница 79: ...onnected to the DB9M Serial port on the CPU s rear panel 3 Restart the download process Electricity failure When the electricity fails while updating the Smart 16 IP firmware do the following If the electricity fails during the firmware update of the Switch a Communication Error message appears Simply resume the firmware update by opening the folder that contains the firmware update file and conti...

Страница 80: ... modes Do not use other custom video settings Resolution Refresh rates Hz 640x350 70 85 640x400 56 70 85 640x480 60 67 72 75 85 90 100 120 720x400 70 85 800x600 56 60 70 72 75 85 90 100 832x624 75 1024x768 60 70 72 75 85 90 100 1152x864 75 1152x870 75 1152x900 66 76 1280x960 60 1280x1024 60 75 1600x1200 60 ...

Страница 81: ...phanumeric keys are in identical positions whichever language mapping you are using Figure 57 US English keyboard layout The table below lists keys that that have 2 ways of being written Alternative and also keys that are written in a different way to that which appears on the actual keyboard key Key code Key Key code Alternative TILDE MINUS EQUALS LESS SLASH Bksp BACK_SPACE Tab TAB CR ENTER Caps ...

Страница 82: ...AGE_UP Del DELETE Pdn PAGE_DOWN UP LEFT DOWN RIGHT The numerical keypad codes Key Key code Alternative num NUM_LOCK 0 NUMPAD0 1 NUMPAD1 2 NUMPAD2 3 NUMPAD3 4 NUMPAD4 5 NUMPAD5 6 NUMPAD6 7 NUMPAD7 8 NUMPAD8 9 NUMPAD9 NUMPADPLUS NUMPAD_PLUS NUMPAD NUMPADMUL NUMPAD_MUL NUMPADMINUS NUMPAD_MINUS CR NUMPADENTER ...

Страница 83: ...the Motion tab 3 Set the Pointer speed slider bar completely to the left When a Microsoft Intellimouse driver is installed on Windows 98 Windows ME or Windows NT4 1 From the Control Panel click the Mouse icon 2 From the Mouse Properties dialog box click the Pointer Option tab 3 Center the Pointer Speed slider bar 4 Click Advanced button 5 Deselect Enable pointer acceleration option NetWare 6 serve...

Страница 84: ...SMART CAT5 SWITCH 16 IP 83 Linux 1 Execute the following command line parameter xset 0 255 2 Or xset m 0 ...

Страница 85: ...low SUN key Combo key Stop Left Ctrl Alt F1 Props Left Ctrl Alt F3 Front Left Ctrl Alt F5 Open Left Ctrl Alt F7 Find Left Ctrl Alt F9 Again Left Ctrl Alt F2 Undo Left Ctrl Alt F4 Copy Left Ctrl Alt F6 Paste Left Ctrl Alt F8 Cut Left Ctrl Alt F10 Help Left Ctrl Alt F11 Compose Application key or Left Ctrl Alt Keypad Crescent Scroll Lock Volume Up Left Ctrl Alt Keypad Volume Down Left Ctrl Alt Keypa...

Страница 86: ...H 16 IP 85 Regional Offices Germany Kiel Tel 49 431 668 7933 b christiansen minicom ch France Vincennes Tel 33 1 49 57 00 00 info france minicom com Italy Rome Tel 39 06 8209 7902 info italy minicom com www minicom com ...

Страница 87: ...OPERATING GUIDE 86 ...

Отзывы: