Trio™ Operating Instructions
0070-10-0666-01
2 - 39
Operations
Parameter Menus
2.4.3.2
Nellcor
®
SpO
2
Nellcor provides a family of sensors suitable for a wide variety of clinical settings and
patients. Specific sensors have been developed for a variety of patient sizes.
Nellcor’s SatSeconds™ Alarm Management feature in their OxiMax® SpO
2
sensor offers an
effective means of managing nuisance alarms without sacrificing patient safety. Nuisance
alarms are often triggered by minor and brief desaturation events that are clinically
insignificant and are often managed by widening alarm limits, turning OFF the alarm or
monitor, or simply ignoring the alarm. The SatSeconds feature distinguishes clinically
insignificant events from events of consequence.
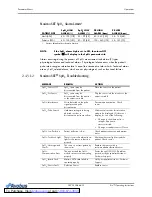
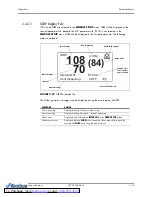
When an SpO
2
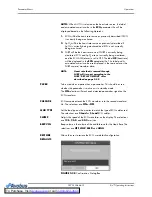
measurement exceeds the alarm limit, the SatSeconds indicator begins to fill
clockwise. The difference between the measurement and the limit multiplied by the time the
measurement remains outside the limit determines if or when the SatSeconds alarm occurs.
For example:
The low SpO
2
alarm is set at 90% and the SatSeconds “clock” is set to 25.
• If the measurement is 85% for 4 seconds (i.e., 5% below the limit for 4 seconds), then
5% X 4 seconds = 20 SatSeconds. This is less than the 25 SatSeconds setting,
therefore no alarm will occur.
• If the measurement is 85% for 7 seconds (i.e., 5% below the limit for 7 seconds), then
5% X 7 seconds = 35 SatSeconds. This is greater than the 25 SatSeconds setting,
therefore an alarm occurs at 5 seconds because 5% X 5 seconds = 25 SatSeconds.
The alarm continues for another 2 seconds.
When the SpO
2
measurement returns to within the alarm limits, the SatSeconds indicator
clears (empties) counter-clockwise in the same amount of time that it took for the SatSeconds
alarm condition to be acquired. The “clear” time is equivalent to the acquire time.
Nellcor’s SatSeconds™ Alarm Management technology also features a safety precaution.
When three (3) SpO
2
alarm violations occur within 60 seconds, a priority 2 alarm will
trigger even if the SatSeconds limit has not been reached.
CAUTION:
NOTE:
Refer to instructions included with each SpO
2
sensor and
cable for proper placement and use. If the sensor LED does
not illuminate within 3 seconds after being connected, then
the sensor is probably defective and should be replaced.
1.
Select an SpO
2
sensor that is appropriate for the size of the patient.
2.
Attach the connector of the SpO
2
sensor to the SpO
2
extension cable.
3.
Attach the SpO
2
sensor to the patient’s finger (or other appropriate site).
4.
Plug the connector on the end of the SpO
2
extension cable into the SpO
2
receptacle on
the right side panel of the
Trio
. The SpO
2
measurement will display when the
Trio
detects that the sensor is connected to the patient. A plethysmogram will be displayed to
the left of the SpO
2
parameter tile (if SpO
2
is selected in the
TRACE SETUP
menu).
NOTE:
To disconnect the cable from the Trio, squeeze the tabs on
the sides of the connector and then pull it straight out.


