Chapter 2 Cutting
55
12
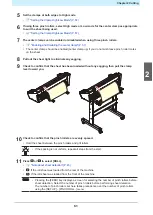
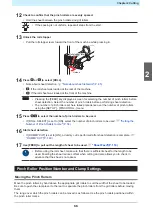
Check to confirm that the pinch rollers are evenly spaced.
• Hold the sheet between the pinch rollers and grit rollers.
• If the spacing is not uniform, repeat all steps from the start.
13
Unlock the roll stopper
• Pull the roll stopper lever toward the front of the machine while pressing in.
Unlock
Roll stopper lever
14
Press
or
to select [ROLL].
• Note about sheet detection
"Note about sheet detection"(P. 45)
•
: If the roll sheet was loaded at the rear of the machine
•
: If the roll sheet was loaded at the front of the machine
• Pressing the [FEED] key displays a screen for selecting the number of pinch rollers before
sheet detection. Select the number of pinch rollers before performing sheet detection.
• The number of pinch rollers set here takes precedence over the number of pinch rollers
using the [SET UP] - [PINCH ROLL.] menu.
15
Press
to select the number of pinch rollers to be used.
• If [ROLL. SELECT] is set to [ON], select the number of pinch rollers to be used.
Number of Pinch Rollers to Use"(P. 56)
16
Start sheet detection.
• If [DUMMY CUT] is set to [ON], a dummy cut is performed after sheet detection is complete.
17
Use [FEED] to pull out the length of sheet to be used.
• Before using the roll sheet, make sure that there is sufficient sheet for the length to be
used. Feeding the sheet reduces offset when cutting and also allows you to check in
advance that the sheet is not askew.
Pinch Roller Position/Number and Clamp Settings
Moving the Pinch Rollers
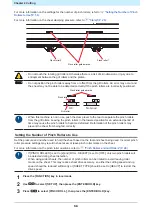
Move the pinch rollers by hand above the appropriate grit rollers to suit the width of the sheet to be loaded.
Be sure to push the clamp lever to the rear to separate the pinch rollers from the grit rollers before moving
them.
The range over which the pinch rollers can be moved is as follows. Use the pinch rollers positioned within
the pinch roller marks.
2
Содержание CG-100AR
Страница 39: ...Chapter 1 Before Using This Machine 39 2 Shut down the computer connected to the machine 1 ...
Страница 76: ...Chapter 2 Cutting 76 ...
Страница 98: ...Chapter 3 Cutting Data with Register Marks 98 ...
Страница 131: ...Chapter 4 Helpful Tips 131 4 Press the END key several times to exit 4 ...
Страница 132: ...Chapter 4 Helpful Tips 132 ...
Страница 133: ...Chapter 5 Settings This chapter Describes the individual settings FUNCTION 134 SET UP 135 ...
Страница 150: ...Chapter 6 Maintenance 150 ...
Страница 158: ...Chapter 7 Options 158 ...
Страница 178: ...Chapter 9 Appendix 178 ...
Страница 182: ...MEMO ...
Страница 184: ... MIMAKI ENGINEERING CO LTD 2022 MM FW 1 0 ...


