Chapter 2 Cutting
56
For more information on the settings for the number of pinch rollers, refer to
For more information on the sheet clamping pressure, refer to
.
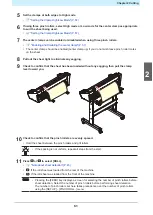
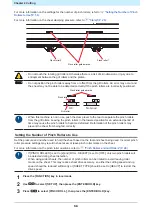
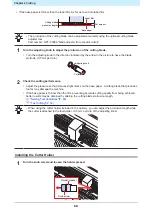
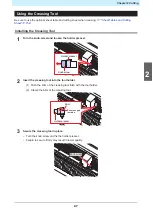
Pinch roller 2
Pinch roller guide marks
Pinch roller 1
• Do not touch the rotating grit rollers. Otherwise there is a risk of skin abrasion or injury due to
entrapment between the grit rollers and the platen.
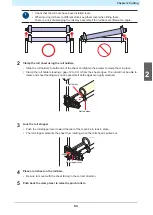
• Do not position the pinch rollers away from or offset from the grit rollers. An error may occur and
the sheet may not be able to be detected correctly if the pinch rollers are incorrectly positioned.
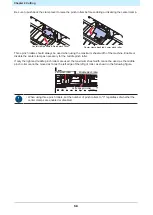
OK
No Good
Pinch roller guide marks
Pinch roller
Grit roller
• When this machine is not in use, push the clamp lever to the rear to separate the pinch rollers
from the grit rollers. Leaving the pinch rollers in the lowered position for an extended period of
time may cause the pinch rollers to become deformed. Deformation of the pinch rollers may
prevent the sheet from being fed correctly.
Setting the Number of Pinch Rollers to Use
Set the pressure and number used to hold the sheet based on the tool and sheet being used. Incorrect pinch
roller pressure settings may result in sheet skew or leave pinch roller marks on the sheet.
For more information on the pinch roller positions, refer to
"Pinch Rollers and Grit Rollers"(P. 28)
• If [PINCH ROLLER] is set to [2] and [ROLL. SELECT] is set to [OFF], only two pinch rollers will
be detected during sheet detection.
• When using wider sheets, the number of pinch rollers can be limited to avoid leaving roller
marks on the sheet. This may reduce sheet drive accuracy, so either the cutting speed and up
speed should be reduced sufficiently or [SHEET TYPE] should be set to [HEAVY] to restrict the
drive speed.
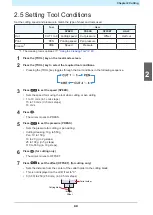
1
Press the [FUNCTION] key in local mode.
2
Use
to select [SET UP], then press the [ENTER/HOLD] key.
3
Press
to select [PINCH ROLL.], then press the [ENTER/HOLD] key.
Содержание CG-100AR
Страница 39: ...Chapter 1 Before Using This Machine 39 2 Shut down the computer connected to the machine 1 ...
Страница 76: ...Chapter 2 Cutting 76 ...
Страница 98: ...Chapter 3 Cutting Data with Register Marks 98 ...
Страница 131: ...Chapter 4 Helpful Tips 131 4 Press the END key several times to exit 4 ...
Страница 132: ...Chapter 4 Helpful Tips 132 ...
Страница 133: ...Chapter 5 Settings This chapter Describes the individual settings FUNCTION 134 SET UP 135 ...
Страница 150: ...Chapter 6 Maintenance 150 ...
Страница 158: ...Chapter 7 Options 158 ...
Страница 178: ...Chapter 9 Appendix 178 ...
Страница 182: ...MEMO ...
Страница 184: ... MIMAKI ENGINEERING CO LTD 2022 MM FW 1 0 ...

