9
User Instructions - English
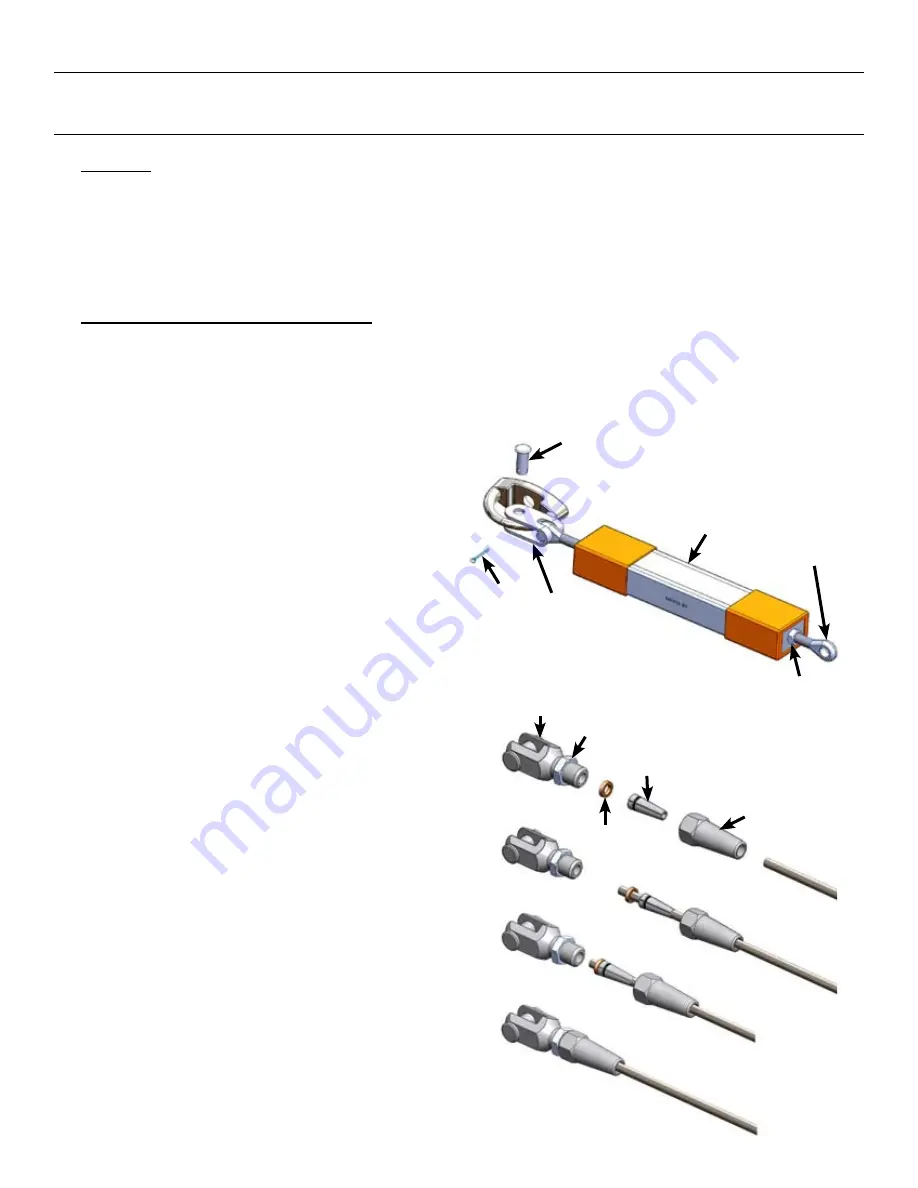
B. Cable to Fast Attach Cable Fitting
(see Figure 4)
1. Disassemble the fitting and verify components.
2. Slide the cone, wedge set and washer onto the cable end.
3. Then slide the cone over the wedge set and washer.
(Note: There should be approximately 1/4" (6mm) of
cable showing beyond the washer.)
4. Screw the jaw anchor head into the cone.
5. Tighten the jam nut down onto the cone. Torque to
approximately 20 ft. lbs. (27Nm).
A. Multi-Purpose Inline Shock Absorber to D-Bolt Anchor
(see Figure 3)
In order to allow for maximum take-up and proper tensioning of the lifeline at the end of installation, the shock absorber must
be prepared for installation by following the procedure below.
Preparing the Shock Absorber for Installation:
► Open the shock absorber fully by loosening the locknuts on either side of the shock absorber body and rotating the shock
absorber, thus exposing the jaw bolt and eyebolt threads. [Note: When fully open, the shock absorber will measure ap
-
proximately 22-1/2" (572mm) from end of jaw to end of eyebolt. The shock absorber is designed to allow approximately 4"
(102mm) of take-up in the lifeline.]
► Once the shock absorber is fully open, rotate it in the opposite direction two to three turns. [Note: This allows for the pos
-
sibility of a lifeline that may be too tight after installation and consequently over-tensioned.]
► Now proceed with the installation steps below.
Jaw Anchor Head
Washer
Wedge Set
Cone
Jam Nut
Fig. 4
1. Remove cotter pin and bolt from shock absorber jaw.
2. Position jaw over D-bolt anchor and insert bolt com-
pletely through jaw and anchor.
3. Insert the cotter pin into the end of the bolt.
Fig. 3
Bolt
Cotter
Pin
Jaw
Eyebolt
Body
Locknut
WARNING:
Always wear gloves when inspecting or installing a cable lifeline.
**Procedures A through C apply to the assembly required on one end of the lifeline.
4.3 Installation of Horizontal Lifeline Assembly
www.netzerotools.com
www.netzerotools.com


