


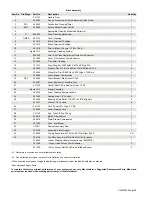


OM-239026 Page 24
7-3.
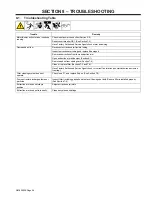
Cleaning Filter
OM-239026 Page 21
7-3.
Cleaning Filter
245608 / 245613
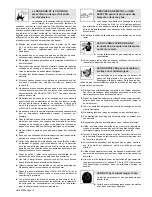
!
Close cover before starting unit or
operating filter cleaning system.
!
Do not operate unit without filter or
with dirty (plugged) filter.
!
Clean or replace filter when dirty.
!
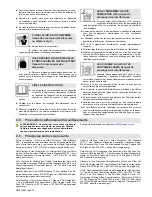
Allow cooling period before in-
specting or replacing filter, or clean-
ing particle tray and spark guard.
!
Do not breathe the particles col-
lected by the fume extractor. Wear
approved safety equipment (respi-
rator, gloves, long sleeve shirt)
when servicing filter and spark
guard. Dispose of used element and
collected particles according to lo-
cal, state, and federal requirements.
!
If ANY air is injected into the skin or
body seek medical help immedi-
ately.
!
Read and understand the Material
Safety Data Sheets (S DSs ) and
the manufacturer’s instructions for
metals, consumables, coatings,
cleaners, and degreasers.
See Section 5-5 for compressed air re-
quirements for proper filter cleaning.
!
Wear protective equipment when
disconnecting compressed air sup-
ply. Internal air tank is under pres-
sure and will discharge when air
supply is disconnected.
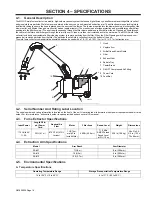
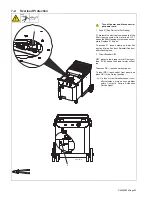
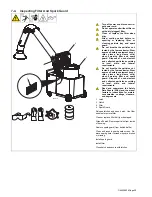
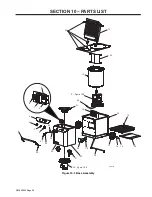
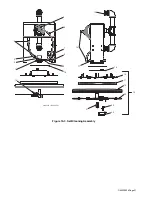
1
Filter Cleaning Switch
Use switch to operate filter cleaning sys-
tem. Clean or replace filter when Filter
gauge reading is over 4 in. w.c. (10 x 100
Pa) or whenever air flow is too low to ex-
tract fumes. Keep cover closed during
cleaning to maintain a tight seal around fil-
ter.
To clean filter, press and release Filter
Cleaning switch. The filter cleaning system
operates only when the unit is off.
The filter cleaning system begins oper-
ation when the internal fan completely
stops.
Close damper before operating filter
cleaning system.
The system cleans the filter in about 15
seconds. Wait until the cleaning has
stopped before removing particles from
tray.
2
Particle Tray Release Lever
3
Particle Tray
Push lever down to release particle tray.
Pull out tray. Remove particles from tray
after every cleaning cycle. Reinstall tray
and pull lever up to secure tray in position.
Inspect filter after cleaning (Section 7-4).
Start unit and check Filter gauge reading.
!
Replace filter if, after cleaning, Filter
gauge reading is over 4 in. w.c. (10
x 100 Pa) or air flow is too low to ex-
tract fumes.
Tools Needed:
3
1
2
OM-222 Page 1
NGO’s
tools/
helmet
weldshield
faceshield
glasses
hairdryer
cclamp
rpmmeter
benchvise
popriveter
oilcan
filtersocket
hacksaw
belttensiongauge
sealant_1
snapringpliers
linepliers
pencil
fusepuller
mallet
scissors
tape
rubbergloves
weldgloves
earmuffs
electrodewrench
pinextractor2
tip_dress
sealant_2
pump pliers
T_allen
pinextractor (141761)
SOAP
bar soap
Liquid soap
Paper Clip
Needle-Nose Vise Grip
Ground Strap
Thermal Compound
Trowel
Chisel
Torx
ear plugs
Close cover before starting unit or
operating filter cleaning system.
Do not operate unit without filter or
with dirty (plugged) filter.
Clean or replace filter when dirty.
Allow cooling period before in-
specting or replacing filter, or
cleaning particle tray and spark
guard.
Do not breathe the particles col-
lected by the fume extractor. Wear
approved safety equipment (respi-
rator, gloves, long sleeve shirt)
when servicing filter and spark
guard. Dispose of used element
and collected particles according
to
local,
state,
and
federal
requirements.
If ANY air is injected into the skin
or
body
seek
medical
help
immediately.
Read and understand the Safety
Data Sheets (SDSs) and the manu-
facturer’s instructions for metals,
consumables, coatings, cleaners,
and degreasers.
�
See Section
for compressed air re-
quirements for proper filter cleaning.
Wear protective equipment when
disconnecting
compressed
air
supply. Internal air tank is under
pressure and will discharge when
air supply is disconnected.
1
Filter Cleaning Switch
Use switch to operate filter cleaning system.
Clean or replace filter when Filter gauge
reading is over 4 in. w. c. (10 x 100 Pa) or
whenever air flow is too low to extract fumes.
Keep cover closed during cleaning to main-
tain a tight seal around filter.
To clean filter, press and release Filter
Cleaning switch. The filter cleaning system
operates only when the unit is off.
�
The filter cleaning system begins oper-
ation when the internal fan completely
stops.
�
Close damper before operating filter
cleaning system.
The system cleans the filter in about 15 sec-
onds. Wait until the cleaning has stopped be-
fore removing particles from tray.
2
Particle Tray Release Lever
3
Particle Tray
Push lever down to release particle tray. Pull
out tray. Remove particles from tray after
every cleaning cycle. Reinstall tray and pull
lever up to secure tray in position.
Inspect filter after cleaning (Section 7-4).
Start unit and check Filter gauge reading.
Replace filter if, after cleaning, Fil-
ter gauge reading is over 4 in. w.c.
(10 x 100 Pa) or air flow is too low
to extract fumes.
Содержание FILTAIR
Страница 4: ......
Страница 18: ......
Страница 37: ...Notes Visit www youtube com MillerWelders for informational videos ...
Страница 39: ......


