background image

5.11.3 

Importing files

1.

Create in the root directory of the USB flash drive (USB stick) a folder named

‘pad_wave’

 and store the user samples to be imported as WAV files in it.

Alternatively, use the software 

‘Wave Manager’

 which is available for down‐

load on the product page of our homepage 

www.thomann.de

 to create a file

named 

‘pad-content.hppd’

 containing the user samples to be imported as WAV

files. Store the file in the root directory of the USB flash drive (USB stick).

2.

Press 

[SETUP]

 and 

[OK]

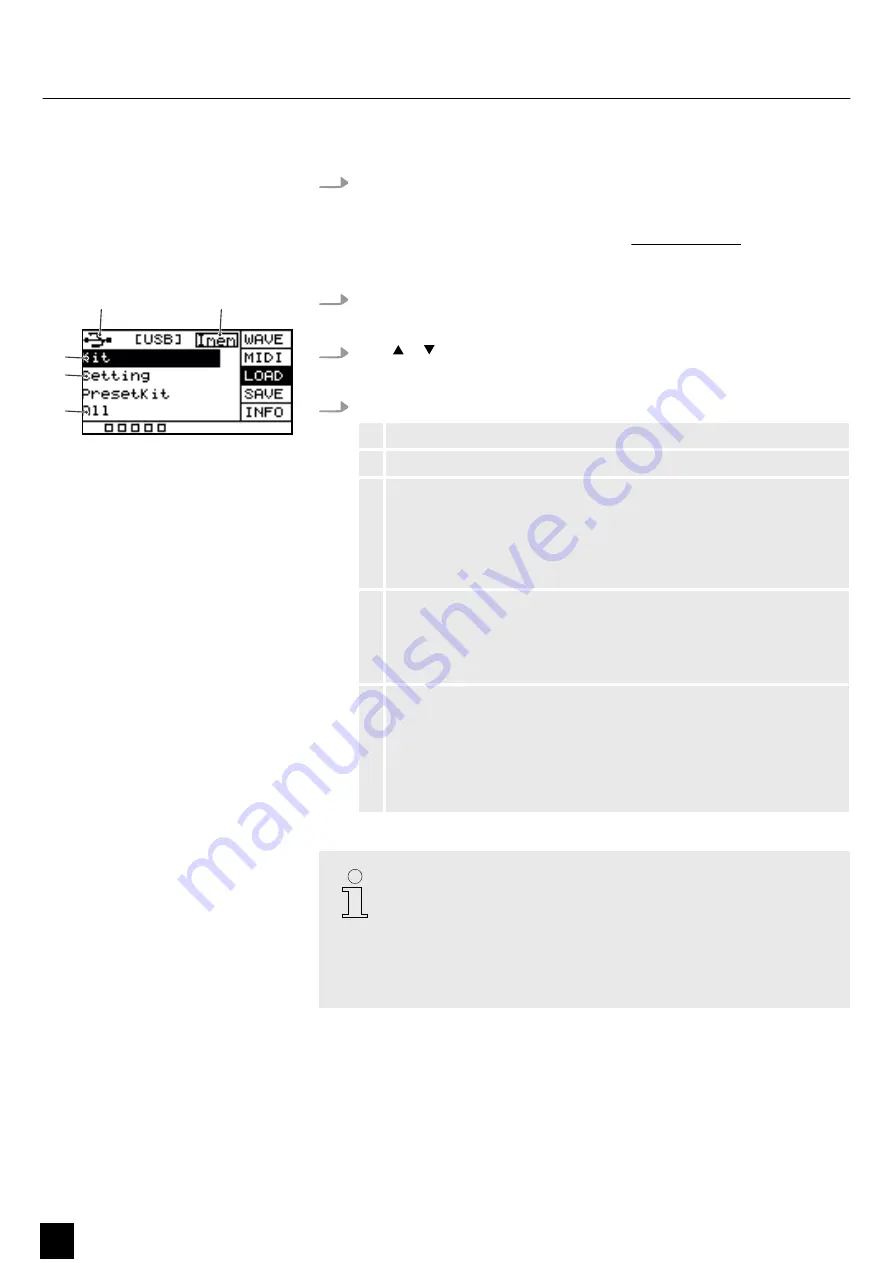
 simultaneously to enter the USB menu.

ð

The display shows the respective submenus.

3.

Press   or   to select the menu item 

‘LOAD’

.

ð

The display shows the respective submenus.

4.

Press 

[SELECT]

 repeatedly to switch between submenus.

1

Indicates that a USB flash drive is connected.

2

Shows the memory capacity of the user samples.

3

Imports the user-defined samples, drum kits, and MIDI files.
Confirm the selection with 

[OK]

.

Press 

[SELECT]

 repeatedly to choose between 

‘Cancel’

 (cancel import),

‘Cover’

 (replace) and 

‘Append’

 (import) and confirm your selection with

[OK]

.

4

Imports user-defined settings for the pads.
Confirm the selection with 

[OK]

.

Press 

[SELECT]

 repeatedly to choose between 

‘No’

 (cancel import) and

‘Yes’

 (import) and confirm your selection with 

[OK]

.

5

Imports all user-defined samples and drum kits on the USB flash drive

(USB stick).
Confirm the selection with 

[OK]

.

Press 

[SELECT]

 repeatedly to choose between 

‘Cancel’

 (cancel import),

‘Cover’

 (replace) and 

‘Append’

 (import) and confirm your selection with

[OK]

.

All user samples on the USB flash drive (USB stick) to be imported must meet

the following criteria to be played back on the Sampling Pad without any

problems.

Sampling rate: 48 kHz, 16 bit, mono

File name length: max. 16 characters

Only WAV files can be imported; it is not possible to import MP3 or MIDI

files for the user samples.

#

ö

$
%

&

Operating


28

NonaPad

Sampling Percussion Pad

Содержание NonaPad

Страница 1: ...NonaPad Sampling Percussion Pad User Manual ...

Страница 2: ...Thomann GmbH Hans Thomann Straße 1 96138 Burgebrach Germany Telephone 49 0 9546 9223 0 Internet www thomann de 17 06 2022 ID 526188 V2 ...

Страница 3: ...ting a drum kit 12 5 4 Selecting a sound 13 5 5 Loops 15 5 6 Effects 17 5 7 Settings 18 5 8 Favourites 19 5 9 Metronome 21 5 10 Advanced settings 22 5 11 Using a USB Flash drive USB stick 26 5 12 Device version 30 5 13 Reset to factory default setting 31 5 14 Firmware 31 6 Technical specifications 32 7 MIDI implementation chart 33 8 Troubleshooting 34 9 Plug and connection assignment 35 10 Protect...

Страница 4: ...4 NonaPad Sampling Percussion Pad ...

Страница 5: ...eyword search Use the search function in the electronic version to find the topics of interest for you quickly Online guides Our online guides provide detailed information on technical basics and terms Personal consultation For personal consultation please contact our technical hotline Service If you have any problems with the device the customer service will gladly assist you 1 2 Notational conve...

Страница 6: ... word Meaning DANGER This combination of symbol and signal word indicates an immediate dangerous situation that will result in death or serious injury if it is not avoided CAUTION This combination of symbol and signal word indicates a possible dangerous situation that can result in minor injury if it is not avoided NOTICE This combination of symbol and signal word indicates a possible dangerous si...

Страница 7: ...ndoor use only To prevent damage never expose the device to any liquid or moisture Avoid direct sunlight heavy dirt and strong vibrations Only operate the device within the ambient conditions specified in the chapter Technical specifications of this user manual Avoid heavy temperature fluctuations and do not switch the device on immediately after it was exposed to temperature fluctuations for exam...

Страница 8: ...preprogrammed sounds n 30 preprogrammed drum kits n 512 MB memory for WAV samples n Recording function n 3 band equalizer n Reverb effect Looper Limiter n Metronome function n Two trigger inputs n Mounting plate optionally available Features 8 NonaPad Sampling Percussion Pad ...

Страница 9: ...4 Connections and operating elements ö Front panel Connections and operating elements NonaPad 9 Sampling Percussion Pad ...

Страница 10: ...p menu 9 LCD display 10 Buttons for selecting parameters 11 OK Button for confirming values and parameters in various menus 12 SELECT Button for scrolling through options in various menus 13 Rotary control for quick selection of values and for scrolling through several options in various menus 14 Buttons for quick selection of values and for scrolling through several options in various menus 0 1 2...

Страница 11: ...oon as a signal is received from the connected external footswitch By default the input jack is used for a kick drum pedal 20 USB B USB to host interface for connection to a computer MIDI data 21 USB A USB interface for connecting a USB flash drive USB stick 22 MIDI IN MIDI OUT MIDI in and out sockets 23 AUX Input socket for connecting external audio devices such as MP3 player designed as 3 5 mm j...

Страница 12: ...g the pads can be changed solely through the intensity of the touch i e the harder the touch the louder the sound produced The pads can be played with drum sticks When playing a pad the respective LED below the pad lights up 5 3 Selecting a drum kit 1 Press KIT to activate the drum kit selection for the device pads ð The display shows the drum kit number and name 2 Use the rotary control or press ...

Страница 13: ...kit 5 4 Selecting a sound The sound you hear when you hit a pad is called a waveform Any sound that you sample or import from a USB flash drive or computer is saved as a waveform WAVE These settings allow you to adjust individual samples within a preset 1 Press or to select the WAVE menu ð The display shows the respective submenus 2 Press SELECT repeatedly to switch between submenus 3 Use the rota...

Страница 14: ...OK 5 Shows the setting of the layer mode If the pad is set to have both sample A and sample B any time you hit the pad that is louder than the set threshold 0 127 sample B will be played If for example the threshold is set to 50 sample A will be played when you hit the pad quieter than 50 sample B when you hit the pad louder than 50 Use the rotary control or press to change the threshold for switc...

Страница 15: ...inked Use the rotary control or press to change the drum kit Confirm the selec tion with OK 3 Shows the name of the currently selected loop Press SELECT and use the rotary control or press to change the loop Press OK to play the loop continuously Press OK again to stop loop play back Make sure that the Midi submenu is still selected 4 Shows the tempo of the selected loop Use the rotary control or ...

Страница 16: ...otary control or press to change the correction of the touch velocity Confirm the selection with OK 6 Shows the metronome tempo 5 5 2 2 Start recording 1 Hit the desired pad for which you want to record a loop 2 Press REC to open the record menu 3 Press SELECT repeatedly to switch between submenus 4 Use the rotary control or press to change the respectively displayed value 5 Press or to select STA...

Страница 17: ...o select a recording 3 Press OK to delete the recording ð The display shows delete is complete and the recording was deleted without a security query 5 6 Effects You can assign several effects to each single drum kit The effects always affect all pads and external triggers and cannot be assigned to individual pads 1 Press or to select the EFFECT menu ð The display shows the respective submenus 2 P...

Страница 18: ...ss SELECT to enter the submenu Type Use the rotary control or press to select the reverb type room studio stage Confirm the selection with OK 5 Shows the built in limiter Use the rotary control or press to switch the limiter on or off With the limiter switched on press SELECT to enter the submenu Threshold Use the rotary control or press to adjust the threshold between 0 dBu no limiting and 12 dBu...

Страница 19: ...e first pad gets muted Confirm the selection with OK 3 Shows the behaviour pattern of the selected pad Use the rotary control or press to switch between behaviour patterns Normal The pad sound gets played once Confirm the selection with OK Switch The pad sounds once it gets played Play it again to end the sound Confirm the selection with OK Loop 2 4 8 The sound of the pad is repeated as many times...

Страница 20: ...desired drum kit for each of the eight positions OFF P1 P30 Confirm the selection with OK 5 8 2 Activating kit chain as favourite To add one of the up to five created kit chains as a favourite to the display proceed as follows 1 Press or to select the KITCH menu 2 Use the rotary control or to select the desired kit chain 1 5 3 Press KIT to directly get to the home display ð The display shows the s...

Страница 21: ...ion with OK 2 Shows the metronome beat Use the rotary control or press to pick a metronome beat 1 to 16 Confirm the selection with OK 3 Shows the metronome rhythm Use the rotary control or press to pick a metronome rhythm 1 to 7 Confirm the selection with OK 4 Shows the metronome s panorama position Use the rotary control or press to adjust the position of the metro nome sound within the stereo pa...

Страница 22: ...lay 4 Use the rotary control or press to set the MIDI value between 0 and 127 5 Press OK to confirm the new value ð The display shows Save successfully The following table shows the assignment of the MIDI values to the corresponding pads Pad Note Pad 1 49 C 3 Pad 2 57 A3 Pad 3 51 D 3 Pad 4 48 C3 Pad 5 45 A2 Pad 6 43 G2 Pad 7 36 C2 Pad 8 38 D2 Pad 9 42 F 2 Trig 1 50 D3 Trig 2 47 B2 Trig 3 41 F2 Tri...

Страница 23: ...t Confirm the selection with OK OFF No control commands are assigned to the pad Confirm the selec tion with OK 3 Shows the touch velocity of the selected pad Use the rotary control or press to set the touch velocity between 1 low and 32 high Confirm the selection with OK 4 Shows the threshold of the selected pad Threshold Use the rotary control or press to set the threshold between 1 and 32 Confir...

Страница 24: ...m Confirm the selection with OK KIT DEC When pressed the foot switch performs the same function as the rotary control counter clockwise and Confirm the selection with OK KIT INC When pressed the foot switch performs the same function as the rotary control clockwise and Confirm the selection with OK CLICK When pressed the foot switch turns the metronome on or off Confirm the selection with OK MUTE ...

Страница 25: ... than 8 Confirm the selec tion with OK DRM19106 setting for mesh head pads Confirm the selection with OK BAS18103 setting for bass drum pads smaller than 4 Confirm the selection with OK BAS19107 setting for bass drum pads larger than 4 Confirm the selec tion with OK CBL17110ST setting for cymbal pads Confirm the selection with OK 3 Shows the TRIG 1 2 input of the external pad Use the rotary contro...

Страница 26: ...f The LEDs below the pads do not light up when the pads are played Confirm the selection with OK type1 The LEDs below the pads light up for 0 5 seconds when the pads are played Confirm the selection with OK type2 The LEDs below the pads light up immediately when the pads are played Confirm the selection with OK ð The display shows Save successfully 5 11 Using a USB Flash drive USB stick The Percus...

Страница 27: ...page 28 The user samples on the USB flash drive USB stick cannot be played directly from the USB flash drive USB stick but must first be imported into the Percussion Pad 5 11 2 MIDI files 1 Press SETUP and OK simultaneously to enter the USB menu ð The display shows the respective submenus 2 Press or to select the menu item MIDI ð The display shows any user defined sound MIDI files on the USB flash...

Страница 28: ...ts the user defined samples drum kits and MIDI files Confirm the selection with OK Press SELECT repeatedly to choose between Cancel cancel import Cover replace and Append import and confirm your selection with OK 4 Imports user defined settings for the pads Confirm the selection with OK Press SELECT repeatedly to choose between No cancel import and Yes import and confirm your selection with OK 5 I...

Страница 29: ... shows export 3 Exports the user defined settings for the pads Confirm the selection with OK Press SELECT repeatedly to choose between No cancel export and Yes export and confirm your selection with OK The display shows export 4 Exports all user defined samples drum kits and MIDI files on the Percus sion Pad as well as the user defined settings for the pads Confirm the selection with OK Press SELE...

Страница 30: ...on with OK Press SELECT repeatedly to choose between No cancel defrag and Yes defrag and confirm your selection with OK Do not switch off the device during the defrag 4 After the formatting defrag the device restarts and the display shows welcome ð The device is operational again Formatting erases all files on the USB flash drive USB stick Make sure there are no files on the USB flash drive USB st...

Страница 31: ...are list is available for download on the product page of our home page www thomann de 1 Save the downloaded firmware to a USB flash drive USB stick The percussion pad automatically detects the firmware update during installation 2 Connect the USB flash drive to the percussion pad via the USB A interface 3 Press SETUP to enter the settings menu ð The display shows the respective submenus 4 Press o...

Страница 32: ...n Main Out 2 1 4 jack socket Display LCD display Sounds 608 Drum kits 30 Effects Reverb Equalizer Limiter Equalizer 3 band Power supply External power adapter 100 240 V 50 60 Hz Operating voltage 9 V 2 A centre positive Dimensions W H D 363 mm 73 mm 305 mm Weight 2 44 kg Ambient conditions Temperature range 0 C 40 C Relative humidity 20 80 non condensing Number of pads 9 Sampling function yes Numb...

Страница 33: ... Control No No Program Change True Number No Yes 0 127 System Exclusive Yes Yes System Common Song Position No No Song Select No No Tune Request No No System Real Time Clock No No Commands No No Aux Messages ALL Sound OFF No No Reset ALL Controllers No No Local ON OFF No No ALL Notes OFF No No Active Sensing Yes Yes System Reset No No POLY MONO OMNI ON OMNI OFF Mode 3 MIDI channel modes MIDI imple...

Страница 34: ...level Interference occurs when using a cell phone 1 Using a mobile phone near the percussion pad can cause interference To prevent this turn off the mobile phone or use it only at a safe distance The percussion pad is not detected when connected to a com puter 1 Check the USB cable for correct connection 2 Connect the USB cable to another USB port on the com puter The foot switches do not work 1 C...

Страница 35: ...ransmission is susceptible to electromagnetic interference especially at low levels such as microphone signals and when using long cables In a professional environment therefore the balanced transmission is preferred because this enables an undisturbed transmission of signals over long distances In addition to the conductors Ground and Signal in a balanced transmission a second core is added This ...

Страница 36: ... and markings on the packaging This product is subject to the European Waste Electrical and Electronic Equipment Directive WEEE in its currently valid version Do not dispose with your normal household waste Dispose of this device through an approved waste disposal firm or through your local waste facility When discarding the device comply with the rules and regulations that apply in your country I...

Страница 37: ...Notes NonaPad 37 Sampling Percussion Pad ...

Страница 38: ...Notes 38 NonaPad Sampling Percussion Pad ...

Страница 39: ......

Страница 40: ...Musikhaus Thomann Hans Thomann Straße 1 96138 Burgebrach Germany www thomann de ...

Отзывы: