


8
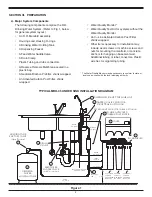
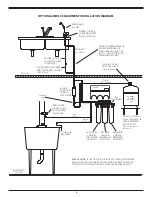
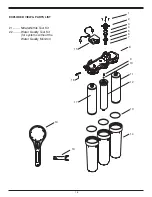
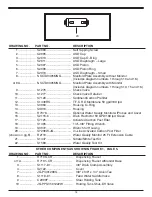
SECTION IV. INSTALLATION STEPS
All plumbing should be done in accordance with
state and local plumbing codes.
NOTE
: Some codes may require installation by a
licensed plumber; check with the local plumbing
authority prior to installation.
In restricted under–sink areas, it may be easier to
install the faucet first. Allow adequate tubing lengths
for any final component position.
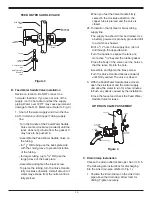
A. Faucet With Water Quality Monitor (Optional)
Installation
The faucet contains an anti–siphon air gap.
While the system is producing water, the drain
water flows from the R.O., through the air gap
and then to the household drain. The purpose of
the air gap is to prevent water in the drain from
backing up into the R.O. Drinking Water System.
The easiest installation is to use an existing
spray attachment hole. If the spray faucet hole is
not available, then the sink top must be drilled.
Choose a convenient location as described in
Sec. III, C.1.
1. Mark the location of the center of the faucet
base.
2a. Drilling a stainless steel sink:
•Center punch the hole to provide a starting
point for the drill.
•Start with a smaller drill as a pilot, and then
drill a ½" diameter hole to accept the bolt of
a 1¼" Greenlee Hole Punch (1¼" chassis
punch).
•Clean away any chips.
•Install the punch and tighten the nut to cut
the hole.
•Deburr any sharp edges.
2b. Drilling a porcelain sink:
It is best to use a special 1¼" diameter cutter
designed for porcelain. A carbide tipped
masonry bit is a second choice.
•Place a piece of tape over the area to be
drilled to help prevent chipping.
•Drill a pilot hole for the porcelain cutter.
Use the pilot drill supplied with the kit or a
carbide tipped drill.
•When drilling the 1¼" hole, drill slowly and
carefully; the porcelain chips easily.
•After drilling, clean the area well. Iron filings,
if left in place, can cause rust stains.
2c. Drilling a counter top:
NOTE:
The counter top must be less than
1¼" thick. Treat ceramic tile as porcelain until
the tile is penetrated, then use the carbide
tipped metal cutter.
Formica counter tops may be drilled with a
good 1¼" wood bit; drilling a
3
/
32
" pilot hole
will help keep the bit going straight.
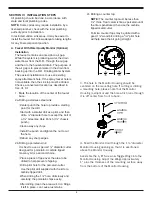
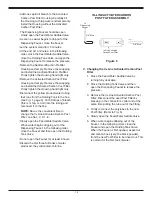
3. The hole in the Monitor Housing should be
centered on the mounting hole. If cutting or drilling
a mounting hole, please note that the Monitor
Housing is elliptical and the hole which runs through
it is off center from front to back.
4. Feed the Monitor Cord through the 1 ¼”diameter
Monitor Housing opening so that it is positioned
above the Monitor Housing.
Assemble the 1/8” Screws & Toggle Wings into the
Monitor Housing. Adjust the Wings approximately
1” plus the thickness of the mounting surface away
from the bottom of the Monitor Housing.
Содержание MRO-35
Страница 15: ...15 NOTES ...


