1.0
Wire / Cyclone / Mesh Fencing
Tools required:
- Black Cable Ties
1. Place your rst panel against the top left corner of your fence and using cable ties, simply pass
them through the fence and pull tight.
2. Repeat the process every 25cm across the top, sides and bottom edges. If needed, add more
cable ties to the centre of the panel to ensure it sits at.
3. See ‘Assembling your wall’ instructions (see next page) on how to assemble the rest of your
green wall. Secure each panel by repeating the steps above.
Tip: We would recommend adding more attachment points (equally spaced) if the area is exposed
to wind.
Concrete / Brick / Stone / Render
Tools required:
- Hammer Drill + Masonry Drill Bit
- Screws (try using screws with a large head for more coverage)
- Wall Plugs
- Hammer
- Pencil
1. Place your rst panel against the top left corner of your fence/wall and mark the drill location
in the top left corner hole. Drill the marked hole using the hammer drill with masonry bit.
2. Lightly hammer a wall plug into the drilled hole and secure with a screw.
3. Align the panel correctly and use it as a guide to mark all the other drill locations. Drill the
marked holes and repeat step 2.
4. See ‘Assembling your wall’ instructions (see next page) on how to assemble the rest of your
green wall. Secure each panel by repeating the steps above.
Tip: We would recommend adding more attachment points (equally spaced) if the area is
exposed to wind.
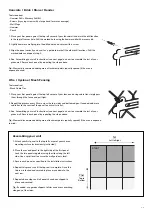
1. Attach your rst panel to the top left corner of your chosen
mounting surface (as previously instructed).
2. Place the second panel to the right side of the rst panel.
Lock the two panels together using the clips along the left
side. Use a spirit level to ensure the wall garden is level.
3. Secure each panel as speci ed in the installation instructions.
4. Repeat this process until the top row is complete. Once the
top row is locked and secured in place move down to the
next row.
5. Repeat above steps until all panels have been clipped in
place and secured.
Tip: If needed, use garden clippers to trim any excess overhang
along any of the sides.
Assembling your wall
2nd
Top to
Bottom
1st
Left to Right
START


