background image


Figure 1: Overview of Milan Climax Sound Bar 


1. STANDBY: Switch on the Sound 
Bar or switch to STANDBY Mode 

6. Display: 

Indicates the 

current status of the unit


11. OPTICAL AUDIO INPUT
 Connect the digital audio output 

from a TVDVD or Blu-ray player


2. SOURCE:  Select an audio 
source 
TV,AUX,COAX,BT,OPTC,USB or 
HDMI 

7. Wall Bracket: Use these 
brackets to fix the unit to a 
wall 
 

12. DC IN SOCKET of Sound Bar: 
Connect to the power adapter 
24V, 1.5A  


3. PLAY/PAUSEPlayPause or 
Resume Playback in USB and 
Bluetooth Mode 

8. AUX AUDIO INPUT (3.5mm): 
Connect the analog audio 
output from an MP3 player or 
similar device using a 3.5mm 
audio cable 


13. USBPORT: Audio input from a 
USB storage device 


4. SKIPSkip to the previous or 
next track USB and Bluetooth 
Mode 
 

9.

 TV AUDIO INPUT (RCA): 

Connect the analog audio 
output from a TV or other 
audio source 


14. HDMI IN: Connect to the 
HDMI output on a digital device 


5.  / - : Increase or 
decrease the output volume 
 

10. COAXIAL AUDIO INPUT 
(RCA):
 Connect the digital 
audio output from a TVDVD 
or Blu-ray player 


15. TO TV- HDMI OUT (ARC):  
Connect to the HDMI input on 
the TV 


16. NFC Area 
 

Содержание climax 2.1

Страница 1: ...MILAN CLIMAX 2 1 CHANNEL SOUND BAR WITH HDMI USER MANUAL...

Страница 2: ...ELAS02 Milan Climax 2 1 Channel Sound Bar with HDMI User Manual Promoting Enjoyable Living Offered by www milanity com...

Страница 3: ...atures and Specifications 1 3 Overview of IR Remote 1 4 Connecting the sound bar to your television 1 5 Connecting a TV DVD or GAME CONSOLE using a RCA RCA audio cable 1 6 Connecting a MP3 player 2 Op...

Страница 4: ...ic and TV viewing experience It has an array of connectivity options such as HDMI Bluetooth USB Coaxial and Optical When integrated with Milan DLE it is transformed into a Smart Sound Bar and is able...

Страница 5: ...DMI Input Sensitivity 550 mV Play music directly from smartphones and tablets using Bluetooth Power Consumption 25 W Easy to integrate with Milan Infoway using Milan Infomap Standby Power Consumption...

Страница 6: ...SE Play Pause or Resume Playback in USB and Bluetooth Mode 8 AUX AUDIO INPUT 3 5mm Connect the analog audio output from an MP3 player or similar device using a 3 5mm audio cable 13 USBPORT Audio input...

Страница 7: ...E PLAY PAUSE or RESUME USB and Bluetooth playback 10 BLUETOOTH MODE press and hold for 3 seconds to unpair a connected Bluetooth device In USB mode press repeatedly to cycle through the repeat modes R...

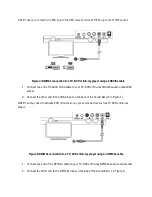
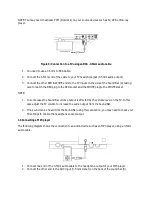
Страница 8: ...th Ethernet to the HDMI ARC socket on TV NOTE 1 The HDMI ARC socket on TV might be labeled differently see the TV manual for details 2 Connect the other end to the TO TV HDMI OUT ARC Input 15 in Figur...

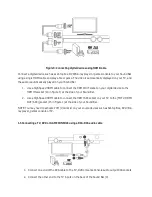
Страница 9: ...tal device to the HDMI IN socket 14 in Figure 1 at the side of your Sound Bar 2 Use a High Speed HDMI cable to connect the HDMI ARC socket on your TV to the TO TV HDMI OUT ARC socket 15 in Figure 1 at...

Страница 10: ...t RCA socket 2 Connect the other end to the COAX input on the back of the Sound Bar 10 in Figure 1 NOTE You may need to activate PCM Downmix on your source devices such as TV DVD or Blu ray player Fig...

Страница 11: ...HITE socket NOTE 1 In some cases the Sound Bar volume output is affected by the volume level on the TV In this case adjust the TV volume to increase the audio output from the Sound Bar 2 If no sound c...

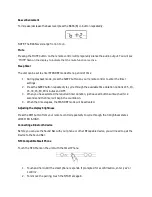
Страница 12: ...ut TV Auxiliary AUX Coaxial input COAX Bluetooth input BT Optical input OPTC USB input USB HDMI input HDMI NOTE When switching inputs there will be a 5 second pause after selecting BT while the unit s...

Страница 13: ...of 5 10 15 30 45 60 90 minutes and OFF 3 When you have selected the required timer duration just leave all buttons untouched for 2 seconds and the timer will begin the countdown 4 When the time elaps...

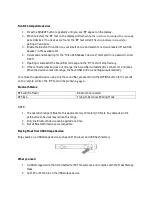
Страница 14: ...attempt to connect for 2 minutes When the device comes into range the Sound Bar will reconnect again automatically To remove the paired device using only the sound Bar press and hold the OPTION button...

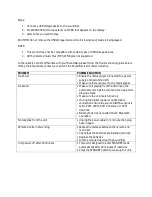
Страница 15: ...upply and is switched ON Make sure there is power to the mains socket No Sound Make sure if playing from the AUX input the external source has the volume turned up and is playing a track Make sure the...

Страница 16: ...larly dust deposits which become damp can sometimes lead to electrical problems which may cause severe damage to the delicate electronics within this unit 4 0 Warranty Policy This Limited Warranty off...

Страница 17: ......

Отзывы: