


7
6
Inserting a Disc
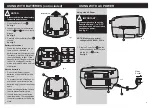
fig. 6
fig. 8
fig. 7
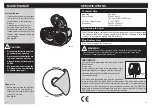
fig. 9
fig. 10
fig. 11
fig. 12
L
M
N
OPERATION OF RADIO
OPERATION OF CD
NOTE: Make sure the disc is not
playing. Always press the
Stop Button G before
opening the CD Door A .
NOTE: When the Headphone is
inserted into the socket the
Speakers will automatically
disable. When the Headphone
is disconnected the Speakers
will be re-activated.
NOTE: This CD-Player can play
Audio Discs, CD-R and CD-
Rewritables. Do not try to play
CD-ROM, CDi, VCD, DVD or
computer CD.
1. Set the Function Switch M to
"RADIO" position.
See fig. 6.
Operation of Radio
3. Rotate Tuning Knob F to the
desired station.
See fig. 7.
4. Adjust the position of Antenna O
to obtain the best reception.
See fig. 8.
5. Adjust the Volume Knob L to the
desired level.
See fig. 6.
6. To turn off the radio, slide the
Function Switch M to "OFF".
See fig. 6.
1. Insert the Headphone (not
included) plug into the Headphone
Socket N .
See fig. 9.
Headphone Jack
E
2. Set the Band Select E to the
desired AM/FM band.
See fig. 7.
F
O
N
G
A B
Head Phone
To remove the disc
•
Open the cover, pick up the disc
holding its edge whilst pressing
the centre pivot gently.
1. To open CD Door A insert your
finger into CD Door Open Recess
B and lift to its open position.
See fig. 10.
2. Place a disc in the centre with the
label side facing up, press down
into place
See fig. 11.
3. Close the disc compartment.
See fig. 12.


