MiiCraft 125 SERIES Скачать руководство пользователя страница 10

3D production system  ►  Make a better world


10

3.1 Installing MiiCraft Software

(1) Download 

MiiUtility.exe

 from 

http://www.miicraft.com/support/

System Requirements

-

Windows OS: Windows7 , Windows8, Windows10 and other updated version

-

Browser: Google Chrome 

(2) Unzip the downloaded file

(3) Click set_up.exe to create shortcut of MiiUtility .exe

(4) Open MiiUtitlity .exe

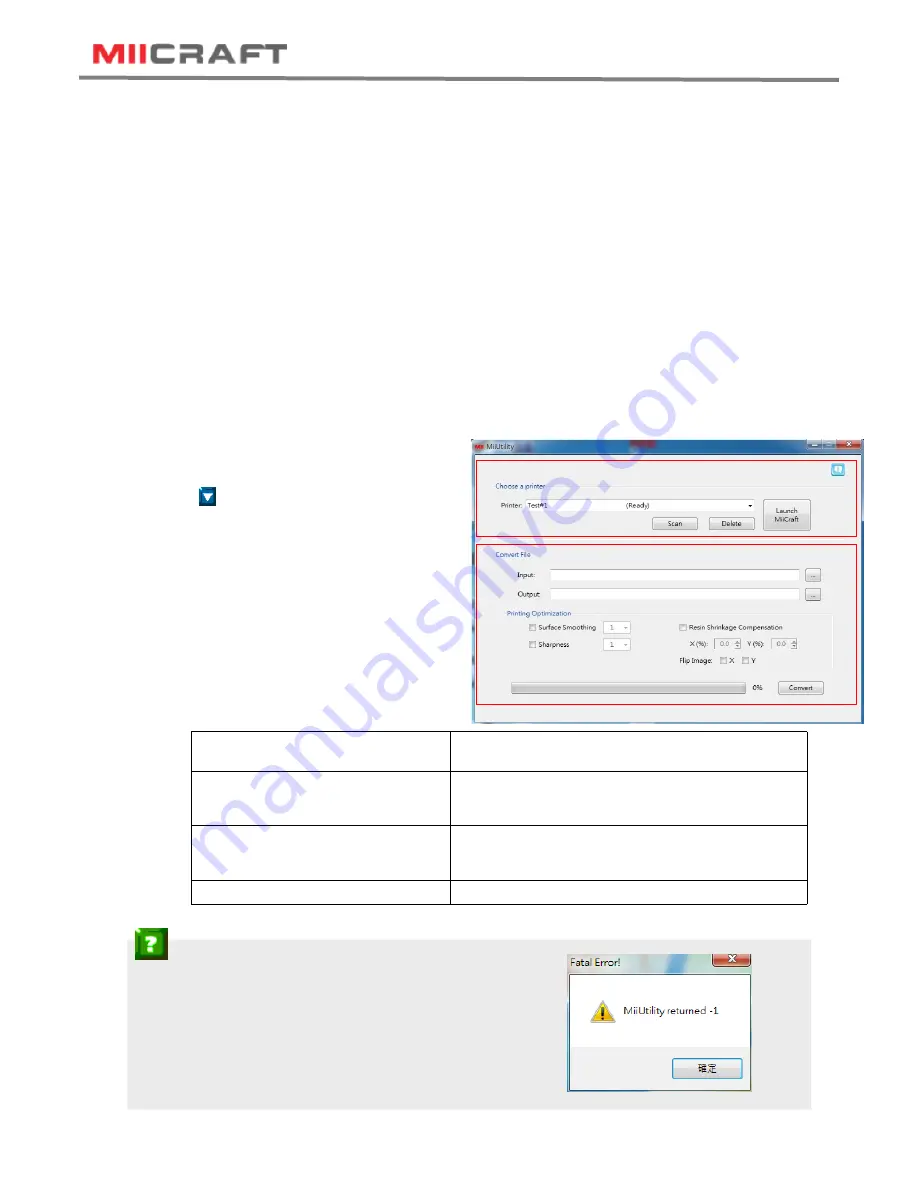
(5) Connect to the 3D Printer

If your computer have opened proxy setting, please close it before connecting. 

-

Scan: search 3D Printer

-

      :Select 3D Printer

-

Launch MiiCraft: link to MiiCraft controller

-

Delete: Delete the scanned record

(6) Convert File

-

Input: Select an object file

(Input type: SLC file, CWS file, ZIP file, 

WRK file, MII file)

-

Output: Save as .MII file

-

Printing Optimization

Surface Smoothing

Surface smoothing from Z axis, the greater number 

means higher compensation from Z axis

Sharpness

Enabling sharpness from X and Y axis

+ →Sharpen an image

─ →Soften an image

Resin Shrinkage Compensation

Compensate resin shrinkage

+0% to 9.9% →Enlarge an image

-0% to -9.9% →Shrink an image

Flip Image

Flip image by X axis or Y axis

(5)

(6)

          Trouble Shooting: 

How to resolve “ Fatal Error” when installing?


Please enter below links, and install x86.exe, make sure you have

Installed software from both of the links.

Visual C++ Redistributable Packages for Visual Studio 2013

https://www.microsoft.com/en-us/download/details.aspx?id=40784

Visual C++ Redistributable for Visual Studio 2015 Update 1

https://www.microsoft.com/en-us/download/details.aspx?id=49984

3 Operating your 3D Printer- Software

Содержание 125 SERIES

Страница 1: ...3D production system Make a better world 1 MiiCraft125 series 125 100 80 50 100X 3D Printer Operating Manual Version 1 3...

Страница 2: ...ng 7 2 2 Connecting to the Power adapter and cable 7 2 3 Power button control 8 2 4 Installing the Picker 9 2 5 Filling the Resin tank 9 3 Operating your 3D Printer Software 10 3 1 Installing MiiCraft...

Страница 3: ...erates uses and can radiate radio frequency energy and if not installed and used in accordance with the instruction manual may cause harmful interference to radio communications Operation of this equi...

Страница 4: ...ill solidify under UV light 7 Chemical substances like resin may cause skin irritation please read the guidelines in Material Safety Data Sheet MSDS of the resin supplied by manufacturer It is recomme...

Страница 5: ...s at ambient temperature from 15 C to 28 C And do not exposure to the light otherwise resin may solidified Liability In case you do not follow the operating manual we cannot be held responsible for da...

Страница 6: ...duction system Make a better world 6 1 5 Product Overview Power Button Printer Door Front Panel Picker Resin Tank USB Port Network Port Power Jack Front view Back view Fan Product Label Handle Storage...

Страница 7: ...able Graph1 Initiating time 1 minute LAN Connect both printer and laptop to local area network Initiating time a few seconds IP sharer Connect both printer and laptop to IP sharer Initiating time a fe...

Страница 8: ...SB Level 1 Insert USB to printer Download the latest firmware from http www miicraft com support to your USB first Save as ZIP file and select it for upgrade Upgrade Firmware Select filez Level 2 Leve...

Страница 9: ...1 Unlock the Resin tank from four corners 2 Pick up the resin tank and pour resin When installing back the resin tank remember to lock it from four corners 1 Carry both end of picker and install it o...

Страница 10: ...IP file WRK file MII file Output Save as MII file Printing Optimization Surface Smoothing Surface smoothing from Z axis the greater number means higher compensation from Z axis Sharpness Enabling shar...

Страница 11: ...our 3D image mii Thickness um Thickness per layer Curing Time s The amount of time for UV curing seconds Speed Peeling speed Gap Adj mm Adjust thickness of the first layer Basic is 0 2mm Base Layers D...

Страница 12: ...t file from Printer O O O Select file from USB on printer O O O 3 Print and inspect Delete file in Printer Delete file in USB on printer Save to Printer Save to USB on printer Printer s memory capacit...

Страница 13: ...rifying Correct Module Behavior Z Motor Up The Z platform moves upwards Down The Z platform moves downwards Stop The movement stops Cartridge Up The cartridge moves upwards Down The cartridge moves do...

Страница 14: ...HCP network and would like to speed up the printer connection First use manual IP function to set a static IP address on printer Second set the same static IP address on your computer Trouble shooting...

Страница 15: ...se tray to cover the resin tank to prevent solidify 4 2 Cleaning the Picker Use putty knife or similar object to scrape away the excess printed model on the picker If any greasy residue persists use a...

Страница 16: ...3D production system Make a better world 16 Appendix 1 Specifications...

Страница 17: ...3D production system Make a better world 17 Appendix 2 Resin curing time...

Страница 18: ...Adj mm Base Layers Base Curing s Buffer Layers BV 012 50u 2 5 Slow 0 1 15 4 BV 005 50u 1 5 Slow 0 1 12 4 BV 005 50u 1 3 Normal 0 1 12 4 BV 005 50u 1 3 Normal 0 1 12 4 BV 002 50u 1 4 Normal 0 3 1 14 3...

Отзывы: