^
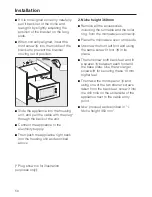
If it is not aligned correctly, carefully
pull it back out of the niche and
realign it by slightly adjusting the
position of the bracket on the long
slots.
^
When correctly aligned, insert the
third screw
a
into the middle of the
bracket to prevent the bracket
moving out of position.
^
Slide the appliance into the housing
unit, and pull the cable with the plug*
through the back of the unit.
^
Connect the appliance to the
electricity supply.
^
Then push the appliance right back
into the housing unit as described
above.
(* Plug shown is for illustration
purposes only).
2. Niche height 360 mm
^
Remove all the accessories,
including the turntable and the roller
ring, from the microwave oven cavity.
^
Place the microwave oven on its side.
^
Unscrew the front left foot and using
the same screw fit foot
b
in its
place.
^
Then unscrew both back feet and fit
a spacer
c
between each foot and
the base plate. Use the two larger
screws
d
for securing these 10 mm
higher feet.
^
Then take the third spacer
c
and
using one of the two shorter screws
taken from the back feet, screw it into
the drill hole on the underside of the
appliance next to the cable entry
point.
^
Now proceed as described in "1.
Niche height 350 mm".
Installation
56
Содержание M 8151
Страница 57: ...57 ...
Страница 58: ...58 ...
Страница 59: ...59 ...
Страница 60: ...Alteration rights reserved 1606 M 8151 M 8161 M Nr 06 542 950 04 gb GB ...


