background image

Interrupting or restarting a
programme

At any time you can . .

. . .

interrupt a programme:

^

Touch

UU UU

or open the appliance door.

The duration stops counting down.

. . .

continue the programme:

^

Close the door and touch "Start".

The programme continues.

Altering settings

If you discover after starting a
programme that . .

. . . the

Microwave power level

is too

high or too low, you can

^

select a new level.

. . . the

duration

set is too short or too

long, you can

^

interrupt the programme (touch

UU UU

),

use the rotary selector to set a new
duration and continue the
programme by touching "Start",

or alternatively:

^

the cooking duration can be
increased by touching "Start" during
operation. Each time "Start" is
touched, the cooking duration is
increased by another minute.
(Exception: the cooking duration is
increased in increments of
30 seconds when the maximum
microwave power level is being
used).

Cancelling a programme

^

Touch

UU UU

or open the appliance door.

The duration stops counting down.

^

Touch

#

.

At the end of a programme

An audible tone will sound when the
cooking programme is complete. The
interior lighting goes out.

The audible tone is repeated several
times. After this, a short reminder tone
sounds at regular intervals for 20
minutes after the end of the
programme. You can deactivate this
function (see "Changing settings").

^

If you want to stop the audible tone,
touch

#

.

Operation

36

Содержание M 6262 TC

Страница 1: ... instructions Microwave oven M 6262 TC To avoid the risk of accidents or damage to the appliance it is essential to read these instructions before it is installed or used for the first time M Nr 09 569 560 en GB ...

Страница 2: ...ic programmes 26 Suitable containers for microwave ovens 27 Material and shape 27 Testing dishes for their suitability 30 The cover 31 Before using for the first time 32 Time of day display 33 Setting the time of day 33 Altering the time of day 33 Time of day display not visible 33 Operation 34 Opening the door 34 Placing the dish in the oven 34 Turntable 34 Closing the door 34 Starting a programm...

Страница 3: ...g 48 Automatic cooking 48 Popcorn Æ 50 Recipes for Automatic programmes 2 51 Saving your favourite programme Memory 58 Changing settings 60 Reheating 63 Cooking 64 Defrosting Defrosting and reheating or cooking 65 Some suggested uses 66 Cleaning and care 67 Oven interior and inside of the door 67 Appliance front 69 Accessories supplied 70 Optional accessory 70 Problem solving guide 71 After sales ...

Страница 4: ...Oven interior and accessories aControl panel bGrill cTurntable dAppliance door eGrilling rack fGourmet plate gCover hBoiling rod Guide to the appliance 4 ...

Страница 5: ... in the ß position by pushing in lElectronic timer and clock display mMemory to save a 1 3 stage programme sequence M nAppliance settings X oTime of day pRotary selector e g to enter time and weight can be turned clockwise and anti clockwise and can be retracted by pushing in qMinute minder N rStop UU UU sStart Add a minute Quick start programmable c tBack for cancelling last input uOK Guide to th...

Страница 6: ...e It prevents the food from drying out and the oven from becoming dirty and it accelerates the heating process Boiling rod When heating liquids the boiling rod provided should always be placed in the container It helps liquids to heat evenly Optional accessory Glass tray The glass tray is suitable for use with all cooking functions It is heat resistant and microwave safe When grilling directly on ...

Страница 7: ...ing of your old appliance Electrical and electronic appliances often contain valuable materials They also contain materials which if handled or disposed of incorrectly could be potentially hazardous to human health and to the environment They are however essential for the correct functioning of your appliance Please do not therefore dispose of it with your household waste Please dispose of it at y...

Страница 8: ...se and maintenance Miele cannot be held liable for damage caused by non compliance with these Warning and Safety instructions Keep these instructions in a safe place and ensure that new users are familiar with the content Pass them on to any future owner Correct application The appliance is intended for use in domestic households and similar working and residential environments This appliance is n...

Страница 9: ...d whilst using it or have been shown how to use it in a safe way and recognise and understand the consequences of incorrect operation Safety with children Children under 8 years of age must be kept away from the appliance unless they are constantly supervised Children 8 years and older may only use the appliance unsupervised if they have been shown how to use it in a safe way and recognise and und...

Страница 10: ...Children s skin is far more sensitive to high temperatures than that of adults When grilling with or without the microwave function the oven interior the grill element and the oven door get hot Great care should be taken to ensure that children do not touch the appliance when it is in use Danger of injury The door can support a maximum load of 8 kg Children could injure themselves on the open door...

Страница 11: ...rom danger Operating a damaged appliance can result in microwave leakage and present a hazard to the user Do not use the appliance if the door is warped the door hinges are loose holes or cracks are visible in the casing the door or the oven interior walls Tampering with electrical connections or components and mechanical parts is highly dangerous to the user and can cause operational faults Do no...

Страница 12: ...d do not guarantee the required safety of the appliance The electrical safety of this appliance can only be guaranteed when correctly earthed It is essential that this standard safety requirement is met If in any doubt please have the electrical installation tested by a qualified electrician For safety reasons this appliance may only be used when it has been built in Repairs and other work by unqu...

Страница 13: ...ed Faulty components must only be replaced by genuine Miele original spare parts If the appliance is installed behind a kitchen furniture door it may only be used with the furniture door open Do not close the furniture door while the appliance is in use Heat and moisture can build up behind the furniture door which can cause damage to the appliance and the furniture unit Only close the door when t...

Страница 14: ...ges to the recipe and the shape and size of the cooking container Some foods may contain micro organisms which are only destroyed by thorough cooking Therefore when cooking or reheating foods e g poultry it is particularly important that food is fully cooked through at temperatures over 70 C for more than 10 minutes If in doubt select a longer cooking or reheating time It is important that the hea...

Страница 15: ...owave oven as these could catch fire Do not use the microwave function to heat up cushions or pads filled with cherry kernels wheat grains lavender or gel such as those used in aromatherapy These pads can ignite when heated even after they have been removed from the microwave oven The microwave oven is not suitable for cleaning or disinfecting items Items can get extremely hot and there is a dange...

Страница 16: ...d in the food itself and that the container will normally be cooler The dish is only warmed by the heat of the food Before serving remember to allow a sufficient standing time and then always check the temperature of the food after taking it out of the microwave oven The temperature of the container is not an indication of the temperature of the food or liquid in it This is particularly important ...

Страница 17: ... reached without the production of typical bubbles The liquid does not boil evenly throughout This so called boiling delay can cause a sudden build up of bubbles when the container is removed from the microwave oven or shaken which can lead to the liquid boiling over suddenly and explosively Danger of injury and damage The formation of bubbles can be so strong that the pressure forces the microwav...

Страница 18: ... fry food If oil or fat does catch fire do not attempt to put out the flames with water Disconnect the appliance from the mains electricity supply and leave the door closed to smother the flames Due to the high temperatures radiated objects left near the microwave oven when it is in use could catch fire Do not use the appliance to heat up the room If using alcohol in your recipes please be aware t...

Страница 19: ...void the interior walls being splashed with food or liquids containing salt If it does happen wipe these away thoroughly to avoid corrosion on the stainless steel surface The oven interior can get hot during use Danger of burning Clean the appliance interior and accessories as soon as they have cooled down Waiting too long can make cleaning unnecessarily difficult and in extreme cases impossible I...

Страница 20: ...r covered wire ties Do not use bowls with milled rims or plastic pots with the foil lid only partially removed see Suitable containers for microwave ovens Such items could be damaged or cause a fire hazard Do not leave the microwave oven unattended when reheating or cooking food in disposable containers made of plastic paper or other inflammable materials Before using single use containers make su...

Страница 21: ...first The pressure could otherwise cause the egg yolk to explode Eggs can only be cooked in their shells in the microwave oven in a specially designed egg boiling device available from specialist shops Hard boiled eggs should not be reheated in the microwave oven as this may lead to the eggs bursting even after they have been taken out of the appliance Food with a thick skin or peel such as tomato...

Страница 22: ...use to measure the temperature of the food Do not use a thermometer containing mercury or liquid as these are not suitable for use with high temperatures and break very easily Do not use a steam cleaning appliance to clean the microwave oven Steam could reach electrical components and cause a short circuit Stainless steel surfaces Adhesives will damage the stainless steel surface and cause it to l...

Страница 23: ...ave function They must not however be used at the same time as this would damage the gourmet plate Always place the gourmet plate directly on the turntable The gourmet plate gets extremely hot when in use Always use oven gloves when handling it to avoid burns Place the hot gourmet plate on a suitable heat resistant mat or pot rest The rack gets hot during grilling with and without the microwave fu...

Страница 24: ... hot glass tray or any other hot cooking containers on a cold surface such as a tiled or granite worktop The glass tray or container could crack or shatter Use a suitable heat resistant mat or pot rest Warning and Safety instructions 24 ...

Страница 25: ... their way directly into the food All food contains moisture molecules which when subjected to microwave energy start to oscillate 2 5 thousand million times a second The friction caused by this vibration creates heat which first starts developing around the outside of the food and then slowly penetrates towards the centre The moisture fat and sugar content of food will affect the speed at which i...

Страница 26: ...lling Ideal for grilling very thin cuts of meat e g steak or sausages Combination mode Microwave Grill Ideal for browning dishes with toppings The microwave cooks the food and the grill browns it Automatic programmes You can choose from the following Automatic programmes nine defrosting programmes Ad 1 to Ad 9 Four cooking programmes for frozen food 2 Ac 1 to Ac 4 and ten cooking programmes for fr...

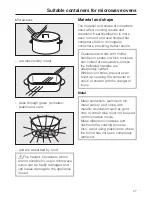
Страница 27: ...lar containers providing better results Containers and lids with hollow handles or knobs in which moisture can collect are unsuitable unless the hollowed handles are adequately vented Without vent holes pressure can build up causing the container to crack or shatter with the danger of injury Metal Metal containers aluminium foil metal cutlery and china with metallic decoration such as gold rims or...

Страница 28: ... the aluminium foil is at least 2 cm from the oven walls at all times It must not touch the walls Metal meat skewers or clamps These should only be used if they are very small in comparison to the size of the cut of meat Glassware Heat resistant glass or ceramic glass are ideal for use in the microwave oven Crystal glass is unsuitable as it contains lead which could cause the glass to crack in the...

Страница 29: ... be pierced beforehand so that steam can escape This prevents a build up of pressure and reduces the risk of the bag bursting There are also special steaming bags available which do not need to be pierced Please follow instructions given on the packet Do not use metal clips plastic clips containing metal parts or paper ties containing wire There is a danger that they will ignite when heated Dispos...

Страница 30: ... Touch Start At the end of the test the water in the glass should be warm and the dish cool If the dish is hot it would be unwise to use the dish If a cracking noise is heard accompanied by sparks during the test switch the appliance off immediately by touching the On Off sensor Any crockery which causes this reaction is unsuitable for use with microwave power If any doubt exists about the suitabi...

Страница 31: ...nd teat must be loosened Otherwise pressure builds up and can cause the bottle or container to explode Do not use a lid or cover if food coated with breadcrumbs is being cooked cooking meals which are to be given a crisp finish the gourmet plate is being used The cover must only be used with Microwave Solo mode Because the cover can only withstand temperatures of up to 110 C it must only be used i...

Страница 32: ...emove the cover to the microwave outlet inside the oven Check the appliance for any damage Do not use the microwave oven if the door is warped the door hinges are loose holes or cracks are visible in the casing the door or the oven interior walls Operating the appliance with this type of damage will result in microwave leakage and present a hazard to the user Clean the inside of the oven and all t...

Страница 33: ...r format see Changing settings Altering the time of day Touch the sensor The symbol flashes in the display for a few seconds While the symbol is flashing use the time selector to alter the time of day Touch the OK sensor or to confirm otherwise the time will revert to the original time Time of day display not visible If the appliance is not used for approx 10 minutes the time of day display switch...

Страница 34: ...turning automatically when the appliance is operated Do not cook reheat or defrost food directly on the turntable Check that the dish is not larger in size than the turntable Stir the food during the cooking time or turn the dish so that it heats up evenly Closing the door Close the door and touch Start again to resume an interrupted cooking programme Starting a programme Use the appropriate selec...

Страница 35: ...e quickly than stored vegetables the frequency of stirring or turning the food Frequent stirring or turning heats the food more evenly and it is therefore ready in a shorter time the amount of food As a general rule allow approx time and a half for double the quantity and for a smaller quantity possibly shorten the duration However always ensure that food is cooked thoroughly as the duration requi...

Страница 36: ...ely the cooking duration can be increased by touching Start during operation Each time Start is touched the cooking duration is increased by another minute Exception the cooking duration is increased in increments of 30 seconds when the maximum microwave power level is being used Cancelling a programme Touch UU UU or open the appliance door The duration stops counting down Touch At the end of a pr...

Страница 37: ...n maximum power Three set durations are stored in the memory 30 secs Touch Start c once 1 min Touch Start c twice 2 min Touch Start c three times Touching Start c four times in succession will bring back the first stored duration and so on The cooking duration can be increased by touching Start during operation each time the Start is touched the cooking duration is increased by another 30 seconds ...

Страница 38: ... appears in the display S I lights up in the display 0 flashes Confirm with OK X and S I light up in the display 0 flashes After a few seconds the display changes to the time of day and the 0 symbol Almost all functions are now locked Only the minute minder can be used when the system lock is activated see Minute minder After an interruption to the power supply the system lock will need to be re a...

Страница 39: ...ute minder entry Touch UU UU The current minute minder time is stopped Alter the minute minder time with the time selector Touch Start c to continue Minute minder cooking function The minute minder can be used at the same time as a cooking function and counts down in the background Touch the N sensor whilst the cooking function is in progress 00 00 flashes in the display and the N symbol lights up...

Страница 40: ...y available from Miele as an optional extra is ideal for this The gourmet plate supplied is not suitable for catching fat as it could overheat when empty resulting in damage to the coating of the plate Place the food in a suitable dish Place the rack and a heat resistant microwave safe container or the glass tray or the container with the food to be cooked on the turntable Caution The rack and gla...

Страница 41: ...l browns it The grill can be combined with one of three different microwave power levels 150 300 and 450 W It is possible during the cooking process to switch between these three power levels without interrupting the programme Use the programme selector to select the required combination v w or x h the microwave power level and the grill symbol Y will light up in the display and 00 00 flashes Sele...

Страница 42: ...at and catch fire Fire hazard When using the gourmet plate make sure that the food is ready to transfer to the gourmet plate as soon as it has heated up Place the gourmet plate directly on the turntable Do not place it on the rack Make sure there is a gap of approx 2 cm between the gourmet plate and the interior walls of the microwave oven otherwise sparking could occur and damage the gourmet plat...

Страница 43: ... on topping Recipes Croque monsieur Serves 3 6 slices of bread 30 g soft butter 75 g grated Emmental cheese 3 slices of cooked ham Butter the bread Add the cheese to three of the bread slices in equal amounts and arrange a slice of ham on top of each Place the remaining three slices of bread on top of the ham with the buttered side face down Pre heat the gourmet plate for 5 minutes at 450 W Grill ...

Страница 44: ...rips diced tomato and seasoning Mix well Cook for 6 minutes at 450 W Grill Turn out and sprinkle with Parmesan cheese before serving Home made potato rösti Serves 2 400 g peeled potatoes 2 small onions 50 g grated Emmental cheese Salt pepper 20 g butter Coarsely grate the potato and onion and mix together with the cheese salt and pepper Place the gourmet plate on the turntable and pre heat for app...

Страница 45: ...l white wine 125 ml double cream 2 tbsp roux made from 1 tbsp each of flour and melted butter and 150 g Roquefort cheese Stir the sauce until smooth and cook for a further 3 minutes Curried chicken Serves 3 600 g chicken or turkey breasts 2 tbsp oil 2 tbsp white wine 2 tbsp apple juice 1 tbsp lemon juice Salt freshly ground black pepper 1 tsp curry powder A pinch of finely chopped rosemary A pinch...

Страница 46: ...utes Place the gourmet plate on the turntable and pre heat for approx 5 minutes at 450 W Grill Remove from the oven pat the fish dry with kitchen paper and place on the gourmet plate Place the gourmet plate back on the turntable and cook for approx 11 2 2 minutes per side at 450 W Grill Serve with rice hollandaise sauce or melted butter and a fresh green salad Gourmet plate 46 ...

Страница 47: ... 8 slices Quick almond tart For the base 100 g plain flour 1 2 level tsp baking powder 75 g butter or margarine 30 g sugar Filling 75 g butter 100 g chopped almonds Few drops of almond essence 30 g sugar 1 2 packet vanilla sugar 75 ml double cream To spread over the top 50 g apricot jam Mix together the flour baking powder butter and sugar and knead to a smooth dough Roll out the mixture into the ...

Страница 48: ...0 15 1 5 kg Ad 8 Cakes 0 1 1 4 kg Ad 9 Bread 0 1 1 5 kg This programme is particularly suitable for defrosting sliced bread If possible place individual slices of bread in the microwave oven or carefully separate them from one another at the halfway signal Automatic cooking There are four programmes for frozen food and ten programmes for fresh food The standing time for each programme is approx 2 ...

Страница 49: ...m weight for the selected automatic programme also continues to show in the display Use the rotary selector to alter the weight Touch OK The duration corresponding to the weight set appears in the display and the Start symbol flashes Touch Start The duration which depends on the weight will begin to count down and the symbols for the functions that are currently in use will light up h and or n as ...

Страница 50: ...he instructions on the packaging and touch Æ The programme will start after a short time It will start immediately if you touch Start You will soon hear popping Stop the programme before the end if the popping noises become infrequent Follow the instructions on the packaging The duration for this programme can be altered within a certain interval see Changing settings The duration cannot however b...

Страница 51: ...ill sound to prompt you to turn or stir the food When cooking vegetables in a sauce the weight entered must include the sauce Do not exceed the maximum weight guidelines Carrots in a chervil cream sauce serves 2 350 g carrots washed and peeled 5 g butter 50 ml vegetable stock instant 75 g crème fraîche 1 tbsp white wine Salt and pepper A pinch of sugar tsp mustard 1 2 tbsp fresh chervil chopped or...

Страница 52: ...urried potatoes serves 3 500 g peeled potatoes 1 onion finely diced 10 g butter 1 2 tbsp curry powder 250 ml vegetable stock instant 50 ml double cream 125 g peas frozen Salt and pepper Cut the potatoes into large cubes approx 3 x 3 cm or use small potatoes Place all of the ingredients into a suitable container and mix well Cover and cook Stir halfway through the cooking duration Setting Cooking f...

Страница 53: ...ted Season generously with salt pepper and grated nutmeg and stir in the parsley Pour the sauce over the vegetables sprinkle with Cheddar and bake uncovered Setting Cooking fresh food Ac 8 Weight 1500 g Place cooking container on the turntable Potato cheese gratin serves 4 500 g potatoes peeled 250 ml double cream 125 g crème fraîche 150 g Cheddar grated 1 clove of garlic Salt black pepper nutmeg ...

Страница 54: ... container on the turntable Chicken kebabs makes 8 kebabs 4 chicken breasts each approx 120 g 4 pineapple slices tinned 16 apricot halves tinned For the marinade 4 tbsp vegetable oil 4 tbsp sesame oil Salt and pepper tsp paprika tsp curry powder A little chilli powder Optional ground ginger or ground coriander 8 wooden kebab skewers Cut each chicken breast into 4 pieces Cut the pineapple slices in...

Страница 55: ...n grilling chicken sprinkle with a mixture of paprika and curry powder The spices will give the skin an appetising golden colour as well as enhancing the flavour Ac 12 Ä Fish fillet in sauce Fish curry Serves 4 300 g pineapple pieces 1 red pepper 1 small banana 500 g rosefish 3 tbsp lemon juice 30 g butter 100 ml white wine 100 ml pineapple juice Salt pepper and chilli pepper 2 tbsp cornflour Dice...

Страница 56: ...d dill Spread over the fish Bake until golden Setting Cooking fresh food Ac 13 Å Weight approx 600 g Place cooking container on the turntable Rosefish and tomato gratin serves 4 500 g rosefish fillet 2 tbsp lemon juice 500 g tomatoes Herb salt 2 tsp oregano finely chopped 150 g Cheddar cheese grated Cut the rosefish into pieces drizzle with lemon juice and leave to stand for approx 10 minutes Dice...

Страница 57: ...ut season inside and out and fill with herbs Place the trout on the lightly oiled rack brush with softened butter and put the rack on a heat resistant microwave safe container and place in the microwave oven Setting Cooking fresh food Ac 14 Weight approx 1000 g Place cooking container on the turntable Recipes for Automatic programmes 2 57 ...

Страница 58: ...ow select the third function and duration and then touch OK When you have finished programming turn the function selector to the 12 o clock position You can then scroll through your entries and check them using the rotary selector Start the programme to save the entry Only ever run the entire programme with food in the appliance If there is no food in the appliance touch UU UU as soon as you have ...

Страница 59: ...the favourite programme is no longer saved and must be re entered Changing an entry Entering a new programme overrides the previously saved programme Turn the function selector to the 12 o clock position Touch M The first step appears in the display Touch OK to alter the first step 1 will flash in the display Enter the new programme sequence as described above Saving your favourite programme Memor...

Страница 60: ...call up the setting The currently valid status appears in the display e g S 1 etc Turn the rotary selector if you wish to change the status see chart and confirm your entry by touching OK for P 8 and P 0 touch OK for approx 4 seconds The change is then stored in memory P will appear in the display again together with the number for the setting The other settings can be changed in the same way Touc...

Страница 61: ...h 12 h 24 hour clock display 12 hour clock display P 5 Reminder tone S 0 S I The reminder tone is switched off The reminder tone sounds briefly every 5 minutes for 20 minutes after the end of the programme P 6 Unit of weight S I S 2 Food weight is displayed in grammes g Food weight is displayed in pounds lb P 7 Display brightness S I to S 7 S 4 Different levels of brightness can be set The brightn...

Страница 62: ... Start is then blocked as it is assumed that there is no food in the microwave oven P II Popcorn 03 10 03 20 03 30 03 40 04 20 The maximum duration for this programme can be altered between these values P 0 Factory default S O S I Factory default settings have been changed Factory default settings have been restored or have not been changed Changing settings 62 ...

Страница 63: ...n a microwave oven even without the shell The eggs can burst Food taken straight from the refrigerator will take longer to reheat than food stored at room temperature The duration required depends on the nature of the food its initial temperature and the amount to be cooked Always ensure that food is sufficiently cooked or reheated If in any doubt that a sufficiently high temperature has been reac...

Страница 64: ... an appropriate length of time Foods with a thick skin or peel such as tomatoes sausages jacket potatoes and aubergines should be pierced or the skin cut in several places before cooking to allow steam to escape and to prevent the food from bursting Eggs can only be cooked in their shells in the microwave oven in a specially designed egg boiling device available from specialist shops Eggs can burs...

Страница 65: ...ng poultry Do not use the liquid from the defrosted poultry Pour it away and wash the tray the sink and your hands Danger of salmonella poisoning Fish does not need to be fully defrosted before cooking Defrost so that the surface is sufficiently thawed to take herbs and seasoning Defrosting followed by reheating or cooking Deep frozen food can be defrosted and immediately reheated or cooked After ...

Страница 66: ...tle heat Tempering citrus fruits 150 g 150 1 2 Place on a plate do not cover Bacon 100 g 900 2 2 30 Place on kitchen paper do not cover Softening ice cream 500 g 150 1 3 Place open ice cream container in microwave oven Skinning tomatoes 3 tomatoes 450 6 7 Cut a cross shape into the top of each tomato cover and heat in a little water The skins will slip off easily Take care as the tomatoes may get ...

Страница 67: ...nd door interior can be cleaned using a damp cloth with a little washing up liquid or a mild detergent and water Wipe dry with a soft cloth For more heavy soiling heat a glass of water for 2 to 3 minutes until the water begins to boil The steam will collect on the walls and soften the soiling The oven interior can now be wiped clean using a little washing up liquid if necessary Do not remove the c...

Страница 68: ... by a Miele authorised and trained service technician To clean the interior Remove the turntable and wash in the dishwasher or by hand Always keep the carrier underneath it clean as well as the oven floor to enable the turntable to turn smoothly Clean the area between the turntable and the carrier Do not turn the turntable and or locator manually as this could damage the drive motor Cleaning and c...

Страница 69: ...faces are susceptible to scratching Scratches on glass surfaces could even cause a breakage in certain circumstances Contact with unsuitable cleaning agents can alter or discolour the surfaces To avoid damaging the surfaces of your appliance do not use cleaning agents containing soda ammonia acids or chlorides cleaning agents containing descaling agents abrasive cleaning agents e g powder cleaners...

Страница 70: ...e gourmet plate is not suitable for cleaning in a dishwasher If the gourmet plate has been used to prepare foods with a strong aroma you can neutralise any odours by adding some water and lemon juice to the gourmet plate and heating in the microwave oven at maximum power for a few minutes Rinse the gourmet plate afterwards with clean water Rack Wash and dry the rack after each use It is dishwasher...

Страница 71: ...iance disconnect the appliance from the mains supply and contact a qualified electrician or the Miele Service Department see After sales service a noise can be heard after a cooking programme This is not a fault The cooling fan will continue to run for a while after the oven has been switched off to dispel any moisture from the oven and prevent it settling on the control panel or surrounding furni...

Страница 72: ...have reached the centre of the food so it is hot on the outside but cold in the centre During standing time heat is transferred to the centre of the food This may leave the food warm in the middle but cool on the outside When reheating food with different densities such as plated meals it is therefore sensible to select a lower power level and lengthen the duration required the microwave oven swit...

Страница 73: ...iance These are to be found on the data plate inside the front of the appliance N B A call out charge will be applied for service visits where the problem could have been resolved as described in these instructions Guarantee For information on the appliance guarantee specific to your country please contact Miele See back cover for contact details In the UK your appliance is guaranteed for two year...

Страница 74: ...switch fuses and relays acc to EN 60335 If the switch is not accessible after installation depending on country an additional means of disconnection must be provided for all poles For extra safety it is advisable to protect the appliance with a residual current device Please contact a qualified electrician for advice WARNING THIS APPLIANCE MUST BE EARTHED Non rewireable plugs BS 1363 The fuse cove...

Страница 75: ...on a surge in power could trigger the safety cut out mechanism This could damage the electronic unit The appliance must not be used with so called energy saving devices These reduce the energy supply to the appliance which could then become too warm Using such devices could alter the specification of the product Electrical connection 75 ...

Страница 76: ...ntilation at the front of the appliance Do not block the ventilation gaps with any objects Do not lift the microwave oven by the door handle as this could cause damage to the door Use the inset handles in the side of the casing Building in dimensions Installation 76 ...

Страница 77: ... it poses an electric shock hazard Push the microwave oven into the niche and pull the cable with the plug through the back of the unit Align the appliance Open the oven door and using the screws supplied secure the oven to the side walls of the furniture unit Installation 77 ...

Страница 78: ...78 ...

Страница 79: ...79 ...

Страница 80: ...Alteration rights reserved 0813 M 6262 TC M Nr 09 569 560 02 ...

Отзывы: