background image

Before building the appliance in, you
will need to decide on which side the
door is to be hinged. If left hand door
hinging is required, follow the
instructions below.

To change the door hinging, you will
need various sizes of

Torx

screwdrivers

and a

slotted

screwdriver.

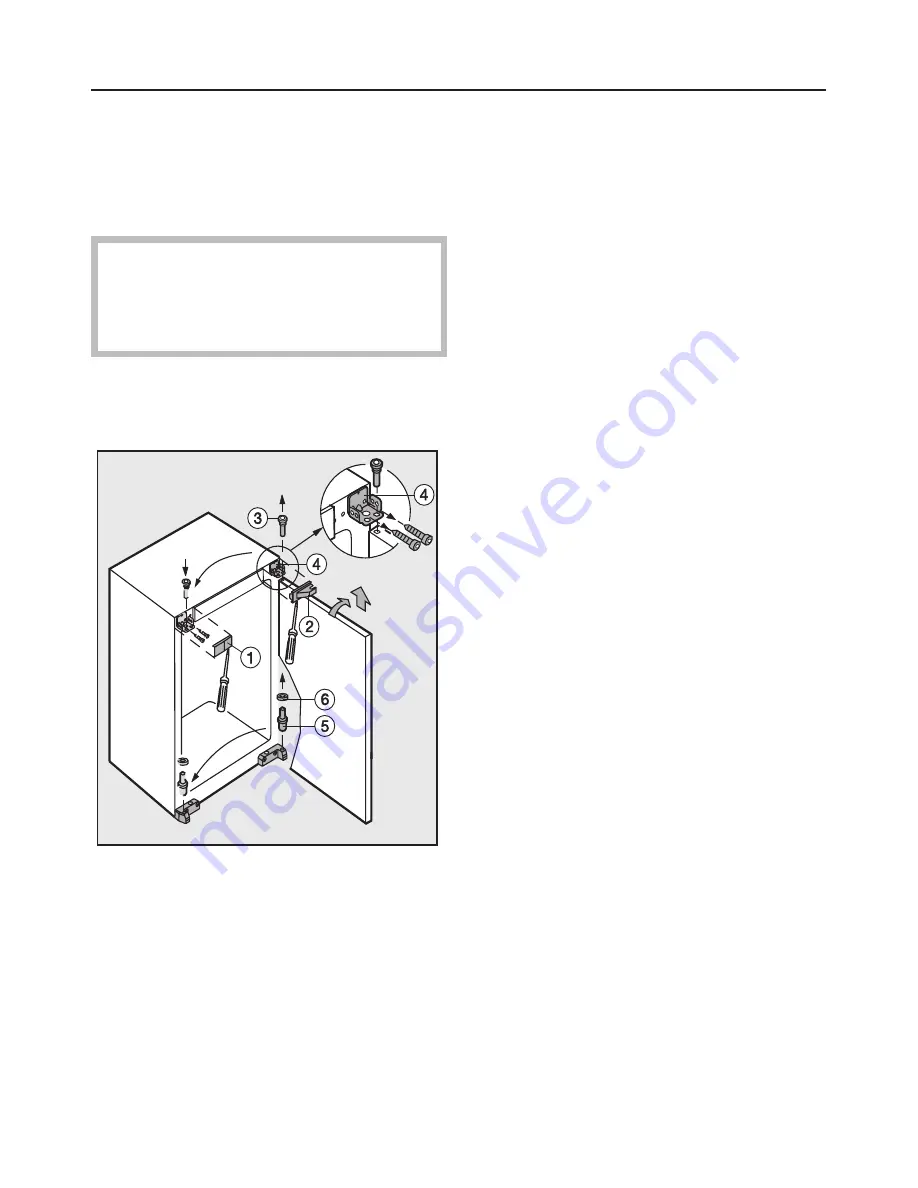
Appliance door

^

Open the appliance door.

^

Pull off covers

a

and

b

.

^

Unscrew hinge pin

c

.

^

Tilt the door, and lift it off.

^

Unscrew hinge plate

d

, and replace

it on the opposite side using the
same screws.

^

Remove lower hinge pin

e

together

with washer

f

, and replace these on

the opposite side.

^

Replace the appliance door on lower
hinge pin

e

.

^

Insert upper hinge pin

c

into the

outer

hole in hinge plate

d

, and

screw securely into the top of the
door.

^

Replace covers

a

and

b

on the

opposite side, turning them by 180 °.

Changing the door hinging

34

Содержание F 9212 I

Страница 1: ...d installation instructions Freezer F 9212 i To avoid the risk of accidents or damage to the appliance it is essential to read these instructions before it is installed and used for the first time G M Nr 07 021 360 ...

Страница 2: ...Super freeze 16 Freezing and storing food 17 Maximum freezing capacity 17 Freezing fresh food 17 Storing frozen food 17 Home freezing 18 Hints on home freezing 18 Packing 18 Before placing food in the freezer 19 Placing food in the freezer 19 Freezing large items 19 Defrosting 19 Ice cubes 20 Cooling drinks 20 Freezer tray 20 Cool pack 21 Defrosting the appliance 22 Cleaning and care 24 Cleaning t...

Страница 3: ...Installation 31 Location 31 Climate range 31 Ventilation 31 Before installation 32 Building in dimensions 33 Changing the door hinging 34 Appliance door 34 Building in the appliance 35 Building into a peninsular run 35 Contents ...

Страница 4: ...aAlarm off button and indicator light bTemperature display aFreezer drawers cSuper freeze button and indicator light dOn Off and temperature selector dial Guide to the appliance 4 ...

Страница 5: ... The plug must be rendered useless and the cable cut off directly behind the appliance to prevent misuse See the Warning and Safety section of this booklet for further details Electrical and electronic appliances often contain materials which if handled or disposed of incorrectly could be potentially hazardous to human health and to the environment They are however essential for the correct functi...

Страница 6: ...manufacturer and could be dangerous The manufacturer cannot be held liable for damage resulting from incorrect or improper use or operation This appliance is not intended for use by persons including children with reduced physical sensory or mental capabilities or lack of experience and knowledge unless they have been given supervision or instruction concerning use of the appliance by a person res...

Страница 7: ...the room it should be installed in In the event of a leakage if the appliance is in a small room there is the danger of combustible gases building up For every 8 g of coolant at least 1 m3 of room space is required The amount of coolant in the appliance is stated on the data plate inside the appliance Before connecting the appliance to the mains supply make sure that the rating on the data plate c...

Страница 8: ...ds do not guarantee the required safety of the appliance e g danger of overheating In countries where there are areas which may be subject to infestation by cockroaches or other vermin pay particular attention to keeping the appliance and its surroundings in a clean condition at all times Any damage which may be caused by cockroaches or other vermin will not be covered by the guarantee Correct use...

Страница 9: ...se can damage the plastic parts Do not use defrosting sprays or de icers as they might contain substances which could damage the plastic parts or which could cause a build up of gases and pose a danger to health Do not use any oils or grease on the door seal as these will cause the seal to deteriorate and become porous with time Do not block the ventilation gaps in the plinth or the top of the app...

Страница 10: ...he cable directly behind the appliance and render any plug unusable Be careful not to damage any part of the pipework whilst awaiting disposal e g by puncturing the refrigerant channels in the evaporator bending any pipework scratching the surface coating Splashes of refrigerant can damage the eyes The manufacturer cannot be held liable for damage caused by non compliance with these Warning and Sa...

Страница 11: ...r setting is switched off when the ambient temperature is warmer than 16 C Refrigerator section 4 to 5 C PerfectFresh zone just above 0 C Freezer section 18 C Wine storage section 10 to 12 C Use Only open the doors when necessary and for as short a time as possible Frequent opening of the doors for long periods will cause a loss of coldness Store food in an organised way If food is not stored in a...

Страница 12: ... energy consumption Defrosting Defrost the freezer compartment when a layer of ice 0 5 cm thick has built up A layer of ice hinders the cold from reaching the frozen food and causes an increase in energy consumption How to save energy 12 ...

Страница 13: ... inside the appliance allow the appliance to run for a few hours before placing food in it Cool pack Place the cool pack in the top drawer or to save space on the freezer tray The cool pack will be at its most effective after it has been in the freezer for approx 24 hours Switching off Using a coin turn the On Off dial in an anti clockwise direction back to the 0 position All the indicator lights ...

Страница 14: ... fresh food is being frozen at once the higher the ambient temperature surrounding the appliance The appliance is designed for use in specific ambient temperatures climate ranges Do not use in ambient temperatures for which it is not designed Setting the temperature The temperature is set using the temperature dial Using a coin turn the On Off dial in a clockwise direction away from the 0 position...

Страница 15: ... has defrosted or started to defrost check that it is still safe to use and if so use it as quickly as possible Defrosted food may only be re frozen after it has been cooked Activating the alarm system The alarm system is always active It does not have to be switched on manually Switching the alarm off early The alarm will stop and the indicator light will go out when the temperature reaches the c...

Страница 16: ...ht will come on At the same time the coldest temperature will light up in the temperature display The appliance works at full power to lower the temperature in the appliance Switching off Super freeze The Super freeze function will switch off automatically after approx 65 hours The indicator light will go out and the appliance will run at normal power again The required temperature will then light...

Страница 17: ...ime to lose moisture so they shrink less As there is not so much moisture loss it is easier for the food to reabsorb it during the defrosting process and very little water collects around the defrosted food Storing frozen food When buying frozen food to store in your freezer check that the packaging is not damaged the use by date the temperature at which the frozen food is being stored in the shop...

Страница 18: ...lets or rolled meat from freezing together in solid blocks when packed separate with a sheet of plastic freezer film Do not season fresh foods or blanched vegetables before freezing Only season cooked food lightly before freezing but care should be taken as the taste of some spices alters when frozen Do not place hot foods or drinks in the freezer This causes already frozen food to thaw and increa...

Страница 19: ...that food already frozen does not come into contact with fresh food being frozen as this could cause the frozen food to begin to defrost Freezing large items If you wish to freeze large items such as a turkey or game the glass cold plates between the drawers can be removed To do this Remove the freezer drawers and carefully lift and slide out the glass cold plate If required all the drawers and gl...

Страница 20: ...on handle to remove the ice tray from the freezer Ice cubes can be removed easily from the tray by twisting the tray gently or by holding it under cold running water for a short while Cooling drinks When cooling drinks quickly make sure bottles are not left in the freezer for more than one hour as they could burst Freezer tray The freezer tray is useful for freezing small items such as berries and...

Страница 21: ...freezer for approx 24 hours If there is a power cut place the cool pack directly on top of the frozen food in the upper drawer so that the food will be kept cold for as long as possible When placing fresh food in the freezer use the cool pack to separate the fresh food from the food which is already frozen so that the frozen food does not begin to thaw The cool pack can also be used in a cool bag ...

Страница 22: ...eezer is ready for use again Remove all the freezer drawers from the freezer To defrost Carry out the defrosting procedure as quickly as possible if food has not been placed in another freezer The longer the food is left out at room temperature the faster it defrosts Switch the freezer off by turning the On Off dial to the 0 position switch off at the socket and remove the plug Open the freezer do...

Страница 23: ...liance back on Switch on the Super freeze function so that the appliance can cool down quickly The indicator light will come on Once the temperature in the freezer is sufficiently low slide the glass cold plates back into the freezer then replace the food in the freezer drawers and put them back in the freezer The Super freeze function can now be switched off The indicator light will go out Defros...

Страница 24: ...ke any frozen food out of the appliance and store it in a cool place Defrost the freezer Take out any removable parts e g shelves for cleaning Cleaning the interior and accessories Use warm water with a little washing up liquid Wash all accessories and drawers by hand only Do not wash in a dishwasher After cleaning wipe the interior and accessories with a damp cloth and dry with a soft cloth Leave...

Страница 25: ...ator light will come on Once the temperature in the freezer is sufficiently low place the food back in the freezer drawers and put them back in the freezer You can switch the Super freeze function off once the temperature in the freezer has reached a constant temperature of at least 18 C The indicator light will then go out Cleaning and care 25 ...

Страница 26: ...s preventing the door from opening Wait a few minutes and then try again It should now open without force the temperature is too low Turn the temperature dial to a lower setting Super freeze has not yet switched itself off The Super freeze function switches itself off automatically after approx 65 hours the appliance is switching in too frequently and for too long Check whether the ventilation gap...

Страница 27: ...tive Call the Service Department the following messages show in the temperature display F0 to F5 There is a fault Call the Service Department food has frozen together Use a blunt instrument e g a spoon handle or plastic scraper to prise it apart carefully there is a thick layer of ice in the freezer section Check whether the door closes properly Defrost and then clean the freezer Too thick a layer...

Страница 28: ...ise of the compressor and the coolant circulating in the system is unavoidable Noises that you can easily rectify What causes them and what can you do about them Rattling vibrating The appliance is uneven Realign the appliance using a spirit level by raising or lowering the screw feet underneath the appliance The appliance is touching another appliance or piece of furniture Move it away Drawers ba...

Страница 29: ...ler or the Miele Service Department see back cover for address When contacting your Dealer or the Service Department please quote the model and serial number of your appliance This information is given on the data plate Please note that telephone calls may be monitored and recorded for training purposes After sales service 29 ...

Страница 30: ...electricity supply by an extension lead Extension leads do not guarantee the required safety of the appliance e g danger of overheating The appliance must not be connected to an inverter and must not be used with a plug adapter as these can cause damage to the appliance s electronic unit Non rewireable plugs BS 1363 The fuse cover must be re fitted when changing the fuse and if the fuse cover is l...

Страница 31: ...tated on the data plate inside the appliance Climate range Ambient room temperature SN N ST T up to 32 C up to 38 C up to 43 C The appliance will function perfectly down to an ambient temperature of 5 C Ventilation Air at the back of the appliance gets warm The appliance housing unit must be constructed to allow sufficient space for ventilation A ventilation gap of at least 38 mm depth must be all...

Страница 32: ...wall of the appliance On no account should the spacers be removed from the back of the appliance These ensure the gap required between the back of the appliance and the wall is maintained Remove any cable clips from the rear of the appliance Check that all parts at the back of the appliance are unhindered Carefully remove any hindrance Installation 32 ...

Страница 33: ...Niche height mm A F 9212 i 874 890 Building in dimensions 33 200 cm2 A 2100 200 cm 2 38 560 568 550 mm ...

Страница 34: ...ance door Pull off covers a and b Unscrew hinge pin c Tilt the door and lift it off Unscrew hinge plate d and replace it on the opposite side using the same screws Remove lower hinge pin e together with washer f and replace these on the opposite side Replace the appliance door on lower hinge pin e Insert upper hinge pin c into the outer hole in hinge plate d and screw securely into the top of the ...

Страница 35: ... unit Before installing the appliance the housing unit must be carefully aligned using a spirit level The housing unit corners must be at right angles as otherwise the appliance furniture door will not align correctly with the 4 corners of the unit Align the furniture door with the hinges Preparing the appliance Slide cover strip a into the holder as shown with the bumps facing downwards The bumps...

Страница 36: ...ont edges of bracket b and hinge plates d and e are flush with the front edge of the housing Align the appliance height from above on both sides using adjusting screw f Plug the gap between the appliance and the furniture wall on the door opening side with sealing strip g Press the sealing strip into the gap starting at the bottom and cut to length so that it fits snugly to the lower edge of brack...

Страница 37: ...toppers l and m Secure door fixings n to the appliance door with screw o 3 9 x 9 5 mm to suit the position of the handle Very large doors will require several door fixings Open the door right out and push fixing guides p into door fixings n Position the furniture door onto the appliance door and secure fixing guides p to the furniture door using screws q 4 x 14 mm Maintain a distance d the thickne...

Страница 38: ...38 ...

Страница 39: ...39 ...

Страница 40: ...Alteration rights reserved 5006 F 9212 i M Nr 07 021 360 00 en GB ...

Отзывы: