background image


10


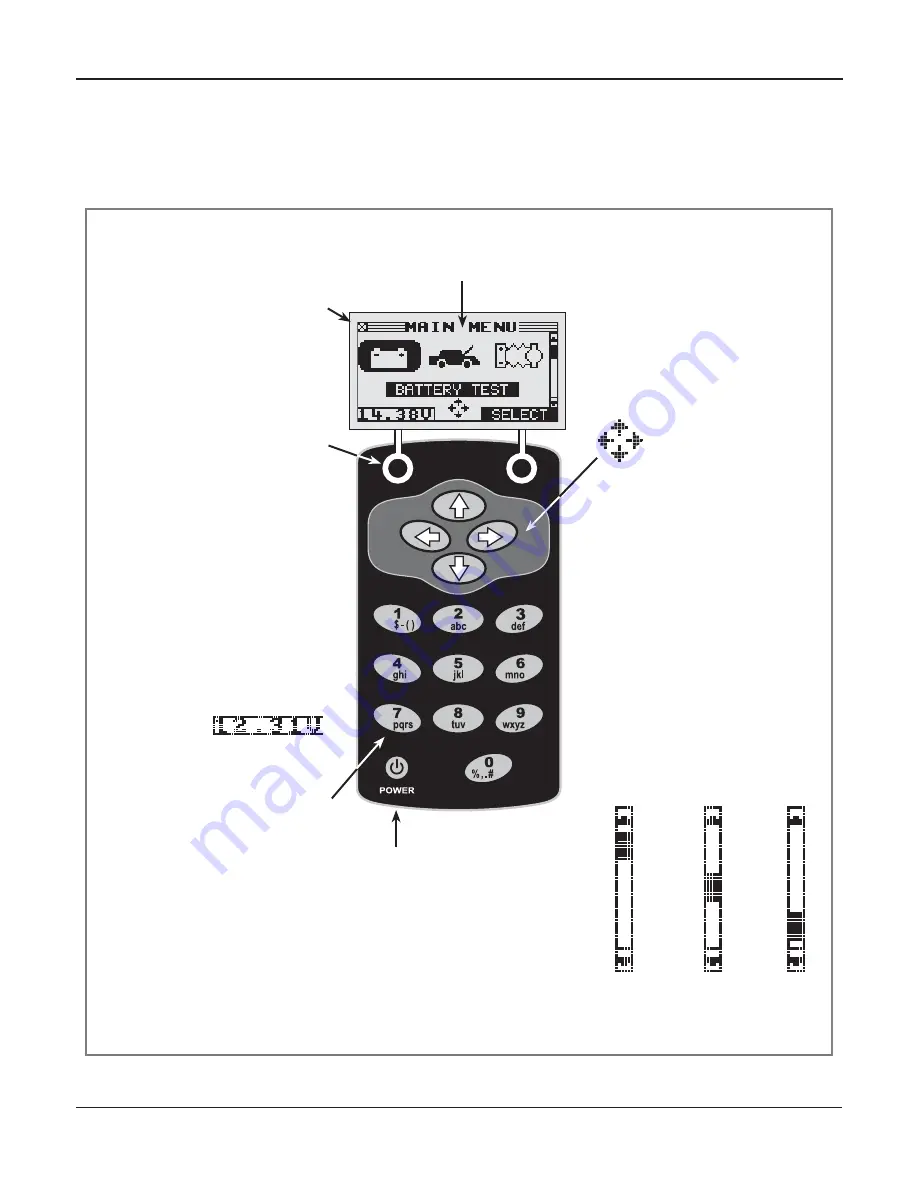
T h e  

I n t e r n a l   B a t t e r i e s

Status  Indicator

, which ap-

pears in the screen’s top 
left corner,


lets you know 

the status and charge 
level of the analyzer’s 6 1.5 V 
batteries. The X shown in the 
fi gure shows that the tester is 
powered by the battery you’re 
testing to conserve the internal 
batteries. 

Press the two 

Soft Keys

 linked 

to the bottom of the screen to 
perform the functions displayed 
above them. The functions 
change depending on the menu 
or test process. So it may be 
helpful to think of the words 
appearing above them as part 
of the keys. Some of the more 
common soft-key functions are 
SELECT, BACK, and END.

When you connect the tester 
to a battery it functions as a 
voltmeter. The 
voltage read-
ing appears above the left soft 
key until you move to other 
menus or functions.

In some cases, you can use 
the 

Alphanumeric Keypad

 to 

enter numerical test parameters 
instead of scrolling to them with 
the 

ARROW 

keys.

You’ll also use the Alphanu-
meric Keys to create and edit 
customer coupons. The keypad 
includes characters for punctua-
tion. To add a space, press the 

RIGHT 

and 

LEFT ARROW

 keys 

simultaneously.

The 

Selection Area 

below the 

Title Bar 

contains items you se-

lect or into which you enter infor-
mation. The area also displays 
instructions and warnings.

The 

Directional Arrows

 on the 

display show you which 

Arrow 

Keys

 to press to move to other 

icons or screens. The Up 

and Down Directional 

Arrows, for example, let 

you know to press the 

UP

 and 

DOWN ARROW 

keys to display the screens that  
are above and below the current 
screen. 

The Left and Right Directional 
Arrows let you know to use the 

LEFT

 or 

RIGHT ARROW 

keys 

to highlight an icon for selection.

Another navigational aid is the 

Scroll Bar

 along the right side 

of the screen. The position of its 
scroll box tells you which menu 
screen you’re viewing.

The 

Title Bar

 shows you the 

name of the current menu, test 
tool, utility, or function.

Press the 

POWER

 button to turn 

the Tester on and off. The Tes-
ter also turns on automatically 
when you connect its test leads 
to a battery.

Whichever way you turn on the 
Tester, it always highlights the 
icon and setting you last used 
for your convenience. 

Top 

or only 

screen

Middle

screen

Last 

screen

Scroll Bar

Scroll

Box

Chapter 2: Description

Display and Keypad

The keypad and display work together to help you quickly fi nd and use the right tools at the right time. 
The display also keeps you on track with on-screen navigation aids, directions and messages. 

Figure 

6

 shows how the elements on the screen relate to the keypad. 

Figure 6: Main Menu and Keypad

Содержание EXP-717

Страница 1: ...Expandable Electrical Diagnostic Platform For testing 12 volt automotive batteries INSTRUCTION MANUAL EXP 717...

Страница 2: ......

Страница 3: ...tors and Data Ports 9 Display and Keypad 10 Data Entry Methods 11 Menu icons 11 Option Buttons 11 Scrolling Lists 11 Alphanumeric Entry 11 Menu Maps 12 Main Menu 12 Print View Menu 13 Info Menu 13 Uti...

Страница 4: ...Select the Temperature not always 18 Before After Charge 19 Deep Scan Test 19 Battery Test Results 20 Chapter 5 QC Test 21 Chapter 6 Utilities 22 Config Tester 22 Display 23 Shop 24 Coupon 25 Edit Co...

Страница 5: ...ew Test 28 View QC Test 28 Chapter 9 Truck info 29 Chapter 10 Troubleshooting 30 The Display Does Not Turn On 30 The STATUS LED Flashes Midtronics Printer 30 Data Will Not Print 30 Chapter 11 Tester I...

Страница 6: ...6 Contents...

Страница 7: ...If battery acid gets on your skin or clothing wash immediately with water and baking soda Always wear proper safety glasses or face shield when working with or around batteries Keep hair hands and cl...

Страница 8: ...ou register it online to activate your warranty Registration will also make it faster and easier for you to obtain technical support and service and order parts and accessories In addition you ll be a...

Страница 9: ...ter IR temperature sensor DB 9 connector for future expandability Accessories port SD card slot for future upgrades There are two IR data ports on the top of the Tester Figure 3 An IR data transmitter...

Страница 10: ...r into which you enter infor mation The area also displays instructions and warnings The Directional Arrows on the display show you which Arrow Keys to press to move to other icons or screens The Up a...

Страница 11: ...preceding the option button To confirm your selection press the appropriate soft key Scrolling Lists Scrolling lists contain items that extend above and below the screen or the selection box that con...

Страница 12: ...or more functions Menu icons are marked here with an asterisk and are mapped on the following pages MAIN MENU Screen 1 MAIN MENU Screen 2 Tests a battery using the battery information you select in a...

Страница 13: ...s the software version total tests from first use and the serial number REPORTS to Main Menu an icon Chapter 2 Description Displays the last Battery and System Test results Sends the results to an opt...

Страница 14: ...a coupon at the bottom of printed test results Sets the language of the display and printouts an icon Utilities Menu The Utilities Menu lets you customize your analyzer to suit your needs to Main Menu...

Страница 15: ...is in the vehicle However if you plan to test out of the vehicle Always disconnect the negative cable from the battery first and reconnect it last Always use a carry tool or strap to lift and transpo...

Страница 16: ...e battery posts This could be because of corrosion on the posts Wiggle the clamps and retest If there is a problem with the cable resistance the same message can appear Contact Midtronics for further...

Страница 17: ...EXT soft key to continue The BACK soft key returns you to the Main Menu at the start of the test and to the previous screen as you progress 2 Select the Ah value Read the value from the battery and co...

Страница 18: ...or probe deeper into the battery s condition The following messages and instructions may appear before the analyzer displays the results of your test Vehicle Type Taxi test The Taxi test is used to pe...

Страница 19: ...In some cases the tester may need to further analyze the battery to determine whether the battery should be replaced or it has a significant chance to be recovered It will then conduct a Deep Scan Te...

Страница 20: ...the battery to rest before retesting Failure to fully charge the battery before retesting may cause false readings If CHARGE RETEST appears again after you fully charge the battery replace the batter...

Страница 21: ...ect the type of battery selection When you select the MANUAL ENTRY you will be asked to enter all relevant battery data When you select PRE SELECTION you can select from a number of batteries that are...

Страница 22: ...etting or BACK to return to the ADJUST screen Mode Use the LEFT RIGHT ARROWS to select the option of your choice You can select the 24 hour or AM PM mode Date Use the arrow keys to select the desired...

Страница 23: ...select your preference 4 Press the SAVE soft key to save your setting or the BACK soft key to return to the CONTRAST LEVEL screen without saving the changes Backlight Time Backlight time is from 0 to...

Страница 24: ...ODE 5 YOUR COUNTRY 6 YOUR PHONE NUMBER 7 WWW WEBSITE COM 8 YOUR SHOP ID NUMBER To create or overwrite a header 1 Press the UP or DOWN ARROW to highlight the line you want to change The cursor will be...

Страница 25: ...with up to 16 characters each The editing process is the same as when you create a header for your test results printouts See the SHOP utility for more information Language The LANGUAGE utility enabl...

Страница 26: ...y Control Test Use this option to ADD BATTERY DELETE BATTERY IMPORT LIST or EXPORT LIST 1 BATTERY LIST 2 IMPORT LIST 3 EXPORT LIST When you use the IMPORT or EXPORT function you can use the SD card to...

Страница 27: ...the starting date 1 TOTAL TESTS 2 TOTALS BY DECISION 3 CLEAR COUNTERS Transfer The TRANSFER utility lets you transfer test data to a PC using an optional IR receiver software package Version info Vers...

Страница 28: ...and System Tests To print the results align the analyzer s IR transmitter with the printer s receiver and select the PRINT soft key To return to the Main Menu press the END key View QC Test VIEW QCTE...

Страница 29: ...e you will not be asked to enter the battery technology When testing in vehicle you will get the question if you are testing a single battery or the complete set of two When you test two batteries it...

Страница 30: ...aper Thermal head too hot Allow head to cool Batteries weak Recharge printer batteries for 16 hours Data Will Not Print If the IR transmitter and receiver are not aligned all the data may not print Th...

Страница 31: ...data transmission and receiving If the printer is not receiving data remove the printer and EXP from direct sunlight If the printed charac ters are not clear or are partially missing recharge the bat...

Страница 32: ...display a warning message when the batteries need replacing Full Powered by test battery Decreasing Low Figure 7 Power Level Indicator for AA Batteries Replacing the Tester Batteries 1 Turn the Teste...

Страница 33: ...gn patents issued and pending This product may utilize technology exclusively licensed to Midtronics Inc by Johnson Controls Inc and or Motorola Inc LIMITED WARRANTY This analyzer is warranted to be f...

Отзывы: