background image

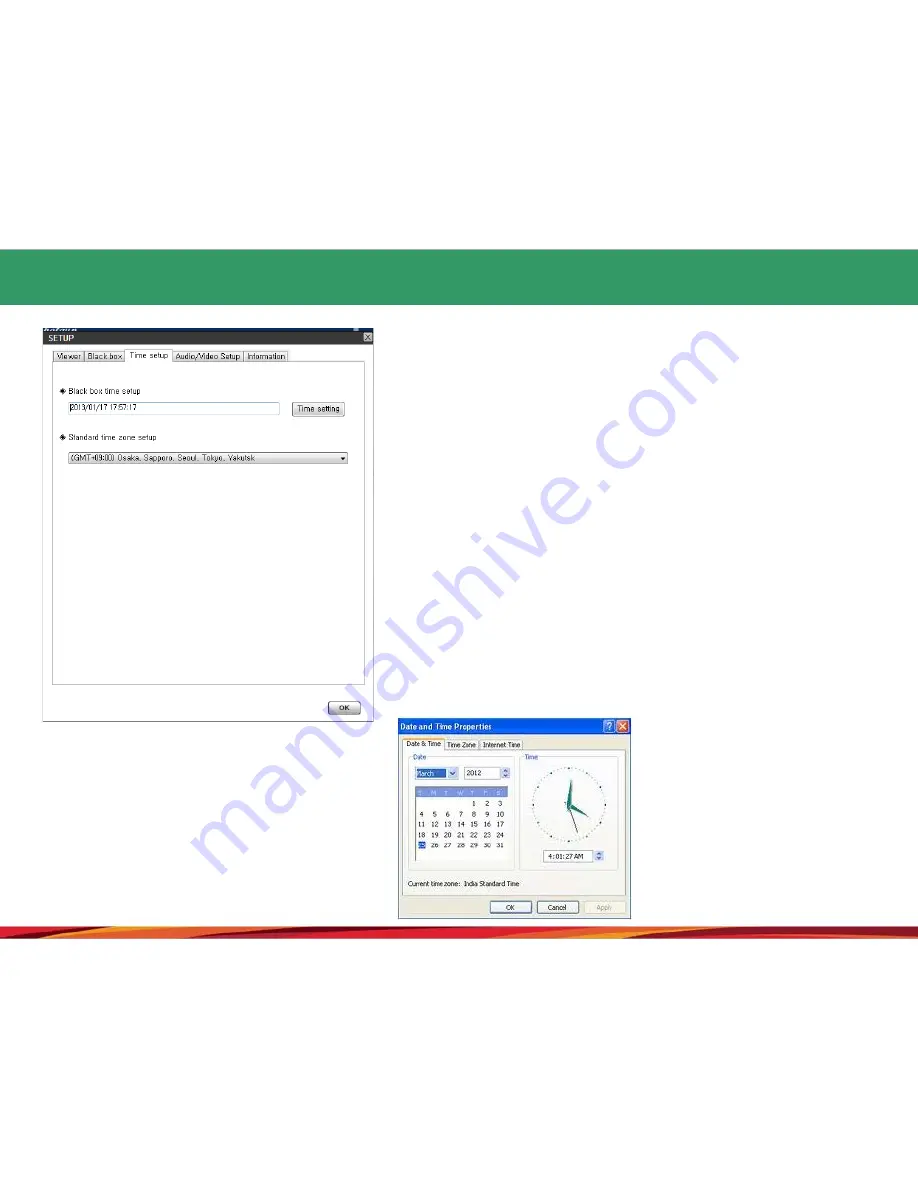
22. Black box environment setting (3) 

1.

It is possible to set the black box time and the standard time by 

selecting the time setting tab.

2.        Black box time setting: if there is no GPS module in the product, 

it is possible to set the time inside the black box system. It is 

required to insert the micro SD card into the black box 

immediately and supply power to it after setting the time in order 

to minimize the difference between the set time and the current 

time.  

3.        Standard time setting: for setting the GMT time for individual 

countries. The default will be set as the time read from the PC 

(Korea standard time — GMT +09:00 Seoul)

4.        Pushing the OK button when completing the selection process 

will complete the environment setting process. 

[Time setting]

Tip: it will help reduce the difference 

between the black box time and the 
current time if the user changes the time 
through the [Date and Time Information] 
menu in a PC and then insert the SD 
card into the black box for the purpose of 
time setting.

34

Содержание URIVE i-Shotgun

Страница 1: ...URIVE i Shotgun User Manual...

Страница 2: ...n screen of the viewer 16 Buttons of the viewer 17 Full screen view 18 Digital zooming 19 Playback of the recorded data 20 Driving record tracking 21 Viewing of the information of the recorded file 22...

Страница 3: ...nishment such as up to five year imprisonment or KRW 50 million penalty according to the software protection law The manual is based on current conditions and may have technical or editorial errors an...

Страница 4: ...it is recommended to use a PC with at least CPU Intel Core2 Quad Q6600 2 40GHz RAM 2GB The product and the user manual can be changed without prior notification for the purpose of improving them The c...

Страница 5: ...owever it is not guaranteed that a whole length of a video related to an accident is to be recorded In case of an accident in which a minor shock occurs the detection sensor will not be activated and...

Страница 6: ...Apply the dual side tape firmly when installing the product Its position can be changed when used for a long period of time or due to the vibration from the vehicle possibly causing the performance t...

Страница 7: ...Continuous recording The product supports a continuous recording function that will record videos taken continuously while driving Event shock recording When an external shock occurs in the continuou...

Страница 8: ...ecific PC viewer The videos stored by the black box after taken through two channels the front and the rear ones can be checked and used to analyze for example the level of shock and the location at t...

Страница 9: ...S socket Power cable socket LED for the mode of monitoring while parked Blue SD card insertion part Manual recording button Power storage state mute and GPS LED red green Full HD camera Audio recordin...

Страница 10: ...blink After the formatting process ends the system will rest art Formatting starts long beep thrice Formatting ends long beep thrice Pushing it long longer than 5 sec onds in the parking mode and rel...

Страница 11: ...he saving process starts Short beep one only when the p rocess ends for the manual recording operation Recording of the m otions monitored w hile parked The ACC power is turned off whil e the battery...

Страница 12: ...e manager window 3 It is required to check whether the firmware update file location is the drive to which the memory card is connected 4 Pushing the Update button will allow the upgrade file main_md8...

Страница 13: ...u after adding and check the terminal 4 Check whether it is possible to carry out updating after checking the current firmware version and the newest firmware version 5 Then touch the firmware update...

Страница 14: ...the black box after powering off the black box 3 Supply power to the black box 4 Wait for about 10 20 seconds 5 As the updating starts the red and blue LEDs will blink and a short beeping sound will b...

Страница 15: ...ly depending on the situation on the supply of parts the images shown above are for the users information so they may look different from actual components Mini USB Wi Fi dongle Main body stand Contin...

Страница 16: ...n arrangement Power socket DC socket GND ACC BAT B GPS socket 2 5 pie VCC 3 6 6V DC Rx GND Tx GPS Signal Output Video socket 3 5 pie Video Out No use GND CAM socket Micro USB 5 P VCC 5 0V DC Video sig...

Страница 17: ...w the procedures set while installing the system Check first whether the micro SD card is inserted correctly before supplying the power Take precautions not to install the product on a location that w...

Страница 18: ...ove the outer layer of the dual side tape of the stand Attach it on a desired location 4 Connect the external camera the external GPS module optional and the video cable when necessary 5 6 Connect the...

Страница 19: ...in the system completely users must check whether the front and rear videos are stored normally Caution After the rear camera is installed the video from it must be checked before building it complet...

Страница 20: ...etup file for the specific viewer Urive i Shotgun msi for the black box which is stored in the micro SD card or the one that is downloaded from the URIVE home page and then follow the procedures as sh...

Страница 21: ...indows wallpaper or the start menu and check whether Urive i Shotgun is installed as shown below 2 Execute Urive i Shotgun 3 The viewer can be deleted by selecting Delete Urive i Shotgun on the start...

Страница 22: ...n and then moving the mouse wheel button Warning While the specific viewer is being downloaded and executed if the Windows Security Warning is displayed users must select the Unblock and Allow buttons...

Страница 23: ...the firmware can be updated automatically Warning While the specific viewer is being downloaded if the Windows Security Warning is displayed users must select the Unblock button 2 Full screen For shi...

Страница 24: ...pture For saving the selected video Front or rear as a JPG file in full scale 12 Control volume For controlling the volume ranging from 0 to 10 13 Playback speed control The video can be played back a...

Страница 25: ...laying the driving location information on a map while a video is being played back This function can be supported only when the GPS an optional item is installed 18 Playback list generation and SD ca...

Страница 26: ...of the viewer will shift the front camera video to a full screen video 2 Rear camera in full screen pushing the button on the top of the viewer will shift the rear camera video to a full screen video...

Страница 27: ...x at the bottom left of the screen 1 Clicking the front or rear screen will bring up a red digital zooming box 2 Scrolling the mouse wheel forward or backward will enlarge or reduce the screen 3 Movin...

Страница 28: ...SD card will be searched before they are displayed through the playback list tab 3 Playback list for selecting the location and type of a video 4 SD location for changing the location of the micro SD...

Страница 29: ...item is installed 1 Take out the micro SD card that is inserted in the black box and connect it to a computer 2 Pushing the button on the viewer s main screen will bring up the driving record window f...

Страница 30: ...ed back Plays back the items selected from the list in the order of the travelling path Displays a marker on the travelled path while the travelling path is being played back Plays back the travelling...

Страница 31: ...clude the front rear direction the left right direction and the up down direction While a video is being played back it is possible to see the driving speed graph or the speed This can be displayed on...

Страница 32: ...ack box system Enter the password and then push the save button to save it Then the password will be applied for the system Black box environment setting Pushing the button on the specific viewer s ma...

Страница 33: ...e setting for setting the cutoff voltage and the cutoff time The cutoff will take place when one of the two conditions is met There are 4 stages of the cutoff reference voltage that can be selected 11...

Страница 34: ...mize the difference between the set time and the current time 3 Standard time setting for setting the GMT time for individual countries The default will be set as the time read from the PC Korea stand...

Страница 35: ...deo quality gets significantly reducing the mosaic pattern accordingly Here the storage space and time can be reduced 5 The frame rate for setting the number of frames of a video that can be recorded...

Страница 36: ...l the formatting process 5 Pushing the confirm button will display a window for formatting the SD card The window will show the micro SD card s memory file system type current assignment unit and post...

Страница 37: ...the black box and connect it to a computer 2 Selecting the button on the viewer s main screen will bring up the SD card checking and recovery tab which will help check and recover the SD card as shown...

Страница 38: ...USB Wi Fi dongle connection will also be turned off when booted up in parking mode 3 In order to turn on the mini USB Wi Fi dongle connection in parking mode operate the system by using the mode butto...

Страница 39: ...page for more details about i Shotgun app manual www urive co kr Urive download center i Shotgun Precautions Downloading can take place only for smartphones based on the Android OS Impossible to have...

Страница 40: ...g mode if there is a motion or shock monitored while parked a video file of the incident taken for 30 seconds starting from 10 seconds before the incident to 20 seconds after it will be stored When th...

Страница 41: ...ent A 16 7 780 3 890 3 890 32 15 565 7 782 7 782 B 16 3 890 7 780 3 890 32 7 782 15 565 7 782 C 16 11 670 0 3 890 32 23 347 0 7 782 Table 2 Storage assignment ratio for each recording mode by type Uni...

Страница 42: ...rees Rear camera HD 1280x720 110 degrees Frames that can be stored Driving mode Max 30 fps Parking mode Max 20 fps Resolution of stored videos Driving mode Front 1920 x 1080 Rear 1280 x 720 Parking mo...

Страница 43: ...or refunding until a faulty product is returned Users are required to keep the warranty and the product number well as they are not to be reissued Be careful about copy products as the company does n...

Страница 44: ...t for which a customer requested a repair work Paid repair or paid replacement When impossible to repair the product as there is no part available for the repair work within the period in which the pa...

Страница 45: ...for A S services the company will think that their data are backed up by the users themselves and will not back up any data separately Considering that users should understand that the company will no...

Страница 46: ...her the continuous power cable is connected correctly Black Ground Red B Yellow ACC power No GPS information received Check the connection between the black box and the GPS socket No buzzer sound hear...

Отзывы: