background image

20 | 


Midland CT3000 instruction guide

Memory channels 

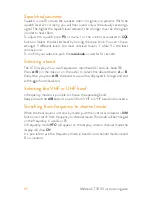
CT3000 allows you to store up to 200 channels. 

The channels let you store the frequency and data. So that you don’t have to 

re-program the same data repeatedly and you can immediately tune on the 

desired channels. 

Storing a channel and its settings:

1.  Select the channel you want to store

2.  Set all the desired parameters 

3.  Keep pressed the 

P

 control associated to 

V/M

 for 2 seconds, the display 

will show the channel number.  If the channel blinks blue it means that the 

memory is empty and you can store the desired settings; while if it blinks 

red the channel is already busy but the settings can be overwritten. 

4.  Rotate the 

main knob 

to select the channel in which you want to overwri-

te the settings 

5.  Press 

V/M

 for 2 seconds for confirmation.

To recall a channel

1.  Press the 

P

 button associated to the

 V/M

 function to enter the radio 

memories 

2.  Turn the 

main knob 

to select the desired memory channel.

Note: 

In case you use the keypad you have to edit all 3 digits: for example, channel 

1, you will edit “0”,”0”, “1”.

Deleting a channel:

1.  Press the button associated to 

V/M 

function to enter the radio memories.

2.  Select the channel you want to delete.

3.  Keep pressed 

FUNC

 and the button associated to

 V/M

 function for 2 

seconds.

This function is available only in frequency mode. 

Содержание CT3000

Страница 1: ...CT3000 DUAL BAND VHF UHF MOBILE TRANSCEIVER INSTRUCTION GUIDE SPECIAL FEATURES Output Power Flip function 180 Extra loud speaker 25W 3W ...

Страница 2: ... Installing an antenna 4 External speakers 4 Controls and display description 5 Display 6 Rear panel 7 Microphone 8 Main operations 9 Turning on and off 9 Volume adjustment 9 Selecting a band 10 Selecting the VHF or UHF band 10 Switching from frequency to channel mode 10 Frequency channel adjustment 11 Frequency STEP selection 11 Output power selection 12 Keypad lock 12 Menu settings 13 ...

Страница 3: ...ivating the frequency inversion 19 Talk around function 19 Memory channels 20 Storing a channel and its settings 20 To recall a channel 20 Deleting a channel 20 Scan function 21 Scan resume time 21 Selective call 21 DTMF functions 22 Transmitting a DTMF code 22 Transmitting a memory DTMF code 22 Changing a memory DTMF code and the tx time of DTMF codes 22 Selective calls with DTMF codes 22 Other f...

Страница 4: ...ruction guide Squelch opening 24 Selecting frequency mode channel name mode channel number mode 24 Setting a password 25 Inhibiting transmission 25 Flip function 26 Reset 26 Troubleshooting 27 Technical specifications 28 ...

Страница 5: ...ctronics require experience and specialized equipment for the same reason the radio should under no circumstances be realigned as it has been calibrated for maximum performance Unauthorized opening of the transceiver will void the warranty Do not store the Radio under the sunshine or in hot areas High tempe ratures can shorten the life of electronic devices and warp or melt certain plastics Do not...

Страница 6: ... scan Digital automatic squelch adjustable in different levels Scan Dual watch Roger beep 200 memory channels TOT time out timer Adjustable backlight Automatic turning on off Keypad lock Microphone with multi function keypad and with RJ45 connector Software programmable through the optional programming kit PRG 3000 cod C1352 1750 2100 1000 1450Hz repeater access tones 104 104 DCS codes 51 CTCSS to...

Страница 7: ...ply Be sure the transceiver is off On the rear of the radio you will see a bi color power supply cable with a fuse holder on the red cable This cable is supplied with a connector suitable for the connection to the radio and vehicle s battery or to an optional cigarette lighter plug In the direct voltage power supply it is very important to observe the polarity even if the unit is protected against...

Страница 8: ...er supplied in the package Installing an antenna Place the antenna as high as possible The longer is the antenna the better will be the performance If possible mount the antenna in the centre of the surface Keep the antenna cable away from noise sources such as the iginition switch gauges etc Prevent cable damage during antenna installation Attention To prevent damage never operate your radio with...

Страница 9: ...he front keys of the radio Keep it pressed to enter the radio s menu 9 MIC microphone connector Plug in the microphone or the program ming cable optional into this jack 10 Main knob keep it pressed to lock unlock the keypad 11 In normal conditions turn the knob to adjust the volume clockwise to increase it counter clockwise to reduce it When you enter the menu rotate it to look through the menu op...

Страница 10: ... located the main parameters that can be selected through the function keys By default the power voltage is indicated G Secondary display second frequency in use and its signal strength H Main display indicates the main frequency in use P4 P5 P6 FUNC ANT EXT SP ope com CT3000 A B V M M O N R E V S Q L F R Q RX VFO N VFO W 1 3 5 7 9 144 00000 145 15000 DC 12 3V A B V M M O N R E V S Q L F R Q RX VF...

Страница 11: ...Midland CT3000 instruction guide 7 G F Rear panel 1 ANT SO239 antenna connector 2 EXT SPK external speaker mike P2 P3 P5 P6 FUNC ANT EXT SP midlandeurope com 1 2 ...

Страница 12: ...IC microphone location 3 UP DOWN push to change the frequency or to look through the set tings 4 KEY LOCK Keypad lock 5 Band selection control 6 Band indicator led MAIN R T R T MIC 4 5 6 7 8 9 PA PB PC PD 0 1 2 3 2 1 3 4 MAIN R T R T MIC 4 5 6 7 8 9 PA PB PC PD 0 1 2 3 6 5 ...

Страница 13: ...IR P4 POW P2 SFT P5 CDT P3 SCN P6 BND The functions associated to controls P1 P2 P3 will appear on the left side of the display while those activated with controls P4 P5 P6 will be displayed on the right It is possible to change the functions associated to the P buttons through the menu or the optional programming software To change the menu press FUNC Turning on and off Push key for 1 second to s...

Страница 14: ...ng a band The LCD display shows two frequencies main band A and sub band B Press A B on the mike or on the radio to select the desired band A or B Everytime you press A B the band in use will be displayed in foreground and with bigger font characters Selecting the VHF or UHF band In frequency mode it is possible to choose the operating band Keep pressed the A B button to switch from VHF to UHF ban...

Страница 15: ...phone Frequency STEP selection The correct frequency STEP allows you to select the exact rx frequency through the main knob or the UP DOWN buttons if they are set for the frequency mode The following frequency steps can be selected 2 5 kHz 5 KHz 6 25 kHz 10 kHz 12 5 kHz 20 kHz 25 kHz 30 kHz 50 kHz To set the desired frequency STEP press FUN for 2 seconds select the option FUNCTION MENU and then ST...

Страница 16: ...s POW on the front panel of the radio Everytime POW is pressed the output power indicator in the lower part of the display will show POW HI high power POW LO low power POW MI middle power The output power can be selected also with the microphone press PC on the mike at every pressure the output power will change Note you can set different output powers for the two bands A and B Keypad lock To lock...

Страница 17: ... confirm the settings Menu access 1 Push FUNC button on the front panel for 2 seconds 2 To select the desired function rotate the main knob 3 Press the main knob to enter the option of the selected function 4 Rotate the knob or press UP DOWN on the mike to selecte the desired option 5 Confirm by pushing the knob 6 To return back to the previous menu level press P3 BACK on the radio 7 Push P3 BACK ...

Страница 18: ... 11 DIM 12 TOT 13 APO 14 RPTone 15 DIR 16 SPK 17 RTDF 18 RST CHAN MENU to modify the settings of the channel in use 1 RCDT 2 TCDT 3 POW 4 5TENC 5 T DEC 6 SIGNAL 7 BAND 8 REV 9 TALK 10 OFFSET 11 LOCK 12 TX 13 OWNID MINI KEY To customize P1 P6 controls 1 HAND KEY 2 H DIM 3 H PA 4 H PB 5 H PC 6 H PD DTMF MENU to change the settings of DTMF codes 1 CALL 2 SPEED ...

Страница 19: ...on ON OFF RDW 10 Dual band frequency enabling ON OFF DIM 11 Setting of the display and controls backlight level 1 2 3 TOT 12 Time Out Timer OFF 1 2 30 min APO 13 Automatic turning on OFF 30 60 120 min RPTone 14 Repeater Tone 1750 2100 1000 1450 DIR 15 To rotate 180 the display STAN FAIL SPK 16 Selecting the speaker in use M H HAND MAIN RTDF 17 Repeater mode ON OFF RST 18 Reset OPT ALL CHAN MENU RC...

Страница 20: ...ection OFF VHF 0 38 MHz UHF 0 90 MHz LOCK 11 Enabling the BCLO OFF BU TX 12 Enabling disabling the transmission ON OFF OWNID 13 DTMF radio id Through the optional programming software MINI KEY In this menu it is possible to set the functions associated to keys P1 P6 Note the option list may vary in case of modifications done with the optional pro gramming kit ...

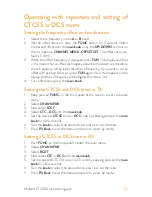
Страница 21: ...isplay and the tx frequency will be higher than the rx one 4 For confirmation press the main knob Setting the CTCSS and DCS tones in TX 1 Keep pressed FUNC on the front panel of the radio to access the radio menu 2 Select CHAN MENU 3 Now select TCDT 4 Select CTC o DCS with the main knob 5 Set the desired CTCSS tone or DCS code by keeping pressed the main knob for a few seconds 6 Turn the knob to s...

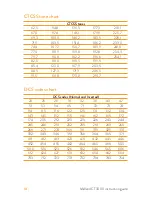
Страница 22: ...67 9 203 5 88 5 127 3 171 3 206 5 91 5 131 8 173 8 210 7 DCS codes chart DCS codes Normal and Inverted 23 25 26 31 32 36 43 47 51 53 54 65 71 72 73 74 114 115 116 122 125 131 132 134 143 145 152 155 156 162 165 172 174 205 212 223 225 226 243 244 245 246 251 252 255 261 263 265 266 271 274 306 311 315 325 331 332 343 346 351 356 364 365 371 411 412 413 423 431 432 445 446 452 454 455 462 464 465 4...

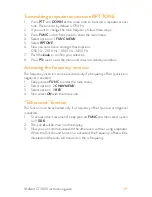
Страница 23: ...standby condition Activating the frequency inversion The frequency inversion can be activated only if a frequency offset positive or negative is enabled 1 Keep pressed FUNC to enter the radio menu 2 Select option n 2 CHAN MENU 3 Select option n 8 REV 4 Now select ON with the main knob Talk around function This function can be activated only if a frequency offset positive or negative is enabled 1 T...

Страница 24: ...desired settings while if it blinks red the channel is already busy but the settings can be overwritten 4 Rotate the main knob to select the channel in which you want to overwri te the settings 5 Press V M for 2 seconds for confirmation To recall a channel 1 Press the P button associated to the V M function to enter the radio memories 2 Turn the main knob to select the desired memory channel Note ...

Страница 25: ...t the scan direction use the main knob 5 To stop scanning press any key on the front panel or PTT Scan resume time It it possible to change the scan resume time It goes from 5s up to 15s 1 Enter the radio menu and follow this path MENU FUNC MENU SCT 2 Press the main knob to enter the options 3 Turn it to select the desired level 4 Confirm your choice by pushing the main knob Selective call You may...

Страница 26: ...desired customised DTMF code 2 Access the radio menu and follow these steps 3 MENU DTMF MENU CALL 4 Select the desired DTMF code and confirm with the main knob 5 Press the control associated to the CALL function previously set in HAND KEY menu Changing a memory DTMF code and the tx time of DTMF codes These functions can be enabled by means of the optional programming soft ware Selective calls with...

Страница 27: ...es Before stopping the transmission CT3000 emits an acoustic alarm to warn you and TOT OVER will appear on the display We suggest you keeping this function enabled also because it is very useful to prevent overheating of the radio 1 Access the radio menu and follow this procedure MENU FUNC MENU TOT 2 Set the desired time and confirm by pushing the main knob Activating deactivating the keypad lock ...

Страница 28: ...GNAL 2 Set the desired value and confirm by pushing MENU or PTT 3 Press FUN to exit the menu and return in stand by mode Selecting frequency mode channel name mode chan nel number mode 1 Access the menu and follow these steps MENU FUNC MENU DSP 2 You can choose amongst the following options FRQ Mode the radio will be set in frequency mode to switch to chan nel mode press V M CH Display Mode channe...

Страница 29: ...dio menu and follow this path MENU CHAN MENU TX 2 Choose one of these options Tx ON to enable the transmission Tx OFF to disable the transmission 3 Select the desired mode and confirm by pushing the main knob 4 Exit the menu and return to stand by mode by pressing P3 Note The selected option can differ from frequency to channel mode and from VFO A to VFO B Note1 when the transmission is inhibited ...

Страница 30: ...U 3 Rotate the knob until option No 15 DIR 4 Select it by pushing the knob 5 Rotate and the current setting will turn green You can change it by tur ning the knob 6 Press it to confirm and exit by pushing P3 Reset 1 Access the radio menu and follow this path MENU FUNC MENU RST 2 Now choose between ALL to make a complete reset settings and memories OPT to reset the settings only 3 Set the desired o...

Страница 31: ...e fuses in the radio and in your vehicle The display shows RX but the radio does not receive Verify the volume level is not too low Check that you have set the same CTCSS tones and DCS codes of your group The keypad does not work The keypad lock is activated While you are communicating with your group you receive interferences from other groups Change the CTCSS tone or DCS code of your group ...

Страница 32: ...5 C Operating mode monoband dualband Selectable output power 25W 10W 5W Modulation F3E FM Tones 51 CTCSS 208 DCS Duty cycle TX 5 RX 5 Stand by 90 Max frequency deviation 5KHz Spurious emissions 13dBm Frequency stability 1 0 ppm Rx sensitivity 12dB SINAD 0 3uV Output power 3W Dimensions 115x43x125 LxAxP Weight mike included 925g Specifications are subject to change without notice ...

Страница 33: ...Midland CT3000 instruction guide ...

Страница 34: ...ismessa al riciclaggio al trattamento e allo smaltimento ambientalmente compatibile contribuisce ad evitare possibili effetti negativi sull ambiente e sulla salute e favorisce il riciclo dei materiali di cui è composta l apparecchiatura Lo smalti mento abusivo del prodotto da parte dell utente comporta l applicazione delle sanzioni amministrative di cui al dlgs n 22 1997 articolo 50 e seguenti del...

Страница 35: ... symbole sur le corps l emballage ou le manuel d utilisation de celui ci ne doivent pas être jetés dans des poubelles normales mais être amenés dans des centres de traitement spécialisés Là les différents matériaux seront séparés par caractéristiques et recyclés permettant ainsi de contribuer à la protection de l environnement Όλα τα προϊόντα στα οποία εμφανίζεται το ακόλουθο σύμβολο στο σώμα τη σ...

Страница 36: ...ions Read the instructions carefully before installation and use Vertrieb durch ALAN ELECTRONICS GmbH Daimlerstraße 1K D 63303 Dreieich Deutschland www alan electronics de Die Benutzung dieses Funkgerätes ist von den landesspezifischen Bestimmungen abhängig Vor Benutzung Bedienungsanleitung beachten Importado por MIDLAND IBERIA SA C Cobalt 48 08940 Cornellà De Llobregat Barcelona España www midlan...

Отзывы: