


Service Manual_2018-V2.0
30
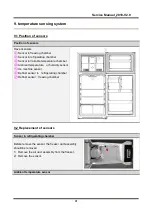
2
)
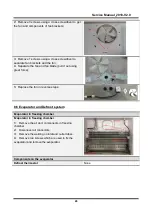
Pull all connector terminals out of the refrigerating
air duct to remove its components;
3
)
Uncover the temperature control indication sticker
on the cover plate of the air duct;
4
)
Gently pry out the PCB installation box with a
straight screwdriver to get the master control board
and installation box components;
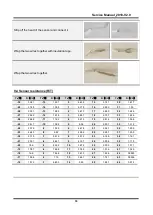
5
)
Pry open the buckle of the PCB installation box with
a straight screwdriver to see the PCB board;
6
)
Remove 2 screws using a cross screwdriver to
remove the master control board. Pull out the
connector terminal and replace the master control
board in reverse steps;
8.10Water dispenser(None)
8.11Ice maker (None)
8.12water filter component (None)
Содержание 22031020003641
Страница 5: ...Service Manual_2018 V2 0 5 1 Significant update notes None...
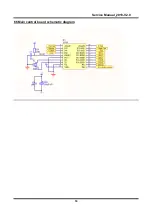
Страница 18: ...Service Manual_2018 V2 0 18 6 5Main control board schematic diagram...
Страница 20: ...Service Manual_2018 V2 0 20 7 3 Circulating route of cooling air...
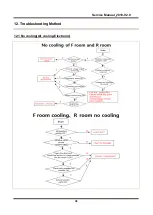
Страница 38: ...Service Manual_2018 V2 0 38 12 Troubleshooting Method 12 1 No cooling Air cooling Electronic...
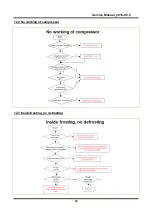
Страница 39: ...Service Manual_2018 V2 0 39 12 2 No working of compressor 12 3 Inside frosting no defrosting...
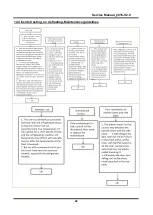
Страница 40: ...Service Manual_2018 V2 0 40 12 4 Inside frosting no defrosting Maintenance guidelines...
Страница 41: ...Service Manual_2018 V2 0 41 12 5 Light is not on 12 6 Fan failure...
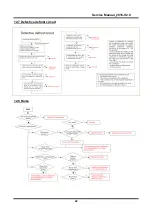
Страница 42: ...Service Manual_2018 V2 0 42 12 7 Defective defrost circuit 12 8 Noise...
Страница 43: ...Service Manual_2018 V2 0 43 12 9 Air duct not operated electronically None...
Страница 44: ...Service Manual_2018 V2 0 44 13 Figures and details of repair parts See this section in the TSP...


