background image


16


B. 

Connection 

Check the oven’s gas supply requirements before making 
the gas utility connections.  Gas supply requirements are 
listed on the oven’s serial plate and in Table 1-4.  Gas 
Orifice and Pressure Specifications (in Section 1, 
Description). 
 

Check the serial plate to determine the type of gas (Propane 
or Natural) to be used with the oven. 
 
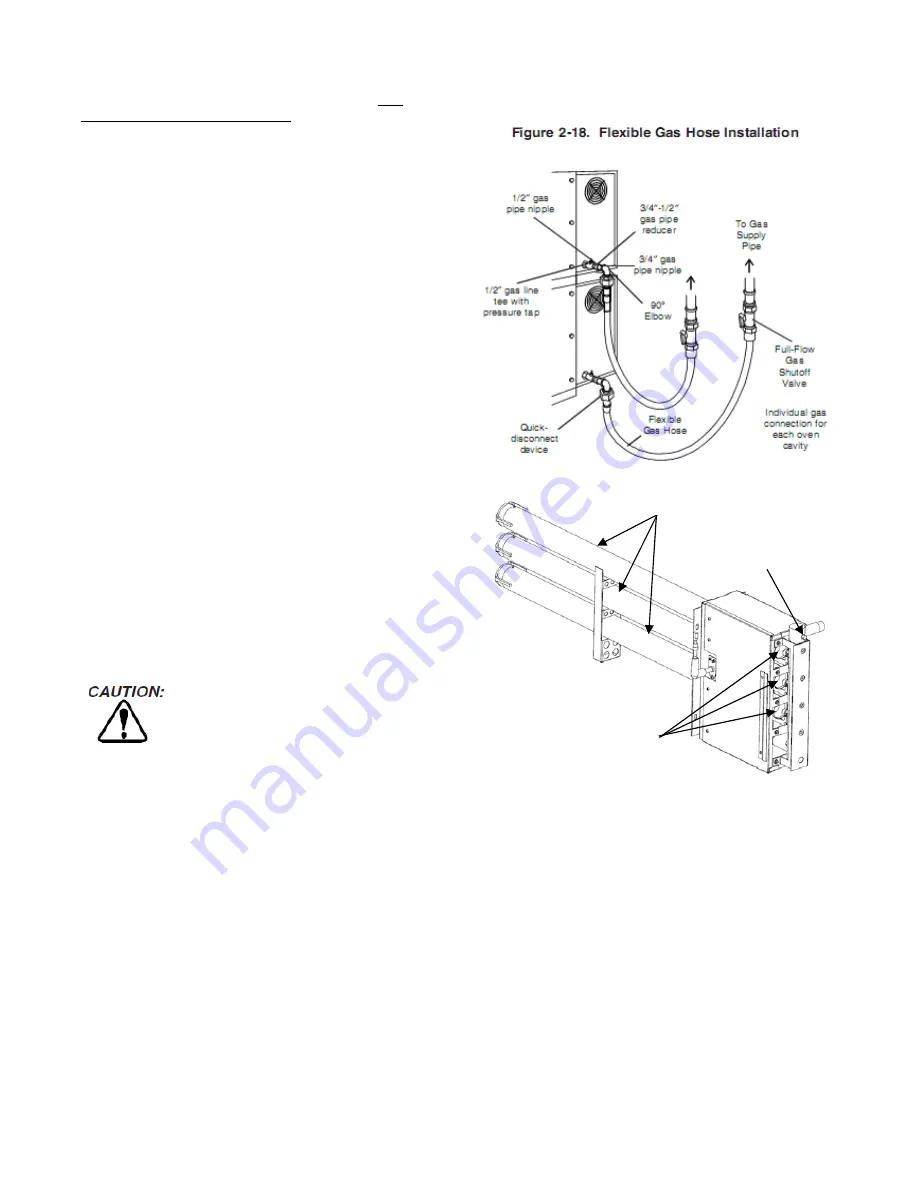
Refer to the instructions in the gas hose package (included 
in the Installation Kit) before connecting the gas line. One 
gas line connection method is shown in Figure 2-18; 
however, compliance with the applicable standards and 
regulations is mandatory.  
 
Inlet, regulated, and pilot gas pressure readings can be 
taken using a digital tube manometer at the tap location 
shown in Figure 2-19. Figure 2-19 shows the burner 
assembly and Figure 2-21 shows the gas valve. 

 
NOTE:   

The installation must conform with local codes or in 

the absence of local codes, to the National Fuel 
Gas Code, ANSI Z223.1-latest edition.   

 
Certain safety code requirements exist for the installation of 
gas ovens; refer to the beginning of Section 2 for a list of the 
installation standards. In addition, because the oven is 
equipped with casters, the gas line connection shall be made 
with a connector that complies with the Standard for 
Connectors for Movable Gas Appliances, ANSI Z21.69 (in 
U.S.A.), as well as a quick-disconnect device that complies 
with the Standard for Quick-Disconnect Devices for Use With 
Gas Fuel, ANSI Z21.41 (in U.S.A.). 
 

C. Gas Conversion 

Where 

permitted

 by local and national codes, it is possible to 

convert ovens from natural gas to propane or from propane 
to natural gas. Use the appropriate Middleby Gas 
Conversion Kit for the specific oven model. 


The terms of the oven’s warranty require all 

startups, conversions and service work to be 
performed by a Middleby Authorized Service 
Agent. 
 

D. PS360G Propane Conversion 

Three items must be changed to change the oven to operate 
on LP: (See Addendum for Propane Conversion Kit # 72870) 
 

1. Replace main orifices. 
2. Adjust main gas regulator. 
3. Adjust the ModuPlus Valve per instructions below. 
 
Disconnect the manifold union closest to the main burner, 
and remove the manifold assembly (four screws). Slide out 
the manifold assembly (leaving the ignition and sense wires 
connected). Replace the main orifices. 
 
Replace the main orifices on the manifold assemblies with 
the LP orifices, and replace the manifold assembly. 
Reconnect the union.  
 
Remove the seal cap on the regulator and rotate the 
adjustment screw in the clockwise direction to increase the 
regulated pressure. 
 

E. Adjusting the Maximum Pressure Setting 


1. Disconnect pressure feedback connection (if applicable). 
2. Connect a suitable pressure gauge to pipe line or to outlet 
pressure tap of gas control concerned, to measure burner 
pressure (measuring point must be as near to burner as 
possible).


Figure 2-19. Gas Burner Assembly 


3. Make sure that the appliance is in operation and the 

Moduplus

® 

coil is energized with maximum current.  


4. If maximum rate pressure needs adjustment, use an 8 mm 

wrench to turn adjustment screw for maximum pressure 
setting (clockwise to increase or counter-clockwise to 
decrease pressure), until the desired maximum outlet 
pressure is obtained. The correct value to adjust the 
manifold pressure is shown in Table 1-4. 


5. Disconnect electrical connection of the Moduplus

®


6. Check minimum pressure setting and readjust if 

necessary. (See Adjusting Minimum Pressure Setting for 
proper adjusting procedure.) 


7. Reconnect pressure feedback connection (if applicable).  


8. If minimum and maximum pressures are set, wire the 

Moduplus

® 

in circuit. 


9. Close pressure tap screw.


FLAME TUBES 

MANIFOLD  
PRESSURE TAP 

GAS BURNERS 

Содержание PS360G Gas

Страница 1: ...Gas Ovens Model Combinations PS360G Gas Single Oven PS360GWB Gas Double Oven Two Stack Triple Oven Three Stack OWNER S OPERATING AND INSTALLATION MANUAL for domestic and standard export ovens 2019 Mid...

Страница 2: ...d urgence de votre compagnie de gaz local Celui ci aura un personnel et des ressources disponibles pour r soudre le probl me NOTICE THE EQUIPMENT IS ONLY FOR PROFESSIONAL USE AND SHALL BE USED BY QUA...

Страница 3: ...manship for which it is responsible The Seller s obligation under this warranty shall be limited to replacing or repairing at Seller s option without charge F O B Seller s factory any part found defec...

Страница 4: ...t Cable Installation 13 D Conveyor Installation 14 VI ELECTRICAL SUPPLY 15 VII GAS SUPPLY A Gas Rough In Recommendations 16 B Connection 17 C Gas Conversion 17 D Propane Conversion 17 E Adjusting Max...

Страница 5: ...ents No user serviceable parts are located within these cabinets H Serial Plate Provides specifications for the oven pertinent to installation operation and maintenance Refer to SECTION 2 INSTALLATION...

Страница 6: ...Natural 31 0 120 3 00mm 6 8 W C 1 49 1 99 kPa 3 5 W C at manifold 0 87 kPa 7 64 0 109 2 77mm Propane ULPG 45 0 082 2 083mm 11 14 W C 2 7 3 5 kPa 6 0 W C 1 49 kPa 5 64 0 078 1 98mm GAS ORIFICE AND PRE...

Страница 7: ...9 W C 1 7 2 2 kPa 3 5 W C at manifold 0 87 kPa 7 64 0 109 2 77mm Propane ULPG 0 094 2 4mm 11 14 W C 2 7 3 5 kPa 6 0 W C at manifold 1 49 kPa 5 64 0 078 1 98mm GAS ORIFICE AND PRESSURE SPECIFICATIONS...

Страница 8: ...contact your local Authorized Service Agent NOTE There must be adequate clearance between the oven and combustible construction Clearance must also be provided for servicing and proper operation NOTE...

Страница 9: ...70130 One 1 PN 70274 PS360G Triple Gas Oven 70131 One 1 PN 70275 PS360GWB Single Gas 72271 One 1 PN 70556 PS360GWB Double Gas 72273 One 1 PN 71230 PS360GWB Triple Gas 72274 One 1 PN 71231 PARTS KITS...

Страница 10: ...5 A PN 69669 SINGLE OVEN BASE TOP KIT...

Страница 11: ...6 B PN 70274 DOUBLE OVEN BASE TOP KIT...

Страница 12: ...7 C PN 70275 TRIPLE OVEN BASE TOP KIT...

Страница 13: ...8...

Страница 14: ...9...

Страница 15: ...on and hood design Consult the hood manufacturer or ventilation engineer for these specifications To avoid negative pressure condition in the kitchen area return air must be brought back to replenish...

Страница 16: ...ill attach to the restraint cable that keeps the oven from moving too far when installed on casters 2 Install one caster and one adjustable 6 leg onto each leg extension and tighten securely in place...

Страница 17: ...the top oven cavity 3 Install the top panel using the screws included in the base pad kit as shown in Figure 2 10 Figure 2 9 Stacking C Restraint Cable Installation Because the oven is equipped with...

Страница 18: ...n the conveyor is positioned properly check for freedom of movement of the conveyor belt by pulling it for about 2 to 3 feet 0 6 1 0 m with your fingers The drive and idler shafts must rotate smoothly...

Страница 19: ...User Interface with no wiring changes necessary Shock hazard in compartments electrical filters are electrically alive SWITCHING PHOTO SENSOR Disconnect power before switching Photo Eye Remove the th...

Страница 20: ...n Refer to the wiring diagram inside the machinery compartment of the oven to determine the correct connections for the electrical supply lines Connect the supply as indicated on the wiring diagram Th...

Страница 21: ...l startups conversions and service work to be performed by a Middleby Authorized Service Agent D PS360G Propane Conversion Three items must be changed to change the oven to operate on LP See Addendum...

Страница 22: ...tment nut in place until the desired minimum outlet pressure is obtained The correct value to adjust the by pass pressure is shown in Table 1 4 6 Check if main burner lights easily and reliably at min...

Страница 23: ...press brings oven to active ON mode Press and hold will put oven into OFF mode If temp is over 200F the blowers will remain on until the oven temp drops below 200F TEMPERATURE key Quick press displays...

Страница 24: ...until the oven is turned OFF The previously used set temperature will appear when the oven is turned ON again BAKING 350 F F 4 00 256 F HEAT SETPOINT Set point baking temperature is displayed here HE...

Страница 25: ...the OFF mode the screen will display the WOW OVEN screen for a one minute period after which the screen backlight will shut off The oven will stay in this condition until it is started again with no...

Страница 26: ...nter SYSTEM SETUP menu Can only be done in OFF mode Four control system values can be changed that relate to the user interface for the daily oven operator 1 Actual temperature display always on or of...

Страница 27: ...reduced speed during non baking periods Reducing the blower speed reduces the volume of air requiring heating and thus reduces energy usage in these non baking times A photo eye sensor at the entrance...

Страница 28: ...mming and Reset the breaker right side control door 3 With power OFF remove chain cover replace chain onto sprocket and replace chain cover RESET IGNITION on display 1 Gas not turned on to oven 2 Burn...

Страница 29: ...rs not operating Press enter key to silence alarm Unplug oven and plug in again Restart oven If unsuccessful call service for immediate repair HEATING ERROR shown on display and audible alarm sounds T...

Страница 30: ...g this oven To avoid saturating the oven insulation DO NOT use excessive amounts of water DO NOT use a caustic oven cleaner which can damage the bake chamber surfaces NOTE ANY replacement parts that r...

Страница 31: ...the air fingers as shown in Figure 4 3 AS EACH FINGER IS DISASSEMBLED WRITE THE LOCATION CODE FOR THE FINGER ON ALL THREE OF ITS PIECES This will help you in correctly reassembling the air fingers Inc...

Страница 32: ...ot tighten the screws at this time 10 Loosen the set screw on both of the conveyor drive sprockets Then remove the sprockets from the shaft 11 Check the conveyor configuration as follows High speed co...

Страница 33: ...the power is disconnected as described in the warning at the beginning of this Section B For gas ovens inspect and clean the burner nozzle and the spark electrode assembly C Check the conveyor drive...

Страница 34: ...ck 9 1 69149 Blower Motor 1 3 HP 10 1 61602 Ignition Module 11 1 60679 Gas Valve Modulating w flanges and cable 12 1 50794 Relay 30A 240V coil 13 1 33983 Hi Limit Thermostat 14 1 32108 Transformer 240...

Страница 35: ...30 SECTION 5 WIRING DIAGRAMS...

Страница 36: ...31...

Страница 37: ...32...

Страница 38: ...33...

Страница 39: ...34 ADDENDUM PS360GWB Propane Conversion Kit 72870 Instructions Part Number 72869 Revision B...

Страница 40: ...35 NOTES...

Страница 41: ...36 NOTES...

Страница 42: ......

Отзывы: