background image

2-7

STRATA TX Operation Guide


400


Rev.  

Tripod Installation

Installation

2.4

Tripod Installation

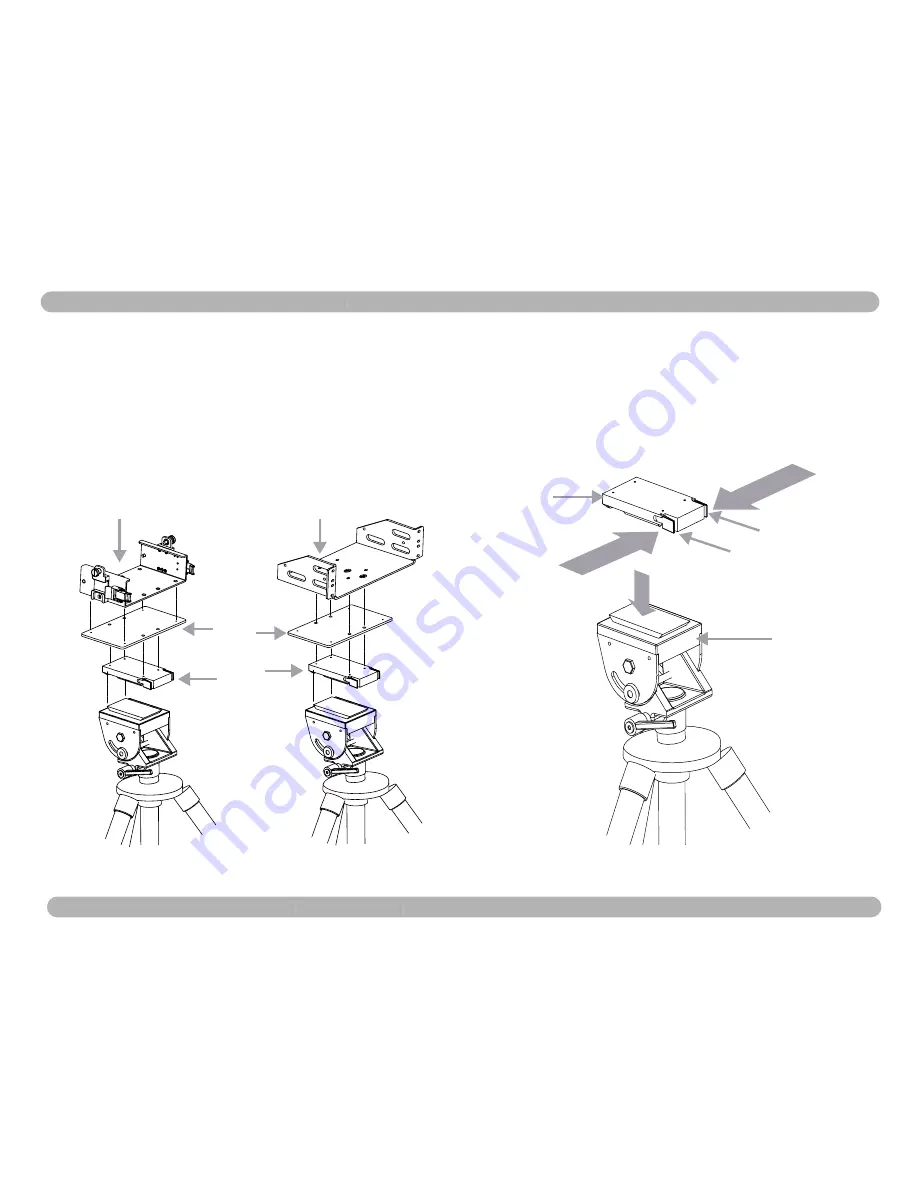
Units can be installed on a tripod using either the fixed or universal brackets. 
Both fixed or universal brackets are designed for the following parts:

• Quick Release Adapter - This adapter is design to used with MRC’s medium 

and heavy weight tripods. The adapter lets you quickly mount and dismount 
a stack of units. For a dimensioned drawing, see 

Figure 2-13

.

• Adapter Plate - The adapter plate is used to mount either fixed or universal 

brackets to the Quick release adapter. For a dimensioned drawing, see 

Figure 2-14

.

Figure 2-11  Quick Release Adapter and Adapter Plate

Quick

Adapter 

Plate

 Release 

Adapter

FIXED

BRACKET

UNIVERSAL

BRACKET

2.4.1

Quick Release Adapter

To install the quick release adapter on the tripod mount:

Step 1

Align the adapter with the edge of the tripod head (

Figure 2-15

)

Step 2

Press both tabs on the adapter to seat the adapter on the 
tripod head.

Step 3

Release the tabs to secure adapter.

Figure 2-12  Quick Release Adapter

Quick

 Release 

Adapter

TRIPOD

HEAD

TABS

PRESS

PRESS

Содержание STRATA TX

Страница 1: ...re 1 011 2 6 04 TRANSMITTER OPERATOR S GUIDE 1 Introduction 2 Installation 3 Powering the STRATA Transmitter 4 Front Panel Controls 5 STRATA Tx Configurator 6 Audio Video Connections A Error Codes B Channel Fequencies ...

Страница 2: ...ve Radio Communications Microwave Radio Communications reserves all patent proprietary design manufacturing reproduction use and sales rights thereto and to any articles disclosed therein except to the extent rights are expressly granted to others The foregoing does not apply to vendor proprietary parts To allow for the introduction of design improvements specifications are subject to change witho...

Страница 3: ...Give information which if strictly followed will prevent damage to equipment or other goods Note Provides supplementary information CAUTION Risk of Electric Shock WARNING General Warning Risk of Danger WARNING Electrostatic Discharge Possible Damage Fuse Identifies fuse boxes or their location Frame or Chassis Ground Identifies the frame chassis terminal Earth Ground Identifies the earth ground te...

Страница 4: ...tegral grounding pin This plug fits into a standard grounded power outlet If you are unable to insert the plug into the outlet contact your electrician to replace your obsolete outlet Do not defeat the safety purpose of the grounded plug Power Cord Protection Power supply cords should be routed so that they are not likely to be walked on or pinched by other equipment items Pay particular attention...

Страница 5: ...Figure 2 6 Captive Screws on Universal Bracket 2 5 Figure 2 7 Removing Unit from Stack with Universal Bracket 2 5 2 3 2 Installing and Removing a Unit from the Bracket 2 6 Figure 2 8 Latch and Latch Release 2 6 Figure 2 9 Moving Latch Clear of Unit 2 6 Figure 2 10 Unit Removed from Universal Bracket 2 6 2 4 Tripod Installation 2 7 Figure 2 11 Quick Release Adapter and Adapter Plate 2 7 2 4 1 Quick...

Страница 6: ...set 4 3 Figure 4 3 Set Channel Screen 4 3 4 3 2 Changing Presets 4 3 Figure 4 4 Change Preset Screen 4 3 4 3 3 Setting Power Attenuation 4 4 Figure 4 5 Power Output Screen 4 4 4 3 4 Turn Voltage from TXU to HPU On or OFF 4 4 2 3 4 1 Model Variations 4 4 Figure 4 6 HPU Coax Screen 4 4 2 3 5 Turning Voltage from TCU to TXU On or Off 4 5 2 3 5 1 Model Variations 4 5 Figure 4 7 75 Coax Screen 4 5 4 4 ...

Страница 7: ...ut Signal Options 6 4 6 8 Audio Connections 6 5 Table 6 4 STRATA Tx Audio Connections 6 5 Figure 6 5 Audio Connector 6 5 Figure 6 6 Audio XLR Cable 907471 6 6 7 Wayside Data Channel 7 1 7 1 Overview 7 1 Figure 7 1 Wayside Simplex Data Channel 7 1 7 1 1 Compatibility 7 1 7 1 2 Wayside Connections to Audio Circuits 7 1 Figure 7 2 Wayside on Audio Wiring Diagram 7 1 7 2 Setup and Installation 7 1 7 3...

Страница 8: ...1 8 STRATA TX Operation Guide 400 Rev Table of Contents ...

Страница 9: ... an AC source to power one or more units in a system 1 1 3 Single Unit Systems The TXU or TCU can be used independently as a single unit application The TXU as a stand alone Transmitter accepting an IF input The TXU as a stand alone transmitter featuring FM modulation or MPEG COFDM The TCU as a separate unit can also be used for FM modulation MPEG COFDM or both FM modulation and MPEG COFDM 1 1 4 M...

Страница 10: ...s available SDI ASI NTSC or PAL digitial analog audio 1 9 to 2 5 GHz or 2 3 to 2 7 GHz RF Input SDI ASI NTSC or PAL digitial analog audio Digital Video Audio Analog Video Audio ASI Monitor ASI Monitor RF IF Only RF IF Only RF IF Only COFDM MPEG COFDM MPEG FMR FMR Option COFDM MPEG Option TXU TCU RF IF Only HPU HPU HPU HPU HPU R X U OPTIONAL OPTIONAL OPTIONAL OPTIONAL OPTIONAL HPU OPTIONAL FMR Only...

Страница 11: ...unications at speeds up to xx provide an addition data carrier for communications between links Connection to the transmitter is made to the serial connector See Appendix C for connections and cabling TCU POWER SUPPLY TXU IF DC Commications Link DC RF DC Communicatiion Link HPU Note System can be controlled from either the TCU or TXU 1 4 STRATA Tx Configurator Software STRATA TX Configuration Soft...

Страница 12: ...e STRATA Tx Configurator Section 5 on page 5 1 STRATA TX Aircraft Remote Control Panel Figure 1 7 Simplified version of the standard model featuring 2 presets for ease of operation Both models feature auto or manual display intensity controls 2 5 0 1 STRATA TX Remote Control Panel Figure 1 6 Controls 10 Preset Selections Transmit Standby mode HI or Low power output mode Channel and Offset Displays...

Страница 13: ...2 2 Fixed Mounting Bracket Universal Mounting Bracket This mounting bracket lets you install any number of units in a stack You install one unit in each bracket Units can be removed from the bracket without having to disable the stack For mechanical mounting information see Section 2 3 Universal Mounting Bracket on page 2 4 2 2 Fixed Mounting Bracket Using the fixed bracket units must be ordered w...

Страница 14: ... Fixed Bracket Dimensions 4 19 10 6 cm 8 75 22 25 cm 2 00 5 08 cm 1 50 3 81 cm 4 00 10 16 cm 8 00 20 32 cm 3 375 8 57 cm 4 375 11 11 cm 2 00 5 08 cm 2 17 5 51 cm 2 17 5 51 cm 10 75 27 3 cm 4 19 10 6 cm 1 5 3 81 cm 5 5 13 97 cm 2 25 5 71 cm 8 00 20 32 cm 187 4 74 mm Typical for Entire Bracket ...

Страница 15: ...3 Unit Fixed Bracket Dimensions 4 00 10 16 cm 8 00 20 32 cm 6 313 16 0 cm 8 00 20 32 cm 4 06 10 31 cm 6 31 16 02 cm 8 75 22 25 cm 2 00 5 08 cm 3 375 8 57 cm 4 375 11 11 cm 2 17 5 51 cm 1 25 3 2 cm 2 17 5 51 cm 1 50 3 81 cm 187 4 74 mm Typical for Entire Bracket 1 5 3 81 cm 5 5 13 97 cm ...

Страница 16: ...g a set of latches Figure 2 5 Brackets can be easily added and removed from a stack of units using the two captive screws on either side of the bracket In addition units can be removed from their brackets without removing it form the stack Note Due to the added height of the High Power Unit it must always be installed at the top of the stack of units Figure 2 4 3 Unit Stack using Universal Bracket...

Страница 17: ...e units from a stack Step 1 Loosen the captive screws on both sides of the unit as shown in Figure 2 6 Figure 2 6 Captive Screws on Universal Bracket Step 2 Once the captive screws are loosened lift the unit from the stack as shown in Figure 2 7 Figure 2 7 Removing Unit from Stack with Universal Bracket Step 3 To install the bracket reverse these steps ...

Страница 18: ...ollow these steps Step 1 Pull the latch and latch release toward the front of the unit as shown in Figure 2 8 Figure 2 8 Latch and Latch Release LATCH LATCH RELEASE PULL IN THIS DIRECTION Step 2 Once the latch releases make sure it is clear of the unit as shown in Figure 2 9 Repeat this for the latch on each side of the unit Figure 2 9 Moving Latch Clear of Unit Step 3 Next remove the unit from th...

Страница 19: ...re 2 13 Adapter Plate The adapter plate is used to mount either fixed or universal brackets to the Quick release adapter For a dimensioned drawing see Figure 2 14 Figure 2 11 Quick Release Adapter and Adapter Plate Quick Adapter Plate Release Adapter FIXED BRACKET UNIVERSAL BRACKET 2 4 1 Quick Release Adapter To install the quick release adapter on the tripod mount Step 1 Align the adapter with th...

Страница 20: ...er 4 00 10 16 cm 138 32 UNC 2B 28 EFF THD 4 PLACES 5 75 14 6 cm 2 00 5 08 cm 3 375 8 57 cm 3 17 8 05 cm 585 14 86 mm 400 10 6 mm 80 20 32 mm 4 00 10 16 cm 875 22 22 mm 875 22 22 mm 7 875 20 00 cm 7 00 17 78 cm 50 12 7mm 50 12 7mm 2 00 5 08 cm 187 4 74 mm 4 25 10 79 cm Figure 2 15 Tripod with 4 Units using Universal Brackets Antenna Quick Release Adapter Adapter Plate Pan Tilt Head Tripod MegaHorn ...

Страница 21: ...tion 3 6 1 on page 3 4 Superimposing and Manual Override of DC Power with the IF and RF signals carried on the coaxial cables between units In this system the operator can turn the DC power on or off using both the front panel menus and switches located on the front and rear panels of the TXU and the front panel of the TCU For more information see DC Voltage Settings Over Ride Switch Models Sectio...

Страница 22: ...onfiguration you re using refer to Table 3 2 Power Requirements on page 3 3 3 4 1 Power Connections To apply power to the TXU or TCU refer to Table 3 1 MRC provides the necessary power connector For more information see Section 3 4 2 Front Panel Power Connection on page 3 2 Section 3 4 3 Power Harness Assembly on page 3 2 ALM ALM TCU TX ALM ALM TCU TX DC Over ride Switch 3 4 2 Front Panel Power Co...

Страница 23: ...ions requiring the HPU option use the 22 48 volt HPU power option 6 Only use the TCU powering option when power is not available at the TXU When powering separated TCU TXU components powering from the TXU is the preferred choice 7 The actual voltage supplied to the TXU is determined by the IF coaxial cable length 8 The actual voltage supplied to the HPU is determined by the RF coaxial cable length...

Страница 24: ...either Power On or Power Off as shown in Figure 3 7 Step 2 Press the control switch The display will blink displaying the current state Step 3 Press the control switch to select either Power On or Power Off Note If the transmitter is in transmit mode while changing the DC power setting the transmitter will automatically be placed in standby mode To place the transmitter in transmit mode press the ...

Страница 25: ...rning DC voltage superimposed with the IF or RF signal may cause damage to test equipment Turn off DC voltage before troubleshooting the transmitter 2 6 3 1 Override Switch Settings DC Override Switches are located on the TXU front and rear panel along with the TCU rear panel Figure 3 8 shows the switch setting for the on and off positions Figure 3 8 DC Override Switch ON OFF Settings OFF Position...

Страница 26: ...particular system See Power Requirements Section 3 5 on page 3 3 Figure 3 9 shows the front and rear view of the power supply showing connectors controls and indicators Figure 3 9 AC Power Supply Front and Rear View DC OUTPUT Front View Power ON OFF Switch AC Fuse Rear View DC Output Connector AC Input Connector Power LED Indicator 3 7 1 AC Power Supply Connections Table 3 4 and Figure 3 10 show t...

Страница 27: ...RF audio and video connections Step 2 Insert the power connector into the power receptacle on either the front panel of the TXU or rear panel of TCU Align the pins and press and rotate the connector collar until it securely seated Figure 3 6 on page 3 2 Step 3 Toggle the front panel Power Switch Figure 3 11 to the ON position 1 the front panel Power LED should glow in amber red and then green Figu...

Страница 28: ... page 3 4 Step 3 Using the front panel control switch turn the control switch counter clockwise to the menu named HPU Coax The menu displays either HPU Preset or No HPU as shown in Figure 3 12 Press the control switch The display will blink displaying the current state Step 4 Rotate the control switch to select Power On Step 5 Press the control switch to store the setting Figure 3 12 HPU Coax Menu...

Страница 29: ...3 9 STRATA TX Operation Guide 400 Rev Powering Up and Test Powering the STRATA Transmitter Figure 3 14 DC to DC Power Cable 907481 Figure 3 15 DC Cable Harness with Terminators 907673 9074811 ...

Страница 30: ...3 10 STRATA TX Operation Guide 400 Rev Powering Up and Test Powering the STRATA Transmitter ...

Страница 31: ...ough the screens Figure 4 1 Rotate the Control Switch clockwise to display the Monitor Screens Rotate the Control Switch counter clockwise to select Command Screens Press the Control Switch for one second to place the transmitter in transmit mode for one second to place the transmitter in standby mode from transmit mode to select options in the Command Screens to save changes in the Command Screen...

Страница 32: ...ction 5 on page 5 1 Set Power Output Transmitter Attenuation See Section 4 3 3 Setting Power Attenuation on page 4 4 Turning TXU to HPU DC Voltage on or off See Section 4 3 4 Turn Voltage from TXU to HPU On or OFF on page 4 4 See also Powering the STRATA Transmitter Section 3 on page 3 1 Turning the TCU to TXU DC Voltage on or off See Section 2 3 5 Turning Voltage from TCU to TXU On or Off on page...

Страница 33: ...nel Ch 6 Options Set Channel 4 3 2 Changing Presets This screen lets you select a Preset from the programmed presets stored in the transmitter The STRATA Transmitter is shipped with factory presets often customized for the customer System presets can only be created and changed using the STRATA Tx Configurator Software Presets are downloaded into the transmitter and where they are store in memory ...

Страница 34: ...On or OFF When the HPU and TXU are used together the HPU is powered using voltage from the TXU The voltage is superimposed on the RF cable from the TXU to HPU This screen lets you turn the voltage on or off from the TXU to HPU 2 3 4 1 Model Variations Certain STRATA Transmitters are shipped with DC Override switches which provide added control to turn DC superimposed voltage on or off If the unit ...

Страница 35: ...er Clockwise to select the 75 Ohm Coax Screen Figure 4 7 Press the control switch to toggle between Power On Voltage ON or Power OFF Voltage OFF Figure 4 7 75 Coax Screen Note Turning the TCU TXU voltage off while the transmitter is in transmit mode will place the transmitter in standby mode Step 2 If the transmitter is in Standby mode and the HPU voltage is turned on place the transmitter in tran...

Страница 36: ...e Audio 1 ON Vid Dev 4MHz No Video Analog IF Pre 4 83 MHz Audio 2 ON Pre 4 83 MHz Audio 3 ON Pre 4 83 MHz Audio 4 ON Pre 4 83 MHz IF CW OFF No Errors HPU Rdy 6 Preset 1 Section 5 7 Radio Menu on page 5 6 Section 5 10 FMT Menu on page 5 9 Section 5 7 Radio Menu on page 5 6 Section 5 11 Channel Plan Menu on page 5 10 Appendix A Error Codes ...

Страница 37: ...udio A Analog Preset 1 COFDM IF FE 1 2 GI 1 8 NTSC NOPdstl Vid In 4 2 0 Video Delay Normal IF CW OFF No Errors HPU Ready C8 HPU Rdy 6 MPEG Audio A Analog Section 5 11 Channel Plan Menu on page 5 10 Section 5 8 COFDM Menu on page 5 7 Section 5 7 Radio Menu on page 5 6 Section 5 9 MPEG Menu on page 5 8 Section 5 7 Radio Menu on page 5 6 Appendix A Error Codes ...

Страница 38: ...4 8 STRATA TX Operation Guide 400 Rev Display Screens Front Panel Controls ...

Страница 39: ...res the following hardware and software Hardware PC compatible LAPTOP or desktop computer Serial Cable with DB9 connectors Software Operating System Windows 98 NT 2000 XP Disk space 50 MB Memory 512 MB 5 3 Installation and Setup Use the following procedure in Table 5 1 to setup the transmitter for operation Table 5 1 Set Procedures Sequence Task Menu Section Step 1 Install the STRATA Configurator ...

Страница 40: ... Double click on the file named STRATAConfigInstall exe Step 10 The InstallShieldWizard will open and the software installation will begin Follow the prompts and the installation is straight forward You will have the opportunity to change the folder that the files are placed in The default file is C Program Files MRC Broadcast STRATA Configuration Program 1 0 Step 11 To verify the installation see...

Страница 41: ...Figure 5 4 Figure 5 4 Serial Cable Wiring Diagram ALM ALM TCU TX Serial Connection Serial Connection 1 2 3 4 5 6 7 8 9 1 2 3 4 5 6 7 8 9 PC STRATA YELLOW RED GREEN GREEN RED YELLOW 9 PIN D FEMALE 9 PIN D FEMALE 5 5 2 Connecting and Verifying Step 1 Connect the PC serial port to the TCU or TXU as shown in Section 5 5 1 Serial Cable on page 5 3 Step 2 Apply DC power to the STRATA TX radio system and...

Страница 42: ...en Step 6 If you are unable to open a serial port or establish a valid serial port connection to a STRATA TX radio system exit the application and resolve the problem Step 7 Once a connection is established with a STRATA TX System you should see the main Customer Screen display with all front panel controls activated as shown in Figure 5 8 Note An active programming or configuration retrieval sess...

Страница 43: ...elect a Preset radio configuration A Preset is a stored radio configuration including channel plan FMT Modulation COFDM or MPEG settings Menu Tabs to display the following menus Radio Menu COFDM Modulation MPEG Encoding FMT Modulator Channel Plan Configuration Blocks TXU Set up for FMT or COFMD MPEG configurations TCU Set up for FMT COFMD or MPEG configurations Note Figure 5 8 shows the Main Menu ...

Страница 44: ...SI stream to the monitor and output connectors to TXU if present External 70 MHz IF in 70 MHz IF input signal from input connector routed through TCU to TXU if present Analog IF Output Routes 70 MHz FM output to the TXU if present This mode is only supported with the FMT option installed Color Bars PAL 625 Line video NTSC 525 Line Video Auto Color Bars display at loss of video OFF Turned off IF CW...

Страница 45: ... have darkened characters Step 2 Select FEC Bandwidth and Guard Interval Option Description Modulation QPSK 16 QAM 64 QAM Used to select each digital modulation mode for COFDM operation and DVB S mode when applicable Note 64 QAM modulation may not be used in the DVB S mode of operation FEC Forward Error Correction 1 2 2 3 3 4 5 6 7 8 Bandwidth 6 7 or 8 MHz Guard Interval 1 4 1 8 1 16 1 32 Figure 5...

Страница 46: ...udio Type MPEG or Linear Audio Audio A Mode Dual Mono or Stereo Audio A Input Test Tone Analog SDI Embedded or AES EBU Audio B Mode Same as Audio A Audio B Input BISS Encryption BISS BISS 1 or BISS E Encryption Modes BISS 1 requires Key BISS E requires Key and ID Note BISS 1 or BISS E Encryption must be licensed through MRC Encryption keys and ID codes are set at the factory and cannot be altered ...

Страница 47: ...ons Option Options Description Video Deviation 3 MHz or 4 MHz Audio Channel 1 Frequency See channel frequencies in Figure 5 13 Enabled Enables audio channel when box is checked Disables audio channel when box is un checked Pre emphasis Enables audio pre emphasis when box is checked Disables audio pre emphasis when box is un checked Figure 5 13 FMT Menu 4830 KHz 5200 KHz 5800 KHz 6200 KHz 6800 KHz ...

Страница 48: ...rs all fields leaving them blank Use this feature first if creating a custom channel plan Default FCC Channel Plan Loads the default FCC channel plan Load Plan from File Loads the a channel plan from stored in a file The channel plan files use the extension CHP Save Plan to a File Loads the a channel plan from stored file The channel plan files use the extension CHP Option Options Description Vide...

Страница 49: ...n the following ways Analog audio as part of a composite video input to the transmitter 4 separate analog channels connected to the front panel audio connector In a TCU with both MPEG and FMT modules installed 4 analog audio channels are connected in series to the FMT and then COFDM modules 6 3 2 MPEG Audio Input Audio circuits must be configured in pairs Audio A Channels 1 2 Audio B Channels 3 4 ...

Страница 50: ...d from the audio connector to the FMT module TCU MPEG Module Only 4 analog 2 4 circuits connected from the audio connector to the MPEG module analog connectors 4 digital 2 4 circuits connected from the audio connector to the MPEG module digital connector 2 analog 2 digital 2 2 2 analog circuits connected from the audio connector to the MPEG module analog connector 2 digital circuits connected from...

Страница 51: ...SC PAL SDI ASI IF Filter Inter Unit Communcitaion Link SDI ASI IF CV IF RF Up Converter Amplifier 70 MHz 6 6 2 Video Connections Video connections are made to a single BNC front panel connector Figure 6 2 Video input selections are made by selecting presets from the front panel control switch Presets are created using the STRATA Configurator Software For more information see STRATA Tx Configurator...

Страница 52: ...reated using the STRATA Configurator Software For more information see STRATA Tx Configurator Section 5 on page 5 1 MPEG COFDM FMT SIGNAL IN ASI MON ASI COFDM 70 MHZ 70 MHZ MONITOR SIGNAL OUT SDI MPEG MPEG CV ASI COFDM 1 FMT CV Filter NTSC PAL SDI MPEG Figure 6 4 TCU Rear Panels Table 6 3 TCU Input Output Signal Options System Option Signal Input Signal Output Monitor Output Alternate Output MPEG ...

Страница 53: ...AES EBU Connectors XLR Connections Audio Connector 1 A RETURN RIGHT CH 1 Channel 2 1 Pin 3 Figure 6 5 Audio Connector B GND Note 1 GND 1 Pin 1 C LIVE RIGHT CH 1 Channel 2 1 Pin 2 2 D RETURN LEFT CH 1 Can 1 2 Pin 3 B GND Note 1 GND 2 Pin 1 E LIVE LEFT CH 1 Can 1 2 Pin 2 3 F RETURN RIGHT CH 2 3 Pin 3 G GND Note 1 3 Pin 1 H LIVE RIGHT CH 2 3 Pin 2 4 J RETURN LEFT CH 2 4 Pin 3 G GND Note 1 4 Pin 1 K L...

Страница 54: ...6 6 STRATA TX Operation Guide 400 Rev Audio Connections Audio Video Connections Figure 6 6 Audio XLR Cable 907471 22 00 55 88 cm 38 00 96 52 cm 907471 REV B ...

Страница 55: ...on models of the STRATA Transmitter Unit TXU or Transmitter Control Unit TCU used connections on the front panel audio connector to connect to the data port on the MPEG module inside the unit You should verify your order to see how you system is configured Figure 7 2 shows a block diagram of the connections required for connections to the Audio Connector Figure 7 2 Wayside on Audio Wiring Diagram ...

Страница 56: ...7 6 Figure 7 6 shows the data connections on the Transmit end of the Wayside Channel for the serial port on the TXU or TCU Both serial and wayside connections are shown Figure 7 5 Transmitter Wayside Connections Figure 7 6 shows the data connections on the Receive end of the Wayside Channel for the serial port on the RCU or RXU Both serial and wayside connections are shown Figure 7 6 Receiver Ways...

Страница 57: ...IF COAX WATTAGE E037 TXU PS RF COAX CURRENT E038 TXU PS RF COAX VOLTAGE E039 TXU PS RF COAX WATTAGE EP3A TXU PS CKT CURRENT EP3B TXU PS CKT VOLTAGE E0EC TXU PS CKT WATTAGE E03D TXU PS DC BUS E03E Table A 2 TCU Errosr Codes Table A 3 HPU Error Codes Error Codes MID TCU PS 48 VOLT LINE E040 TCU PS 5 5 VOLT LINE E041 TCU PS TEMPERATURE E042 TCU PS COAX CURRENT E043 TCU PS COAX VOLTAGE E044 TCU PS COA...

Страница 58: ...desm Table A 5 FMT Error Codes Table A 6 System Errors Error Codes MID COFDM ENCODER COMM ERROR E080 Error Codes MID FMT VIDEO PLL UNLOCK E0E0 FMT AUDIO1 PLL UNLOCK E0E1 FMT AUDIO2 PLL UNLOCK E0E2 FMT AUDIO3 PLL UNLOCK E0E3 FMT AUDIO4 PLL UNLOCK E0E4 SYSTEM_ERROR_SUMMARY E400 Error Codes MID SYSTEM_ERROR_SUMMARY E400 ...

Страница 59: ... 25 2475 5 2479 75 10 2487 75 2492 0 2496 25 11 2487 75 2492 0 2496 25 12 2487 75 2492 0 2496 25 13 2487 75 2492 0 2496 25 14 2487 74 2492 0 2496 25 B 3 Future Bands Table B 2 6 GHz RF Channel Guide U S Broadcast on page B 1 Table B 3 12 GHz RF Channel Guide U S Broadcast on page B 2 Table B 4 13 GHz RF Channel Guide U S Broadcast on page B 2 Table C 2 6 GHz RF Channel Guide U S Broadcast Setting ...

Страница 60: ...2 50 12868 75 8 12881 25 12887 50 12893 75 9 12906 25 12912 50 12918 75 10 12931 25 12937 50 12943 75 Table C 4 13 GHz RF Channel Guide U S Broadcast Setting Offset MHz 0 Center MHz Offset MHz 11 12956 25 12962 50 12968 75 12 12981 25 12987 50 12993 75 13 13006 25 13012 50 13018 75 14 13031 25 13037 50 13043 75 15 13056 25 13062 50 13068 75 16 13081 25 13087 50 13093 75 17 13106 25 13112 50 13118 ...

Отзывы: