background image

36     Microtek ScanWizard Bio Reference Manual

Resolution Settings

Resolution is the sampling of image pixels per measurement unit or the amount
of pixel information stored in an image. Together, the image resolution and
dimensions determine the file size of the image, which is measured in kilobytes
(KB) or megabytes (MB).

The resolution of an image is important in determining the quality of the output
image. Resolution is also directly related to file size, and the higher the
resolution, the larger the resulting file size will be.

When dealing with resolution, remember to distinguish between optical
resolution and interpolated resolution.

Optical resolution is the “real” resolution as measured by the scanner’s optics.
Interpolated resolution is software-enhanced resolution and can be useful for
enlarging very small images or for printing line art to obtain superior results.

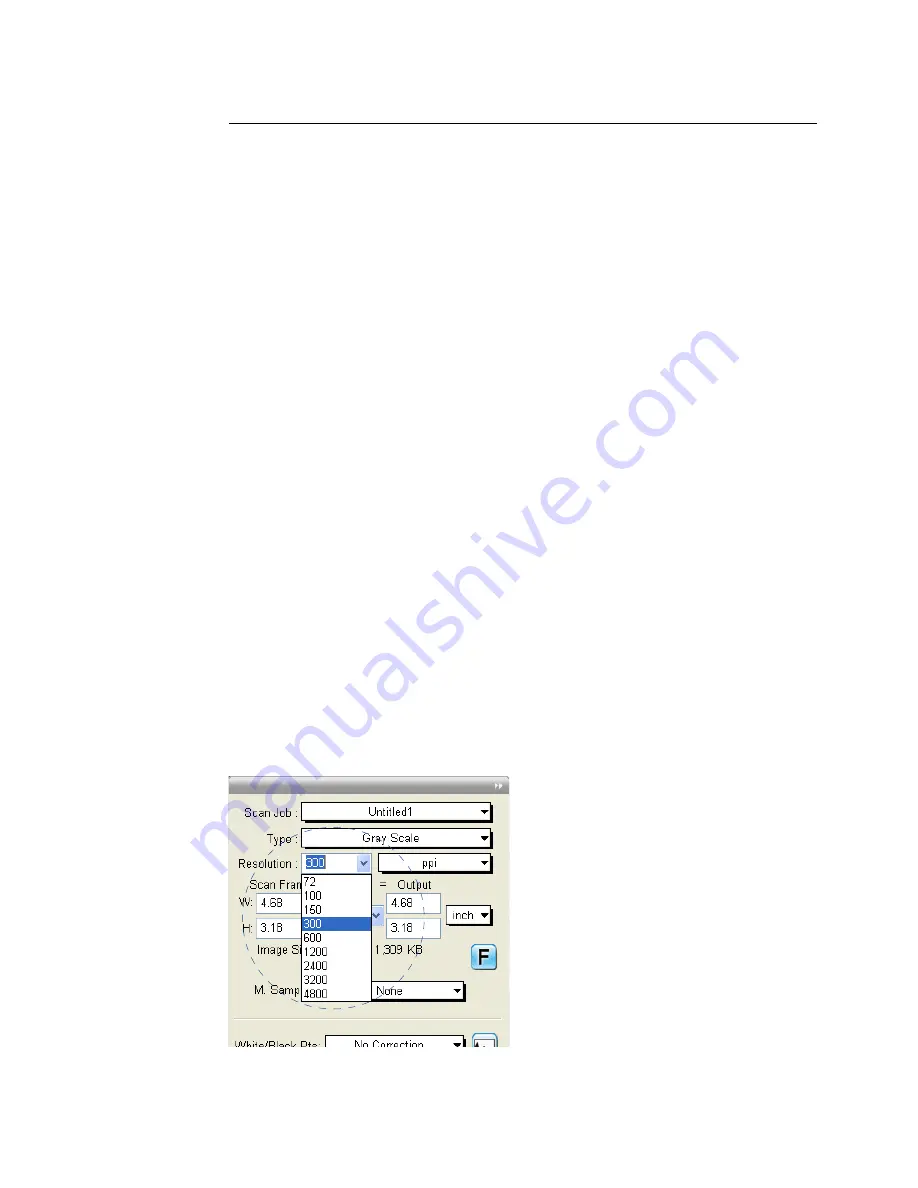
Resolution List Box

This provides predefined resolution values for easier selection of the resolution
setting.

The default resolution depends upon the scanner you are using, and the choices
available to you in the resolution list box will also depend on your scanner. After
you select your resolution value, this value is then recorded for subsequent use,
until a new value is selected and takes over.

To choose your resolution, click the arrow button next to the Resolution box,
and choose your setting from the list box.

Содержание ScanWizard Bio

Страница 1: ...Reference Manual...

Страница 2: ...aphical errors Important Documents that you scan may be protected under copyright law The unauthorized use of such documents could be a violation of the rights of the copyright holder Microtek bears n...

Страница 3: ...iew Prescan and Scan to 9 Overview 9 Prescan 9 Scan to 9 Copy 10 E mail 10 Toolbar 11 Scan Frame Frame 11 Zoom Magnify Glass 11 Move Pan 11 White Black Points Pickers 12 Auto Focus 13 The Scanner Menu...

Страница 4: ...32 Scan Job 34 Image Type 35 Resolution Settings 36 Resolution List Box 36 Resolution Unit 37 Scan Frame and Related Settings 38 Scan Frame Settings 38 Scaling 38 Output Settings 39 Image Size 39 Unit...

Страница 5: ...0 Sample Display Area 61 Color Meter Options 61 The Scan Job Queue Window 62 Elements of the Scan Job Queue window 62 One pass Scan for Multiple Scan Jobs 64 Multiple Auto crop for EZ Lock Film Holder...

Страница 6: ...vi...

Страница 7: ...for the use of the electrophoresis gel scanning This manual covers the various commands and features found in the ScanWizard Bio scanning software for the Windows system The manual information is div...

Страница 8: ...time You may hide or show the Scan Job Queue and Information windows by clicking on the Hide Show toggle commands in the View menu of the Preview window Settings window contains scanning parameters f...

Страница 9: ...on the desktop or choose Start Programs Microtek ScanWizard Bio for Windows and then ScanWizard Bio From Plug in mode Choose the Import or Acquire command from the File menu of your image editing soft...

Страница 10: ...e Manual The Preview Window The Preview window is the most prominent window of the four major windows and it includes the various commands and tools for controlling the scanner Elements of the Preview...

Страница 11: ...starts the final scanning process F Scan Material button This shows the type of your scan material Reflective photos and prints or Transmissive electrophoresis gels and slides G Minimize button Click...

Страница 12: ...rescan or Scan to button By the default the maximum size of the preview area is determined by your scanner s bed size or maximum scan area For example if the scanner s maximum scan area is 14 x 17 the...

Страница 13: ...film If you are scanning reflectives such as photos or printed materials this is the appearance of the Scan Material icon When you click the icon and hold down the mouse you will see the Reflective o...

Страница 14: ...clicking the ruler unit button at the 0 0 point of the rulers in the Preview window Depending on your selection the rulers can mark off measurement in these units inch centimeter millimeter point and...

Страница 15: ...review window Prescan The Prescan button offers a high resolution preview image of the area selected by the scan frame tool Multiple prescans can be done if you have several selected scan jobs The pre...

Страница 16: ...s Specify the number of copies to be made then click OK E mail Click the Scan To button and hold down the mouse until the Options menu appears then select E mail When the E mail Save As dialog box app...

Страница 17: ...fies or reduces by a factor of 2 Thus the magnification levels increase from 100 to 200 to 400 and to the maximum 800 When you reach the maximum magnification factor the center of the Zoom tool will a...

Страница 18: ...Info window based on the sample size selected in the Info window Pixel value information is useful especially when you are making color adjustments based on color value To change the sample size of t...

Страница 19: ...vated only for the scanners that support Auto Focus function e g Bio 5000 The area applied with the Auto Focus function is decided and selected by the software system automatically Click the Overview...

Страница 20: ...olbar in the Preview window and select the area in the scan frame to which the AF function will be applied A redefined Auto Focus frame bordered in red will appear within the scan frame labeled with t...

Страница 21: ...nd the current scanner is indicated by a check Only one scanner can be accessed at a time To switch among various scanners select the scanner to be used Get Current Scanner Info This command provides...

Страница 22: ...scanner hardware installation guide Scanner Control Power Saving Control The power saving feature of the scanner lamp to save energy and extend the life cycle of the lamp By default the lamp turns off...

Страница 23: ...mage obtained when you click the Overview button in the Preview window The image shows you whatever is on your scan bed The Overview image is always checked automatically whenever you launch the ScanW...

Страница 24: ...the Settings window hidden behind other windows or if you have expanded your Preview window such that it hides the Settings window in the background Show Hide Window commands These commands allow you...

Страница 25: ...options such as specifying a working directory for files Scan Material This command allows you to select the correct scan material Scan materials can be classified into two types Reflectives such as m...

Страница 26: ...ubmenu that appears select your scan material a check will appear next to the selected option Calibration Setup This command allows you to specify the calibration mode and reset the calibration data i...

Страница 27: ...ata This option allows you to remove the calibration data you are using presently however other calibration data you have created previously will not be affected Once the current calibration data has...

Страница 28: ...you specify 10 percent as your White Point clipping value and then click the Auto button the white point on the histogram is adjusted so that 10 percent of the color information is clipped or ignored...

Страница 29: ...or Auxiliary Lines command in the Preferences menu From the submenu that appears select how the cursor lines will appear On both x horizontal and y vertical axes On x axis only On y axis only None no...

Страница 30: ...e the overview area so that the scanner consistently overviews only the specific dimensions you have in mind For example if your maximum scan area is 12 x 17 you can customize the overview area so tha...

Страница 31: ...travelling at a lesser distance Fast Overview The Fast Overview option supports faster scanning If Fast Overview is unchecked the Overview scanning speed is slow but a better overview image quality i...

Страница 32: ...rs Fast Prescan If checked a coarser or lower quality image is obtained but at a faster scanning speed If unchecked a better quality image is obtained but at a slower scanning speed Prescan Image Marg...

Страница 33: ...r gamma option is checked click the up down arrow buttons to make the gray level of the boxes as close as possible Click OK to confirm Invert This command creates a negative effect to an image The Inv...

Страница 34: ...age that is scanned in the Overview command remains on the screen until the next image is acquisition is performed If unchecked the overview image is deleted when you exit ScanWizard Bio Keep All Pres...

Страница 35: ...ta is delivered faster and the image data is processed in 8 bits per channel Quality This is the default setting Scanned data is delivered a little slower but in high quality and the image data is pro...

Страница 36: ...irectory to use The working directory is the folder where ScanWizard Bio creates temporary files with the temporary files deleted at the end of an operation You should change to a different folder onl...

Страница 37: ...tion menu correspond to the AIC buttons in the Settings window For more information see the section of the manual on Advanced Image Correction The Help Menu The Help menu lets you access on line help...

Страница 38: ...s window contains the parameters for outputting your scanned image for the current scan job and includes the advanced image correction tools of the program Elements of the Settings window A B C D E G...

Страница 39: ...which represent the dimensions of the image when it is output E Image size This shows the size of the file when the image is scanned F M Sampling Multiple Sampling This lets you reduce the random noi...

Страница 40: ...he Scan Job box of the Settings window To select from multiple scan jobs choose the scan job you wish in the Scan Job box this will automatically select the corresponding scan job in the Preview and S...

Страница 41: ...io allows a direct scanning in either of RGB Colors RGB Colors 48 bit Gray Scale or Gray Scale 16 bit color spaces The default image type depends upon the scanner you are using and the choices availab...

Страница 42: ...l resolution and interpolated resolution Optical resolution is the real resolution as measured by the scanner s optics Interpolated resolution is software enhanced resolution and can be useful for enl...

Страница 43: ...your scanned images are to be printed If you choose 1x for instance your scanned image will be printed at 133 lines per inch resulting in a 133 dpi image At 1 5x the image will be printed at 199 5 dp...

Страница 44: ...ame settings width and height represent the area on the scan bed that you wish to scan To specify your settings enter the dimensions manually in the width and height edit boxes or use the Scan Frame t...

Страница 45: ...you accept the dimensions shown in the edit boxes together with the resolution setting that you have selected Size is calculated automatically The resulting file size depends on the image type resolut...

Страница 46: ...down scanning as the process requires extra time to yield higher quality images To use the Multiple Sampling function 1 In the Preview window click the Overview button to preview the image 2 Select th...

Страница 47: ...that the effects of the Transform function will only be applied to the scanned image after you click the Scan button the Transform effect is not applied to the Overview image Transform The Reset butt...

Страница 48: ...within ScanWizard Bio and preview the changes to your image even before you scan The various AIC tools available for use will be shown depending on the Scan Material chosen in the Preview window The f...

Страница 49: ...ls 1 To access an AIC tool click a particular tool in the Settings window or choose its counterpart in the Correction menu in the Preview window 2 After clicking a tool the AIC dialog box appears The...

Страница 50: ...e shown in the Preview window If unchecked the image size appears fit into the shown dialog box D Hide Thumbnails If checked the before and after thumbnails becomes hidden The screen collapses to show...

Страница 51: ...tails H Add To Menu button This button allows you to save a custom setting for an AIC tool You may retrieve this custom setting afterwards from the Setting windows I AIC tools These tools adjust or en...

Страница 52: ...en closes the AIC dialog box The settings remained unchanged Reset button This button brings up the Reset dialog box where you can specify which settings are to be restored to their default values the...

Страница 53: ...ng as a custom setting The next time you wish to retrieve that particular shadow setting simply go to the White Black Point AIC drop down menu and choose that setting Adding Custom Settings To add a c...

Страница 54: ...enu When a dialog box comes up select the particular setting to be removed then click Remove and Done in the dialog box Loading Retrieving Custom Settings To load or retrieve a custom setting that you...

Страница 55: ...c representation of how all the pixels in an image are distributed across brightness and darkness levels The darkest pixels are at the left the lightest pixels are at the right A histogram skewed heav...

Страница 56: ...nput value is 2 it means that 15 of all pixels in the image have a value of 2 or less E The Setup button This button provides you with advanced controls for setting the clipping points for your white...

Страница 57: ...rs to new points on the histogram Moving the black slider to the right will yield more contrast in the highlight areas of the image so that more detail emerges in the highlight areas Moving the white...

Страница 58: ...255 scale for 8 bit images 0 to 4096 scale for 12 bit images A G B D E How to Read the Curve The Curve shows the relationship of the brightness changes across the middle pixels between the resulting...

Страница 59: ...ne is to horizontal the lower the contrast A Curve The Curve is a graphic representation of the tone curve showing scanner input from dark on the left to light on the right B Method The Method sets th...

Страница 60: ...ck handle appears to mark your position To remove the handle drag it off the graph Use the Curve Zoom Frame tool to zoom in and out on a particular point in the curve Once the area is zoomed in you ca...

Страница 61: ...en click on the curve to define the points where the curve will be modified You can then either raise or lower the curve at that point and see changes to the image accordingly 4 When the changes are d...

Страница 62: ...er separation between the darkest and lightest areas of the image Brightness The Brightness control lets you change the brightness setting Too much brightness can make an image look washed out while t...

Страница 63: ...Using the Exposure Time 1 In the Settings window click the arrow button next to the Exposure Time box and choose Custom to enable its slide bar under it 2 Point your mouse to the slider bar then adju...

Страница 64: ...h one click automatic color recovery process is simple and straightforward involving no learning curve or hassle To use the Automatic Color Restoration function 1 In the Preview window of the Advanced...

Страница 65: ...tion window displays color information as you move the cursor over the preview image in the Preview window or the thumbnail in the Advanced Image Correction dialog box if it is open You can choose to...

Страница 66: ...ter will show the appropriate K values of that point in the image The significance of the numbers is explained below There are two numbers shown in the Color Output Meter The first number represents t...

Страница 67: ...ting from the drop down menu that appears Value and Percent If Value is chosen the numbers represent values in the 0 to 255 pixel scale regardless of the bit depth of your output image If Percent is c...

Страница 68: ...veral scan job items shown in the Scan Job Queue window You can have multiple scan jobs each having its own distinct settings the number of scan jobs is indicated by the number of titles in the Scan J...

Страница 69: ...ype a new name when an edit box appears F Selected scan job The selected scan job is the highlighted item You can have multiple selected scan jobs and clicking on a function button such as Check or Du...

Страница 70: ...al of three passes More scan jobs there are the longer the scanner time will be If this option is checked the scanner performs scanning in a single pass for all the selected scan jobs The scanner s ca...

Страница 71: ...ner to auto crop multiple scanning frames To perform multiple auto crop preview of the film loaded onto the scanner click the Smart Scan button When done you will see multiple scan frames that have be...

Страница 72: ...Jobs ScanWizard Bio lets you edit multiple scan jobs at the same time increasing your efficiency in using the software To edit multiple scan jobs simply select all the scan jobs to be edited in the Sc...

Страница 73: ...ew scan job the new scan job becomes the current scan job Duplicating a Scan Job The Duplicate button lets you duplicate the settings of a scan job This function is very helpful if you have created op...

Страница 74: ...ck sign will appear next to the selected scan job To uncheck a scan job highlight the scan job then click the Check button The scan job will be unchecked and the scan job will not be scanned when you...

Страница 75: ...bs by clicking the Folder icon yellow or use the current default folder 3 Highlight the scan jobs you want to save at the right column of the window 4 Click the Save button in the window The selected...

Страница 76: ...or Remove all button in the window to remove the scan job from the Scan Job Queue New name auto given if the name already exists When you load or save scan jobs you may check or uncheck the New name a...

Страница 77: ...dicated on the ScanWizard Bio scanning software Your system components or the devices on your system such as an external hard drive CD ROM etc Software being used with your scanner Important Aside fro...

Отзывы: