background image

4     ScanMaker s480/s380 Supplement

How the Smart-Touch Scanner Buttons Work

Note: The Smart-Touch buttons on the front panel of your scanner automate frequently
performed tasks, such as Scan to File, Send to Printer, etc. For each scanner button,
the parameters governing the use of that button are defined or set through the
Microtek Scanner Configuration (MSC) utility. You can use the MSC, for instance, to
define how many copies are to be printed of your scan every time you hit the “Copy”
button. To launch the MSC, exit ScanWizard 5 first, then double-click the MSC icon on
your desktop.

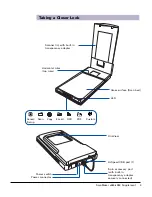
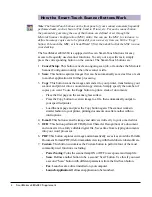
The ScanMaker s480/s380 is equipped with seven Smart-Touch buttons for easy
access to frequently used scanner functions. To carry out a specific task, simply
press the corresponding button on the scanner. The Smart-Touch buttons are:

1. Cancel/Setup: This button cancels an ongoing scan job, or launches the Microtek

Scanner Configuration utility when the scanner is idle.

2. Scan: This button captures images that can be automatically saved as files or sent

to another application for further processing.

3. Copy: This button scans the image and sends it to your printer, transforming your

scanner and printer into a convenient copy station. Simply specify the number of
copies you want. To use the Copy button to print a stack of documents:

-

Place the first page on the scanner glass surface.

-

Press the Copy button to scan an image to a file, then automatically output to
your specified printer.

-

Load the next page and press the Copy button again. The scanner works in
similar fashion to your printer, printing documents one after another with no
interruptions.

4. E-mail: This button scans the image and delivers it directly to your e-mail editor.

5. OCR: This button performs OCR (Optical Character Recognition) of a document

and converts it to a fully editable digital file. Saves time from retyping documents
into your word processor.

6. PDF: This button captures an image and automatically saves it as an Adobe Portable

Document Format (PDF) file for immediate viewing with the Adobe Acrobat software.

7. Custom: This button customizes the Custom button to perform four of the most

commonly used functions, including:

-

Power Saving: Turns the scanner lamp ON or OFF to save power and lamp life.

-

Scan: Defines another button to be a second “Scan” button. Use this if you need
a second “Scan” button with different parameters from the first Scan button.

-

Fax: Launches a fax driver installed on your computer.

-

Launch Application: Defines an application to be launched.

Содержание ScanMaker s380

Страница 1: ...m up to 6 x 17 cm Also featured is ColoRescue Microtek s one touch color restoration to revive faded color in both photos and film Copyright 2007 Microtek International Inc http www microtek com Octob...

Страница 2: ...odate 35mm slides 35mm filmstrips 4 x 5 film and medium format film up to 6 x 17 cm Seven Smart Touch buttons These buttons on the front panel of the scanner provide you with a quick and easy way to l...

Страница 3: ...ory port with built in transparency adapter securely connected Scan E mail Copy OCR PDF Cancel Setup Custom LED Glass surface Scan bed Scanner lid with built in transparency adapter Horizontal ruler t...

Страница 4: ...ming your scanner and printer into a convenient copy station Simply specify the number of copies you want To use the Copy button to print a stack of documents Place the first page on the scanner glass...

Страница 5: ...your first scan in order to familiarize yourself with scanning basics It makes use of the Standard Control Panel in ScanWizard 5 Scanning photos 2 This scenario is similar to above but uses the Advan...

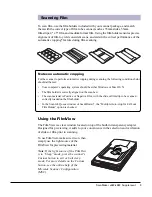
Страница 6: ...ass surface Position the top end of the photo towards the back of the scanner Note Use of the white mat on top of your photo filters out unwanted light during scanning and ensures the correct function...

Страница 7: ...will appear in the preview window 6 If you wish to resize the preview image drag on the edge or corner of the scan frame the floating dotted lines around the preview image This allows you to determin...

Страница 8: ...8 ScanMaker s480 s380 Supplement...

Страница 9: ...film holder is correctly aligned on the scan bed The scan material is Positive or Negative Film with the slide or filmstrip to be scanned correctly loaded on the film holder In the Scan Job Queue win...

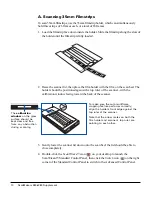
Страница 10: ...ndow facing toward the back of the scanner 3 Gently lower the scanner lid down onto the scan bed the lid should be able to close completely 4 Double click the ScanWizard 5 icon on your desktop to laun...

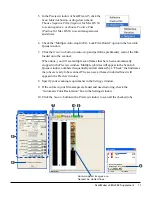
Страница 11: ...a preliminary scan of the film loaded onto the scanner When done you will see multiple scan frames that have been automatically cropped in the Preview window Multiple job titles will appear in the Sca...

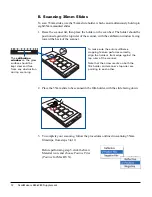
Страница 12: ...n the film holder with the slide facing down 3 To complete your scanning follow the procedures outlined in scanning 35mm filmstrips from steps 3 to 10 Before performing step 5 click the Scan Material...

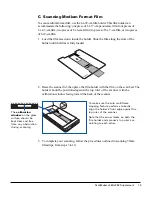
Страница 13: ...anner lid then place the film holder with the film on the scan bed The holder should be positioned against the top ruler of the scanner with the calibration window facing toward the back of the scanne...

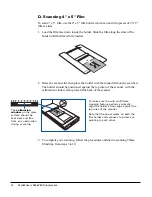
Страница 14: ...be positioned against the top ruler of the scanner with the calibration window facing toward the back of the scanner 3 To complete your scanning follow the procedures outlined in scanning 35mm filmst...

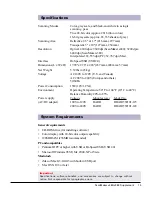
Страница 15: ...g Area Reflective 8 5 x11 7 216mmx297mm Transparent 5 x 10 127 mm x 254 mm Resolution Optical 4800 dpi x 9600 dpi ScanMaker s480 3200 dpi x 6400 dpi ScanMaker s380 Interpolated 65 535 dpi PC 32 767 dp...

Страница 16: ...rference by one or more of the following measures Reorient or relocate the receiving antenna Increase the separation between the equipment and receiver Connect the equipment into an outlet on a circui...

Отзывы: