background image

ScanMaker 9800XL Plus User Guide     13

C. Using the 120 Film Template

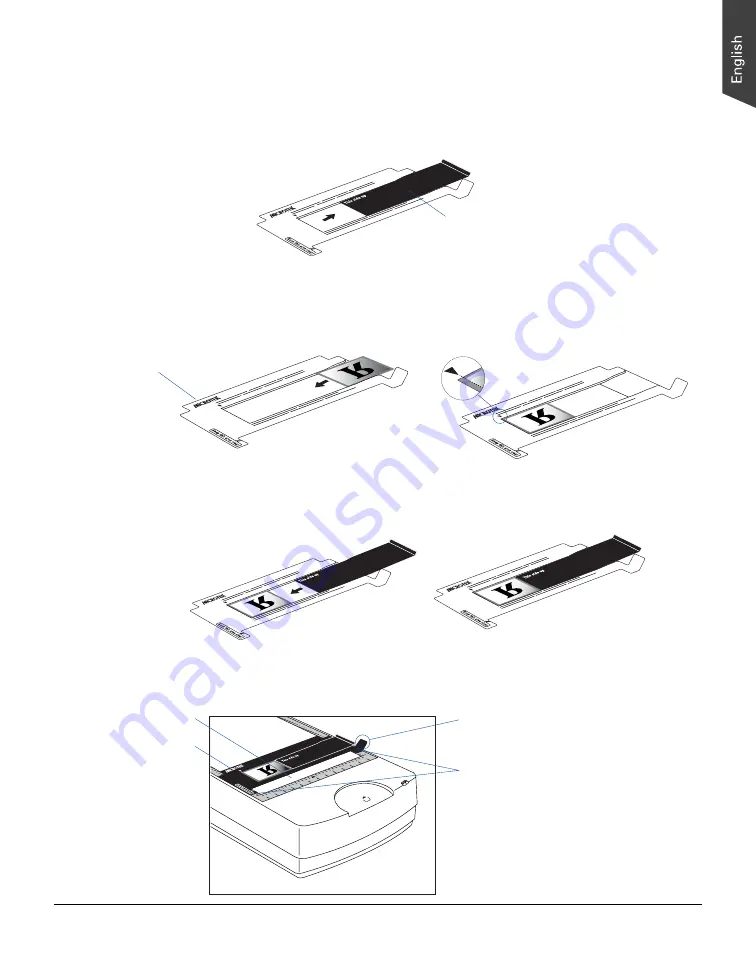
To scan 6 x 4.5 cm, 6 x 6 cm, 6 x 7 cm, 6 x 9 cm, and 6 x 17 cm panoramic film, use the
120 Film Template, which can hold up to 4 pieces of 6 x 4.5 cm film, 2 pieces of 6 x 9 cm
film, or a single piece of 6 x 17 cm panoramic film.

1. Place the 120 film to be scanned inside the frame of the 120 Film Template. The

shiny base of the 120 film should be facing down, and the emulsion side of the
film should be facing up.

2. Load the Black Plate into the template frame, with the side of the Black Plate that

reads “This side up” facing up. Slide the Black Plate until its edge is against the
film and completely covers the blank spaces of the template.

Orient template with
"Microtek" logo facing up

3. Place the 120 Film Template containing the loaded film on the scanner glass

surface. Make sure to orient the template with the “Microtek” logo facing up.

Align the edge of the film frame
with the arrow mark of the template

2

1

0

3

4

5

6

6

5

4

3

2

1

The 

Grabber

 is used to remove the

template out of the scanner glass
surface.

Important

: Align the template's

front corners firmly against the top
corners (left and right) of the
U-shaped ruler located at the front
of the scanner. During placement of
the template, make sure that the
calibration strip on the scanner
glass surface is kept clear and free
of obstruction at all times.

Calibration strip

Microtek logo

Remove the Black Plate from the 120 Film
Template before loading the 120 film

Содержание ScanMaker 9800XL Plus

Страница 1: ...B Installing theTMA 1600 III 6 C Unlocking theTMA 1600 III 7 Positioning Reflective Originals 8 PositioningTransparent Film 10 A Using the 35mm SlideTemplate 1 1 B Using the 35mm FilmstripTemplate 12...

Страница 2: ...es faded colors in photos and film bringing hues back to their original luster and brilliance for more vibrant images ColoRescue s one click automatic color recovery process is simple and straightforw...

Страница 3: ...1 Scanner lid or TMA 1600 III Glass surface Vertical ruler READY indicator Green POWER indicator Orange Power connector Accessory port or with TMA 1600 III s connector securely connected Hi Speed USB...

Страница 4: ...out a little protruding slightly from the bottom of the scanner Shipping the Scanner If you have to transport the scanner you will need to lock the scanner back Follow the steps below 1 Turn off the s...

Страница 5: ...an optional accessory depending on the scanner configuration that you purchased TMA 1600 III Black Plate for scanning reflective media Film Alignment Ruler for scanning film without using templates 4...

Страница 6: ...s switched off 2 Remove the scanner lid then attach the TMA 1600 III by sliding the posts at the rear of the TMA 1600 III into the holes 1 0 3 4 5 6 6 5 4 3 2 1 2 1 0 3 4 5 3 2 1 1 0 3 4 5 6 6 5 4 3 2...

Страница 7: ...u have to transport the TMA 1600 III you will need to lock the TMA 1600 III back Follow the steps below 1 Make sure the TMA 1600 III is connected to the scanner then turn off the scanner if your scann...

Страница 8: ...6 6 5 4 3 2 1 1 0 3 4 5 6 6 5 4 3 2 1 B If you purchased your ScanMaker 9800XL Plus with the TMA 1600 III you will need to use the Black Plate included with your TMA 1600 III package to shield unwante...

Страница 9: ...ight out Two Black Plates are available with your TMA 1600 III package Take note of the following before using the Black Plate 1 The Black Plate may become dirty over time and with prolonged use To cl...

Страница 10: ...non standard size transparent film such as 8 x 10 film as well as medical and dental X rays Included in the TMA 1600 III package are four types of templates 35mm Slide Template 35mm FilmstripTemplate...

Страница 11: ...35mm slide should be facing down and the emulsion side of the slide should be facing up 2 1 0 3 4 5 6 6 5 4 3 2 1 The Grabber is used to remove the template out of the scanner glass surface Important...

Страница 12: ...the loaded filmstrip on the scanner glass surface Make sure to orient the template with the Microtek logo facing up Orient template with Microtek logo facing up Align the edge of the film frame with t...

Страница 13: ...film and completely covers the blank spaces of the template Orient template with Microtek logo facing up 3 Place the 120 Film Template containing the loaded film on the scanner glass surface Make sure...

Страница 14: ...ing the loaded film on the scanner glass surface Make sure to orient the template with the Microtek logo facing up Orient template with Microtek logo facing up 2 1 0 3 4 5 6 6 5 4 3 2 1 The Grabber is...

Страница 15: ...e front of the scanner with the ruler oriented correctly and with the correct side up During placement of the Ruler make sure that the calibration strip on the scanner glass surface is kept clear and...

Страница 16: ...s At least two sets of each template are included in your TMA 1600 III package for multiple placements of the templates on the scanner The templates can be placed side by side on the scanner glass sur...

Страница 17: ...arize yourself with scanning basics Scanning positive film This scenario details the steps for scanning positive film such as 35mm mounted slides and X rays Scanning negative film This scenario detail...

Страница 18: ...e 2 Launch ScanWizard Pro either as a standalone by clicking the program icon or by using the File Import or File Acquire command from your image editing program such as Adobe Photoshop The first time...

Страница 19: ...desired resolution c Adjust the scan frame settings if necessary 8 Adjust image quality if necessary using theAdvanced Image Correction AIC tools 9 If the colors in your photo are faded and need rest...

Страница 20: ...20 ScanMaker 9800XL Plus User Guide...

Страница 21: ...he Toolbar in the Preview window and choose the area to be scanned by dragging a rectangle around it You will see a flashing frame marquee around the selected area 6 Click the Prescan button to displa...

Страница 22: ...ed If ScanWizard Pro was launched in standalone mode you will be prompted to specify the file attributes for the scanned image after the Scan or Batch button is pressed such as entering the file name...

Страница 23: ...t Ruler it is normal for a black ruler to appear in the preview window after you perform a preliminary scan of your original The Load Save button allows you to select a film template mode from a list...

Страница 24: ...flashing frame marquee around the selected area 6 Click the Prescan button to display a detailed image A thumbnail of the image appears as well in the Scan Job Queue window 7 In the Negative Scan Sett...

Страница 25: ...can or Batch button in the Preview window or on the scanner unit to start scanning If ScanWizard Pro was launched from an application program the image is then delivered to your application where the...

Страница 26: ...26 ScanMaker 9800XL Plus User Guide...

Страница 27: ...Color in the Color Type as your image output type Select Color to scan the image in color Select Grayscale to scan the image in grayscale Select Black White to scan the image in black and white b Sel...

Страница 28: ...contains a composite display of nine image effects Filter column and additional image correction tools Additional Adjustment column for your scanned image Click the Scan Settings button to switch bac...

Страница 29: ...multiple auto crop preview of the film loaded onto the scanner 5 Click the Preview button to perform a preliminary scan of the image in the Preview window You will see multiple scan frames that have...

Страница 30: ...and additional image correction tools Additional Adjustment column for your scanned image Click the Scan Settings button to switch back to the default control panel of ScanPotter Preview window Select...

Страница 31: ...Data CD included in your software kit Insert the IT8 Calibration Data CD to ensure that the MSP utility will have the latest color profile targets to reference Then the MSP installation is complete C...

Страница 32: ...sitioning the ReflectiveTarget 1 Place the target face down on the scanner glass surface making sure that the target is positioned correct side up toward the front of the scanner 2 Using the U shaped...

Страница 33: ...elect Reflective Otherwise select Positive C Select the date code and target type or reference number from the drop down list that matches your target You can verify this information by looking at the...

Страница 34: ...the target image is displayed and an instruction dialog box prompts you to align the upper right registration mark Move the cursor to the target image area the pointer will change to a normal L mark A...

Страница 35: ...ust created 1 Launch ScanWizard Pro 2 In the Preview window click the Scan Material icon Select the Reflective option for reflective materials select the Positive or Positive Film option for transpare...

Страница 36: ...281 billion colors 16 bit grayscale approx 65 536 shades of gray Scanning Area Reflective 12 x16 9 305mmx 429 26mm Transparent 12 x 16 305 mm x 405 mm Resolution Optical 1600 H dpi x 3200 V dpi Dynam...

Страница 37: ...off and on the user is encouraged to try to correct the interference by one or more of the following measures Reorient or relocate the receiving antenna Increase the separation between the equipment a...

Отзывы: