Microtek ScanMaker 4 Скачать руководство пользователя страница 20

16

English

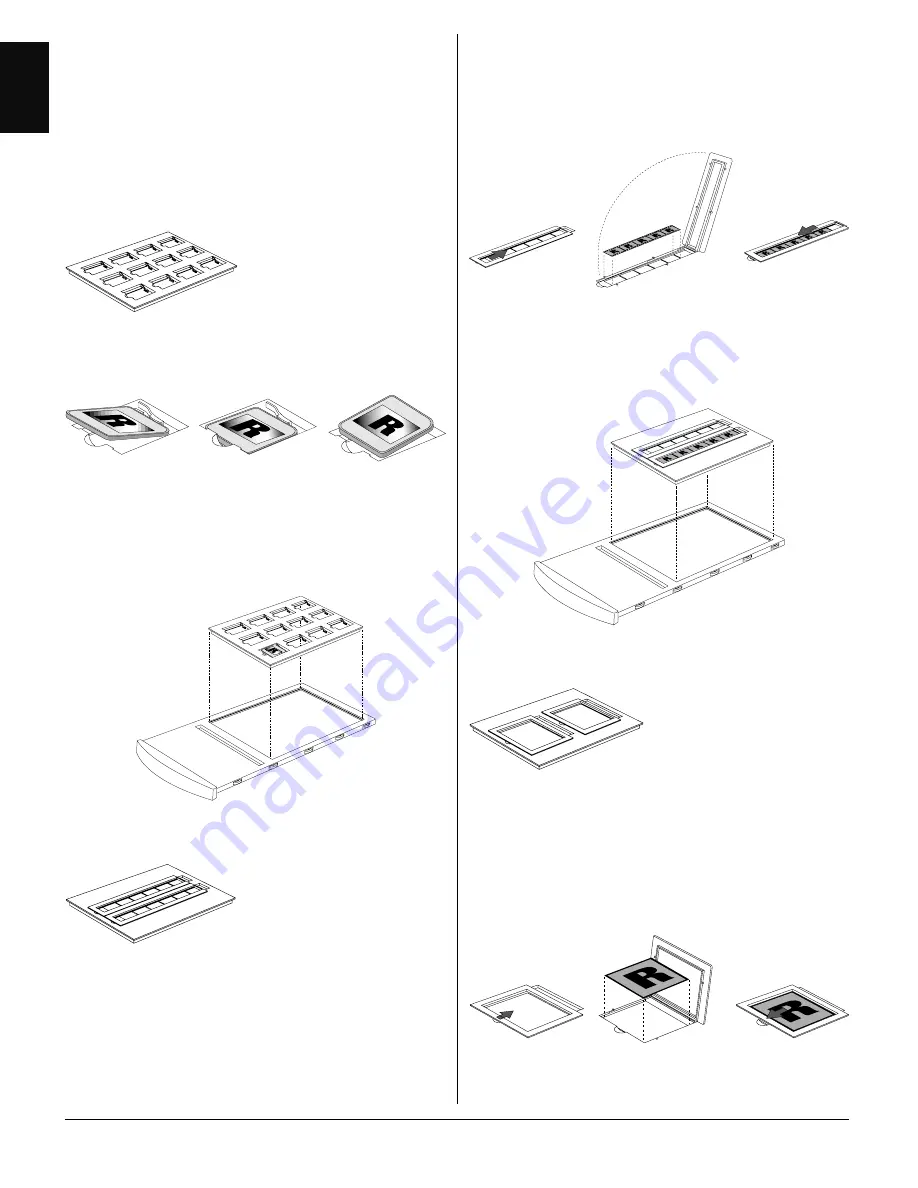
Using the Main Holder

To scan standard-sized transparent film, use the
Main Holder with the correct template that
corresponds to the film type to be scanned.

a)  Using the 35mm Batch Slide Holder

1. Insert the individual your 35mm slide to be

scanned into the 35mm Batch Slide Holder.

2. Place the 35mm Batch Slide Holder in the Main

Holder, then put this assembly in the
transparency tray of the ScanMaker 4.

b)  Using the 35mm Filmstrip Holder

1. Push to open the 5-piece 35mm Filmstrip

Holder.

2. Place the 35mm filmstrip to be scanned in the

35mm Filmstrip Holder.

35mm Batch Slide Holder

Main Holder

3. Pull to close the 5-piece 35mm Filmstrip

Holder.

4. Place the 35mm Filmstrip Holder in the Main

Holder, then put this assembly in the
transparency tray of the ScanMaker 4.

c)  Using the 4" x 5" Batch Film Holder

1. Push to open the 4" x 5" Batch Film Holder.

2. Place the films to be scanned in 4" x 5" Batch

Film Holder.

3. Pull to close the template.

35mm Filmstrip Holder

Main Holder

Содержание ScanMaker 4

Страница 1: ...Microtek ScanMaker 4 User s Manual...

Страница 2: ...tion against harmful interference in a residential installation This equipment generates uses and can radiate radio frequency energy and if not installed and used in accordance with the instructions m...

Страница 3: ...8 3 Checking your Windows NT configuration 8 4 Installing software 9 5 Connecting the scanner 9 6 Testing your scanner 10 Troubleshooting for Windows NT 4 0 11 Installation under Macintosh 12 1 Reset...

Страница 4: ...tch film holder 16 d Using the 6 x 9 cm batch film holder 17 Miscellaneous 18 Returning your scanner for repairs 18 Locking the carriage 18 Locking the ScanMaker 4 for shipping 18 Lamp Replacement 19...

Страница 5: ...kwise to unlock it When successfully unlocked the screw will push out a little nearly even with the bottom of the scanner BeforeYouBegin Introduction An image scanner is a device that captures and con...

Страница 6: ...ion To install under Windows 95 98 take the steps below 1 Install the interface card in your computer 2 Check the interface card status 3 Install software 4 Reset the scanner s SCSI ID if necessary 5...

Страница 7: ...k s proprietary color calibration technology for use with Microtek color scanners With DCR installed your scanner is capable of capturing extremely accurate color images Step 4 Install documentation r...

Страница 8: ...d Take the following steps to connect 1 Shut down your computer 2 Connect the card and the scanner using the SCSI cable that provided in the scanner package Make sure your scanner and computer are tur...

Страница 9: ...cates the Scanner Test was successful and the scanner is now ready to scan 6 Close and exit Microtek ScanTest program For more details on how to operate your scanner with ScanWizard refer to the file...

Страница 10: ...d is not properly seated in the PCI card slot on your computer Situation B Your interface card conflicts with another device Situation C Windows 95 98 can not recognize your interface card Situation D...

Страница 11: ...to shut down your computer select No then click Close You will be asked whether you wish to restart your computer Click Yes and restart your computer Resolving situation D See the section Technical Ti...

Страница 12: ...r and computer 6 Test your scanner Part of the above procedures especially to hardware installation should refer to the previous pages Installation under Windows 95 98 section Descriptions below follo...

Страница 13: ...3 Follow screen instructions to complete installation When installation is complete Microtek ScanWizard for Windows NT appears as a folder on the Programs menu Step 2 Install software application Ins...

Страница 14: ...your scanner 1 Restart Windows NT Before you restart the computer make sure your scanner is on and ready 2 Click Start Programs Microtek ScanWizard for Windows NT and then select Scanner Test 3 When...

Страница 15: ...ace card is not properly seated in the PCI card slot on your computer Situation B The AVA 2902E SCSI driver is not properly installed in your computer See details below for resolving the individual si...

Страница 16: ...ssary This procedure is provided as a reference You may or may not need to change the SCSI ID on your scanner A SCSI ID is a number assigned to each SCSI device in your daisy chain to differentiate th...

Страница 17: ...am Follow screen instructions until installation is complete 4 Scanning images 1 Launch your image editing software 2 When ScanWizard starts up and appears on your screen you will see the Settings and...

Страница 18: ...ted the READY indicators stay lit Note Note Note Note Note If there are problems with the POWER and READY indicators you may need service on your scanner Call Technical Support for help or outside the...

Страница 19: ...uch as 6 x 9 cm film 4 x 5 film individual 35mm slides or 35mm filmstrips Main Holder a 35mm Batch Slide Holder b 35mm Filmstrip Holder d 4 x 5 Batch Film Holder c 6 x 9 cm Batch Film Holder Using the...

Страница 20: ...y tray of the ScanMaker 4 b Using the 35mm Filmstrip Holder 1 Push to open the 5 piece 35mm Filmstrip Holder 2 Place the 35mm filmstrip to be scanned in the 35mm Filmstrip Holder 35mm Batch Slide Hold...

Страница 21: ...assembly in the transparency tray of the ScanMaker 4 d Using the 6 x 9 cm Batch Film Holder 1 Push to open the 6 x 9 cm Batch Film Holder 2 Place the film to be scanned in the 6 x 9 cm Batch Film Hol...

Страница 22: ...get damaged during shipping Miscellaneous This section contains information the following Returning the scanner Locking the carriage Replacing the scanner lamp Returning your scanner for repairs Your...

Страница 23: ...p back out Lamp Replacement The lamp inside your scanner is not user serviceable and should be replaced if it does not come on or begins to flicker dim after some time If the lamp requires replacement...

Страница 24: ...SCSI 2902E Interface Card for PC model only 5 SCSI Terminator optional 6 Warranty Card 7 Scanner Software CD ROM 8 Universal Glass Film Holder 9 Main Holder 10 35mm Batch Slide Holder 11 35mm Filmstri...

Страница 25: ...dy indicator for reflective materials orange LED Power indicator green LED Ready indicator for transparent films orange LED Reflective material Scanner cover Glass surface Horizontal ruler Power conne...

Страница 26: ...om 0 to 51 in 3 increments Resolution Settings 1 dpi to 1200dpi in 1 dpi increments Scanning Speed 5 milliseconds per line for line art halftone and gray 6 5 milliseconds per line for color speed meas...

Отзывы: