background image

22     ArtixScan DI 7200S/7280S User's Manual

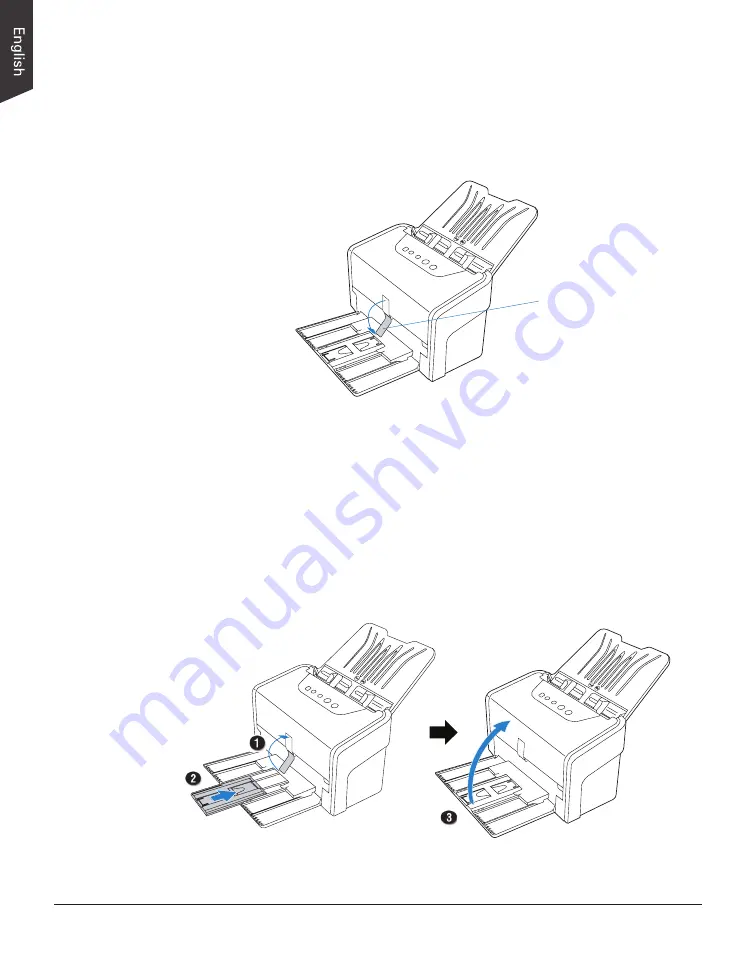
The Paper Stabilizer located at the bottom of the scanner cover is majorly 

designed to keep the stability for the paper stacks when they fall into the output 

tray from the output slot of the scanner. It is very helpful to scan documents 

with mixed paper sizes. 

To open it, bring it down gently from the top towards the direction as shown in 

the graph.

Paper Stabilizer

NOTE: If the papers to be scanned are too thin, please do not bring down the 

Paper Stabilizer. 

In case if needed to close the Document Output Tray, please remember to follow 

the steps bellow:

1.  Bring up the Paper Stabilizer.

2.  Then, push back the Output Tray Extender if it has been pull out.

3.  Finally, raise the Document Output Tray to close.

Содержание ArtixScanDI 7200S

Страница 1: ...www microtek com Document Imaging Scanner ArtixScanDI 7200S ArtixScanDI 7280S User s Manual ...

Страница 2: ...s are the property of their respective holders Specifications software and hardware bundles are subject to change without notice Not responsible for typographical errors Disclaimer The contents of this manual have been checked carefully for accuracy and every effort has been made to ensure that there are no errors However Microtek makes no guarantee as to the accuracy of the contents of this docum...

Страница 3: ...nd on the user is encouraged to try to correct the interference by one or more of the following measures Reorient or relocate the receiving antenna Increase the separation between the equipment and receiver Connect the equipment into an outlet on a circuit different from that to which the receiver is connected Consult the dealer or an experienced radio TV technician for help NOTE A shielded SuperS...

Страница 4: ...re it exits from the outlet When the scanner is left unattended and unused for long periods of time unplug it from the wall outlet Moving and Storing the Scanner Do not place the scanner on any slippery slanted or unstable surface The product may slide or fall causing serious injury to people as well as serious damage to the product Do not use this scanner near water Never spill liquid of any kind...

Страница 5: ...g Feed Tray Output Tray 14 Step 4 Connecting the Scanner 16 To the Power Adapter 16 To the SuperSpeed USB Cable 16 Connecting to an External USB Device 18 Positioning Documents 19 To Load a Stack of Documents 19 Paper Stopper and Paper Stabilizer Notice 21 To Load Cards 23 Document Notices 24 Scanning Scenarios 25 Using ScanWizard DI 25 Scanning Documents 25 Scanning Documents with Barcodes 29 Sca...

Страница 6: ...r Buttons 46 How the Scanner Button Works 47 Care and Cleaning 48 Cleaning the Scanner Glass Surfaces 48 Cleaning the Rollers 49 Cleaning the Sensors 50 Cleaning the Recesses of the Roller Cover 51 Maintenance 52 Replacing the Separation Roller Assembly 52 Replacing the Feed Roller Assembly 54 Appendix 57 Fixing Paper Jams 57 Troubleshooting 58 How to Scan the Document Using the Document Sheath Op...

Страница 7: ...can DI 7200S or 160 ipm ArtixScan DI 7280S in color grayscale and black white at 200 dpi SuperSpeed USB USB 3 1 Gen 1 interface SuperSpeed USB USB 3 1 Gen 1 is the third major version of the Universal Serial Bus USB standard for interfacing computers and electronic devices and certified by the USB IF It enables end users to move content across devices quickly conveniently and without worrying abou...

Страница 8: ...e to merge two separate images as one united image With this function you do not need other after scan editing program to modify your scanned documents Fast JPEG compression This feature allows you to save quantities of color materials in short time after scan Remove Blank Page With this feature blank pages are automatically detected and removed by the software when scanning a stack of documents T...

Страница 9: ...tem requirements CD ROM DVD ROM drive for installing software Color display with 24 bit color output capability 1 GB RAM or more 2 GB is recommended Intel Core2 Duo Processor at 2 1 GHz PC or higher with a SATA2 SATA3 at 7200 rpm HDD or SSD recommended Intel Based Mac computer with built in USB port Windows 7 8 or 10 Mac OS X 10 10 or later ...

Страница 10: ... a stack of the output documents with dfferent sizes neatly in the Document Output Tray 7 Button Panel Power Button Turns the scanner on or off Select Button Toggles through the numbers of predefined function buttons Scan Stop Button Starts scan immediately or cancel a ongoing scan job Favorite Button Activates the function associated with the Favorite button that was defined in the Save Settings ...

Страница 11: ...tack of documents are fed into the feeder 3 Release Button Lifts up to open the scanner cover 4 Glass Surfaces The places where the CCD cartridges are stored 5 Feed Roller Assembly Used to feed documents into the feeder 6 SuperSpeed USB Port 2 Connects the SuperSpeed USB cable to another scanner 7 SuperSpeed USB Port 1 Connects the SuperSpeed USB cable to the computer 8 Power Connector Connects th...

Страница 12: ... scanner package follow the steps in order for a quick and easy installation process Step 1 Unpacking Package Contents After unpacking your scanner package please check for the major components listed below Scanner SuperSpeed USB Cable Power Adapter Software CDs DVDs Power Cord ...

Страница 13: ...rotek Software CD DVD ScanPotter into a drive and double click the ScanPotter installer icon to install ScanPotter 3 Install the remaining software components then restart your computer at the end of all software installation NOTE After rebooting your Macintosh the Microtek software will attempt to locate your scanner on the system Since this is your first install and you have not yet connected th...

Страница 14: ...ch can be opened Before After 2 Along the tracks of the two sides of the Document Feed Tray slide the feed tray down until the supporters of the tray touch the bottom edge of the tracks 3 Tilt the Document Feed Tray backwards in the direction as arrow shown to fully open the tray 4 Along the tracks of the two sides of the tray slide the feed tray down until it locks in place ...

Страница 15: ...er Bring down the Document Output Tray from the top towards the direction as shown in the graph Document Output Tray Then locate the Paper Stabilizer located at the bottom of the scanner cover Lower it down gently from the top towards the direction as shown in the graph Paper Stabilizer ...

Страница 16: ... back of the scanner 2 Plug one end of the power cord into the power adapter and plug the other end of the power cord into a wall outlet or other power source To the SuperSpeed USB Cable 3 Connect one end of the SuperSpeed USB cable to your computer 4 Connect the other end of the SuperSpeed USB cable to the scanner s USB port 1 ...

Страница 17: ...s and hold the Power button until the orange LED lights on Once the scanner is powered on the green LED will be lighted up and the 7 segment LED display SSD will also be activated as well The system will detect the scanner automatically Power button ...

Страница 18: ... to your scanner 3 Turn on your computer The system will start to locate your external flatbed scanner When the external flatbed scanner is found the found flatbed scanner appears on the device list indicating your external flatbed scanner is ready for use NOTE 1 Your scanner has to be connected to your computer and plugged into a power source first and then both of them need to be powered on At t...

Страница 19: ...ed Tray 2 Align the top edges of the papers neatly 3 Load the stack of papers onto the Document Feed Tray with the side to be scanned facing down and the top edge facing toward the feeder Push the stack of papers into the tray until the paper s edge touches the bottom edge of the feeder WARNING The document feeder is not designed for scanning photos doing so may damage your originals Microtek acce...

Страница 20: ... originals with the center of the Document Feed Tray by sliding the two Guide Arms toward the stacked papers if needed 5 Pull out the Output Tray Extender to carry the longer paper if needed 6 Lift up either of two Paper Stoppers to keep a stack of output papers stay neatly and tightly inside the Document Output Tray if needed ...

Страница 21: ...r 1 or 2 depending on the length of the paper Be sure the stopper is lightly against the edge of the paper Load the paper inside the space between the stopper and the output slot of the scanner 3 Take out one piece of paper from the stacks and put it in the output tray laying it completely flat and bringing the top or bottom edge of it into contact with the bottom of the scanner 4 Push back the Ou...

Страница 22: ...cuments with mixed paper sizes To open it bring it down gently from the top towards the direction as shown in the graph Paper Stabilizer NOTE If the papers to be scanned are too thin please do not bring down the Paper Stabilizer In case if needed to close the Document Output Tray please remember to follow the steps bellow 1 Bring up the Paper Stabilizer 2 Then push back the Output Tray Extender if...

Страница 23: ... toward the center of the feed tray and free up the enough space to put the card inside 2 Load and center the card into the Document Feed Tray with the front side facing up and the top edge directing toward the feeder NOTE The Document Feed Tray can hold up to 2 pieces of cards at one time ...

Страница 24: ...ons Paper size ArtixScan DI 7200S 7280S Max 8 85 x 118 225 mm x 3000 mm Min 2 75 x 3 149 70 mm x 80 mm Paper weight 8 to 32 lbs 30 08 to 120 32 g m Card thickness Up to 1 3 mm 0 05 If the documents are torn curled or wrinkled do not put them into the scanner to scan because they may cause paper jams Remove paper clips or staples before placing documents into the tray DO NOT use the scanner to scan...

Страница 25: ...ARNING Do not place photos or fragile materials in the feed tray for it will damage the originals when performing the feeding process Before using the ScanWizard DI make sure that your anti virus software program has been turned off Otherwise the scanning speed may be affected The following sections will show you step by step how to use ScanWizard DI Scanning Documents 1 Load the document to be sc...

Страница 26: ...solution e If necessary select Text Orientation Recognition in the Rotate to ensure the scanned images in a readable orientation When it is selected you can select the preferred language used as an identification in the options menu f If Auto crop Auto deskew is selected the scanner automatically detects the size of the original image crops the full scan frame to fit the image and removes unwanted...

Страница 27: ...ned images 8 If necessary go to the Image Process panel by clicking the Image Process tab in the Settings window Use the image correction tools presented there to enhance the image quality according to your specific requirements 9 Click the OK button to close the Scan Setup interface and return to the Main interface of ScanWizard DI 10 In the Main interface click the File Format menu button to sel...

Страница 28: ...7280S User s Manual AP control panel Main interface TWAIN driver control panel Scan Setup interface File Location menu box Click on a thumbnail image to enlarge it in the Image View Window at the right side of the interface ...

Страница 29: ...Wizard DI 6 In the Main interface click the File Format menu button to select a file format for the scanned images 7 In the Main interface click the File Name menu button and then select Barcode Suffix from its drop down menu for the scanned images NOTE If you want to know more about how to deal with documents with barcodes refer to the ScanWizard DI Reference Manual in the Microtek Software CD DV...

Страница 30: ...7280S User s Manual AP control panel Main interface TWAIN driver control panel Scan Setup interface File Location menu box Click on a thumbnail image to enlarge it in the Image View Window at the right side of the interface ...

Страница 31: ...ton and then select Card Scan 4 Click the File Format menu button to select a file format for the scanned images 5 Click the File Name menu button to specify a file naming method for the scanned images 6 Click the Card Scan button to start scanning When done the scanned images will be automatically saved into the folder defined in the File Location menu box At the same time the scanned images will...

Страница 32: ...r the scanned images If you want to save all scanned pages of your document in one file please select PDF Multiple Pages or TIFF Multiple Pages from the drop down option menu 5 If it is the first time that you perform an automatic scan by using the Auto Paper Detection function follow the steps below to activate it a Click the Arrow icon next to the Normal Scan button by default to bring up the Sc...

Страница 33: ...an will be closed automatically when it is not in use for a period of time When done the scanned images will be automatically saved into the folder defined in the File Location menu box At the same time the scanned images will be displayed in thumbnail sizes in the Thumbnail View window and labeled with the chosen file format 7 Click the Open Folder button to locate the scanned images if you want ...

Страница 34: ...toShop 3 Select the Microtek ScanWizard DI TWAIN driver in the Import options from the File menu When succeeded the ScanWizard DI TWAIN driver interface appears on the screen 4 In the interface follow the procedure steps 4 through 8 for Scanning Documents section to specify your scanning requirements 5 When finished click the Scan button to start scanning When done the scanned images is then deliv...

Страница 35: ...through 8 for Scanning Documents section to specify your scanning requirements if necessary When done click the OK button to close the Scan Setup interface and return to the Main interface of ScanWizard DI NOTE Not all scan functions and settings are available for the Fast JPEG Compress image file When you click the Scan Setup button you will see a different set of functions and settings in the Sc...

Страница 36: ...an DI 7200S 7280S User s Manual AP control panel Main interface TWAIN driver control panel Scan Setup interface Click on a thumbnail image to enlarge it in the Image View Window at the right side of the interface ...

Страница 37: ...nto text files that can be edited in any common word processing applications e g Word Excel PowerPoint 1 Check the box next to the images or use the selection tools All and Invert to select the image files you want to perform OCR in the Thumbnail View window 2 Click the OCR button in the Thumbnail View window to activate the OCR Settings window Selection tools OCR button Thumbnail View window Sele...

Страница 38: ...file compression feature The available options include Auto JPEG JPEG 2000 LZW and ZIP If JPEG or JPEG 2000 is selected the Quality control will be enabled in the window Drag the slider to left or right to define a quality setting for the file Export Mode This menu box lets you select a layout mode when exporting a file containing text and images The available options include Image Only Image on T...

Страница 39: ...to the images or use the selection tools All and Invert to select the image files you want to send out by E mail in the Thumbnail View window Selection tools E Mail button Thumbnail View window Selected and checked image If you like to select all images at one time click the All button 2 Click the E Mail button in the Thumbnail View window to activate the default E Mail application Then follow ins...

Страница 40: ...nto a convenient copy station 1 Check the box next to the images or use the selection tools All and Invert to select the image files you want to make a copy in the Thumbnail View window Selection tools Print button Thumbnail View window Selected and checked image If you like to select all images at one time click the All button 2 Click the Print button in the Thumbnail View window to activate the ...

Страница 41: ... images or use the selection tools All and Invert to select the image files you want to save and upload in the Thumbnail View window 2 Click the Cloud button in the Thumbnail View window to activate the Cloud Settings window 3 In the Cloud Settings window select a webside service provider to which you want to upload your scanned files Please note that only the providers who have been installed and...

Страница 42: ...he TTS Settings window 3 In the TTS Settings window Automatic start speech If this option is checked the saved and converted file will be opened and read out word by word in orders automatically in the Text to Speech window If this option is not checked the saved and converted file will be opened and highlighted in the Text to Speech window OCR Languages Select a language in which the original tex...

Страница 43: ...ArtixScan DI 7200S 7280S User s Manual 43 4 When done click the OK button to perform TTS Once TTS is complete The scanned and recognized file will be opened in Text to Speech window ...

Страница 44: ... Stop and Favorite used to automate a number of customized and predefined operations such as scanning to a file sending an image to your printer or e mail account scanning for OCR etc Customizing is done through the Scanner Button Settings interface as explained next LED display Displays the selected function button number ...

Страница 45: ...terface Before setting up scanner function buttons follow the steps below to enable the Scanner Button Settings interface 1 Look for the Scanner icon at the right corner of Toolbar on your Windows desktop 2 Move your mouse onto the Scanner icon and then click the right button of the mouse A small window appears on the screen Select Settings to activate the Scanner Button Settings interface ...

Страница 46: ... c Make your selection among the Function radio buttons below to define your selected button The four functions provided are Scan To Captures images that can be automatically saved as files or sent to another application for further processing This is the default selection Copy Scans the image and sends it to your printer transforming your scanner and printer into a convenient copy station Simply ...

Страница 47: ...se it as a hot key to store one set of operational parameters used most frequently How the Scanner Button Works When you finish customizing the function buttons follow the steps below to perform the scanning task by pressing the function button on the scanner The scan will be performed in accordance with the designated button function using the parameters configured in the Scanner Button Settings ...

Страница 48: ...ase button in the direction as shown in the graph to open the scanner cover 2 When the scanner cover is opened you can find two scanner glass surfaces locating at the inner sides the scanner Use a soft non abrasive and lint free cloth to gently wipe the glass surface areas NOTE Do not use any detergents synthetic cleaning solutions cleaning naphtha or other solvents to clean the glass surface dire...

Страница 49: ...llers Output Rollers 2 When the scanner cover is opened you can find several groups of rollers locating at the inner sides of the scanner Then clean the rollers with a lint free cloth or a swab moistened with alcohol or water as shown in the graphic below NOTE Do not attempt to spin or rotate the rollers while cleaning for it may damage the drive train mechanism of the scanner The Separation Rolle...

Страница 50: ...on in the direction as shown in the graph to open the scanner cover 2 When the scanner cover is opened you can find two recesses at the top of the roller cover Then clean the levers with a lint free cloth or a swab moistened with alcohol or ECO cleaner as shown in the graphic below Release button Scanner cover ...

Страница 51: ...he scanner cover 2 When the scanner cover is opened you can find four sets of sensors Ultrasonic Double feed sensors I O sensors and Tray sensors locating at the inner sides of the scanner Then clean the sensors with a dust blower as shown in the graphic below Release button Scanner cover Recesses at the top of the roller cover Roller cover ...

Страница 52: ...cedure below for replacement of the Separation Roller and Feed Roller Assembly Replacing the Separation Roller 1 Lift up the Release button in the direction as shown in the graph to open the scanner cover Locate the Separation Roller Assembly at the top of the inner side of the scanner cover 2 Find a hollow space at the top of the Separation Roller Assembly Use it as an exerting handle to pull dow...

Страница 53: ...at two flanges on the roller are designed in different sizes The left flange is wider than the right one Make sure that you have put them at the correct side before inserting them into the slots of the assembly unit 5 Close the cover of the Separation Roller Assembly back Then push the scanner cover back until you hear a click Flange notch NOTE The recommended replacement point for the Separation ...

Страница 54: ...own in the graph to open the scanner cover Locate the Feed Roller Assembly at the inner side of the scanner 2 Pull down the roller cover with your finger to open the roller cover After the roller cover is fully opened you can see that two rollers inside You can only change one roller for each time Release button Scanner cover Feed Roller Assembly ...

Страница 55: ...out carefully from its compartment 4 Insert the new roller into its compartment a Mount the roller with a white cap at the right of the roller into the mounting socket at the right side of the compartment b Then move the roller shaft to the right horizontally Insert it into a hollow at the left side of the roller until it sticks into place c Rotate the lever on the roller shaft up to fasten the ro...

Страница 56: ...ing approximately 100 000 scans through the feeder Please contact your local resellers for purchasing new Feed Roller Assembly In order to avoid breaking down the levers at the corners of the roller cover remember to push them downward slightly when push the roller cover back 5 Follow the instructions described in the step 3 and 4 to change a new roller for the roller at the bottom a Remove the ol...

Страница 57: ...ve the jammed paper by taking out it in an upward direction Release button Scanner cover 3 Close the scanner cover You should hear a click sound when the scanner cover returns to its original position NOTE Do not take out a jammed paper by force from the scanner when the scanner cover closes If doing so it may damage the rollers and cause the scanner work improperly ...

Страница 58: ...close the ScanWizard DI or ScanPotter Control Panel Disconnect the SuperSpeed USB cable from the back of your computer and refer to the installation instructions in this document 3 After clicking scan a blank screen appears Uninstall and reinstall the ScanWizard DI or ScanPotter software 4 The scanner cannot pick up papers into the feeder Make sure the sheets of papers loaded on the Document Feed ...

Страница 59: ...ller failure Click OK first then open the scanner cover as illustrated in the pervious section Fixing Paper Jams If the problem is occurring from a paper jam follow the procedures laid out in the Fixing Paper Jams section If the problem is occurring from situations other than a paper jam follow the procedures laid out in the Position Documents section Finally close the scanner cover and restart sc...

Страница 60: ... A3 size document at the point you want 2 Open the sheath and then insert the document into the sheath with the side to be scanned as the first image facing down Position the top end of the document toward the inner side of the sheath 3 Push the document into the sheath until its top end is against the inner side of the sheath the side with an arrow mark Then close the sheath Sheath B Load the She...

Страница 61: ...e Scan Source drop down menu 3 Follow the procedures described in previous scanning scenarios of this manual to specify your scanning requirements 4 Click the Setup button next to the Combine Images option to open a window In the window a By a clicking a drop down menu you are allowed to choose to put the first scanned image at the left right top or bottom side when two images are combined b Check...

Страница 62: ... mm x 3000 mm Min 1 x 1 25 4 mm x 25 4 mm Paper Weight Thickness 8 to 32 lbs 30 08 to 120 32 g m Up to 1 3 mm 0 05 of card Paper Size Max 8 85 x 118 225 mm x 3000 mm Min 2 75 x 3 149 70 mm x 80 mm Feeder Capacity Up to 100 sheets of papers 17 to 18 lbs 63 75 to 67 5 g m Up to 2 pieces of 1 3 mm 0 05 cards Separation Roller 150 000 scans Assembly Life Feed Roller Assembly Life 100 000 scans Duty Cy...

Страница 63: ...m x 3000 mm Min 1 x 1 25 4 mm x 25 4 mm Paper Weight Thickness 8 to 32 lbs 30 08 to 120 32 g m Up to 1 3 mm 0 05 of card Paper Size Max 8 85 x 118 225 mm x 3000 mm Min 2 75 x 3 149 70 mm x 80 mm Feeder Capacity Up to 100 sheets of papers 17 to 18 lbs 63 75 to 67 5 g m Up to 2 pieces of 1 3 mm 0 05 cards Separation Roller 150 000 scans Assembly Life Feed Roller Assembly Life 100 000 scans Duty Cycl...

Страница 64: ...64 ArtixScan DI 7200S 7280S User s Manual ...

Отзывы: