background image

14      ArtixScan 2500 Installation and Operation Manual

English

7.

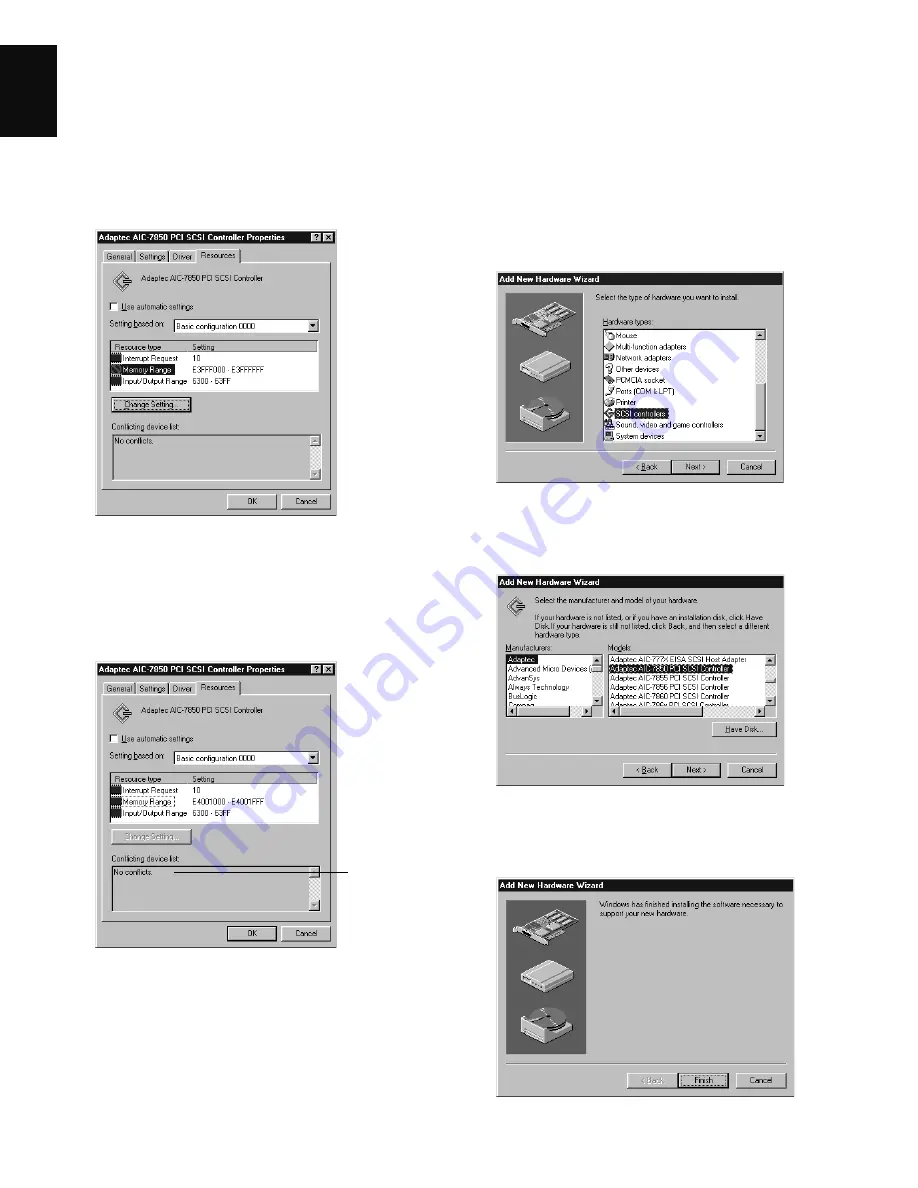
When you get a “No conflicts” message in the
Conflicting device list, the Memory Range conflict is
resolved. Take similar steps for the Interrupt Request
(IRQ) and Input/Output Range resources. If all of
IRQs are taken, you need to contact your computer
dealer for help on how to free up an IRQ resource.

8.

When the settings are all correct, click OK to save
the modifications. The dialog box should now show
the correct Interrupt Request, Memory Range, and
Input/Output address settings.

If you are asked to shut down your computer, select
No, then click Close. You will be asked whether you
wish to restart your computer. Click Yes and restart
your computer.

No conflicts
found

Resolving situation C

1.

Click StartSettings, and select Control Panel.

2.

Double-click Add New Hardware.

3.

Click Next and select No for “Do you want Windows
to search for your new hardware?”.

4.

From the next menu, select SCSI controllers and
click Next.

5.

Select Adaptec on the left and “Adaptec AIC-7850
PCI SCSI Controller” on the right. Click

6.

When the “Add New Hardware Wizard” dialog box
appears, click Finish.

Содержание ArtixScan 2500

Страница 1: ......

Страница 2: ...Pte Ltd No 160 Paya Lebar Road 05 04 Orion Industry Building 409022 Singapore Tel 65 747 7851 Fax 65 747 7852 Internet http www microtek com sg Adara International Inc 8F No 220 Ta Tung Road Section 3...

Страница 3: ...3 Installation on the Macintosh 7 A Installation for Macintosh computers that feature built in SCSI ports 7 B Installation for Macintosh G3 or G4 computers without SCSI ports cards 8 C Installing the...

Страница 4: ...bration 28 7 Scanning the target image 28 8 Aligning the target registration marks 29 A Aligning the upper left registration mark 29 B Aligning the upper right registration mark 29 C Aligning the bott...

Страница 5: ...t go to the General Installation section of the manual then proceed to Installation on the Macintosh then go to Operating the Scanner If you are operating under Windows 95 Windows 98 or Windows 2000 g...

Страница 6: ...and Operation Manual English Power switch Power LED green Transparency Ready indicator orange Reflective Ready indicator orange Vertical ruler Scanner cover Glass surface Horizontal ruler Transparenc...

Страница 7: ...ArtixScan 2500 Installation and Operation Manual 3 English 6 ON OFF Power connector SCSI 25 pin connector SCSI 50 pin connector ID switch Terminator switch ArtixScan 2500 Scanner...

Страница 8: ...thstand a reasonable amount of abuse Refer to the package contents checklist included with your scanner to ensure that you received all of the parts necessary for scanner setup Should you observe any...

Страница 9: ...ensure that your scanner has not been damaged during shipment the following preliminary power up test must be performed Contact your dealer immediately if the scanner is not in proper working conditio...

Страница 10: ...the power switches and disconnect the cord Before you choose a location for the scanner please read the operating environment requirements listed below Requirements for the Operating Environment Make...

Страница 11: ...cable provided in the scanner package Note See the next section for details on termination 3 Plug the power cord to the power connector at the back panel of the scanner and plug the other end of the p...

Страница 12: ...connec tion will make you unable to use your scanner and you will then have to remove the computer case and reinsert the card 3 Close the computer then plug the power cord back in 2 Connecting the sca...

Страница 13: ...n the SCSI chain Make sure the internal terminator switch located at the back of the scanner is set to the OFF position Make sure the last device on the SCSI chain is terminated C Installing the softw...

Страница 14: ...ter then plug the power cord back in 5 Turn your PC back on 2 Checking the interface card status When Windows starts with the new Adaptec SCSI card installed in your computer the card is detected and...

Страница 15: ...ram in the order that it appears on your screen to install the software After all the software has been installed shut down your computer 4 Connecting the scanner 1 Turn off your PC 2 Plug the 25 pin...

Страница 16: ...SCSI controllers to display the dialog box below 4 Click on the Adaptec AIC 7850 PCI SCSI Control ler option and then click Properties 5 Select Resources from the top The dialog box gives you informa...

Страница 17: ...he Conflicting device list For example to resolve the Memory Range conflict take these steps a At the Resource type double click on the Memory Range string the Edit Memory Range dialog box is displaye...

Страница 18: ...e correct Interrupt Request Memory Range and Input Output address settings If you are asked to shut down your computer select No then click Close You will be asked whether you wish to restart your com...

Страница 19: ...the top 10 Double click on SCSI controllers to check whether conflict happens If a conflict exists follow the steps in Resolving Situation B 11 When the settings are all correct click OK to save the m...

Страница 20: ...esolving situation B 1 Restart your computer 2 In Windows 4 0 click Start Settings and select Control Panel 1 Installing the interface card See page 10 for details Card installation on Windows NT 4 0...

Страница 21: ...DE CD ROM drives are not SCSI but Windows NT 4 0 will still list it on the screen because of the way the driver is implemented 4 Click on the Drivers tab and click on the Add button to select Adaptec...

Страница 22: ...ons through software interpola tion To scan images in the area marked HIGH RESOLUTION see next section 1 Lift the scanner lid If you are scanning a book or thick materials documents lift the scanner l...

Страница 23: ...glassless holders To make sure that the holder you use is flat in the transparency tray push firmly down on all four corners of each holder before pushing in the transparency tray into the scanner Th...

Страница 24: ...ace the film face down on the glass surface in the area of the holder labeled HIGH RESOLUTION High resolution scanning is at 2 500 dpi R 2 Place the vinyl strip on the edge of the transparency to secu...

Страница 25: ...the slides to be scanned into the holder in the area labeled HIGH RESOLUTION High resolution scanning is at 2 500 dpi 2 Pull the transparency tray out slightly then place the 35mm slide holder into t...

Страница 26: ...ttle then place the 35mm filmstrip holder into the transparency tray Make sure the holder is seated firmly in the transpar ency tray by pushing down on each corner of the holder firmly 3 Gently push t...

Страница 27: ...e down to close the holder Scanning in high resolution Insert the film to be scanned into the holder in the area labeled HIGH RESOLUTION High resolution scanning is at 2 500 dpi 2 Pull the transparenc...

Страница 28: ...close the holder Scanning in high resolution Insert the film to be scanned into the holder in the area labeled HIGH RESOLUTION on the holder High resolution scanning is at 2 500 dpi 2 Pull the transpa...

Страница 29: ...effect delivers more accurate color and contributes to overall improved image quality To keep the colors in your scanner consistent over time it is recommended that you use the Scanner ICC Profiler r...

Страница 30: ...appears click on the Install option for the Scanner ICC Profiler program then follow the on screen instructions until the program finishes installing 5 Placing the color target Positioning the target...

Страница 31: ...he top border on the flip side of the target with a pen see graphic below 5 2 4 5 0 0 5 10 B5 A4 Trace this border line on the flipped side of the target When positioning this border line must align a...

Страница 32: ...es your target type and date code You can verify this information by looking at the bottom of the target for the date code and the target type information C Click on the Start Profiling button The cal...

Страница 33: ...l upper right registration mark Move the cursor into the target image area the pointer will change to a vertically flipped L mark Align the cursor with the small bottom right registration mark Bottom...

Страница 34: ...pears prompting you to input Profile Filename and Profile Description Click OK a custom scanner ICC profile is saved automatically to your system s ColorSync Profiles folder Exit the Scanner ICC Profi...

Страница 35: ...t to the colorimetric data inside the TDF to create an ICC color profile a characterization of how your scanner sees color 4 Tonal Mapping This option lets you select the way in which the tonal reprod...

Страница 36: ...he scanner 2 Scanner Probe This command displays the SCSI devices on the SCSI chain as well as the SCSI ID numbers of the individual devices To use this command a Choose the Get SCSI Chain Info comman...

Страница 37: ...e performed the required alignment of the three registration marks on the target 2 Previous Mark This button lets you go back one step to align the previous registration mark 3 Next Mark This button l...

Страница 38: ...his command lets you choose the correct ScanWizard Pro Plug in driver for the ICC Profiler program in case the Plug in driver cannot be found b Get Current Scanner Info This command provides informati...

Страница 39: ...how your scanner sees color 4 Tonal Mapping This option lets you select the way in which the tonal reproduction curve of the profile is controlled Normal Slightly brightens the highlights but also da...

Страница 40: ...performed the required alignment of the three registration marks on the target 2 Previous Mark This button lets you go back one step to align the previous registration mark 3 Next Mark This button le...

Отзывы: