


PlatinumRAID Owner’s Manual
1
1. Overview
The LCD front panel is your primary method for control and monitoring of your
PlatinumRAID. Utilizing the LCD, you can:
• Create RAID set,
• Expand RAID set,
• Define volume set,
• Add physical drive
• Modify volume set
• Modify RAID level/stripe size,
• Define pass-through disk drives,
• Modify system function and
• Designate drives as hot spares.
2. Main Menu Options
Select an option and the related information or submenu items display beneath it. The sub-
menus for each item are explained on the section 4.8.3. The configuration utility main menu
options are:
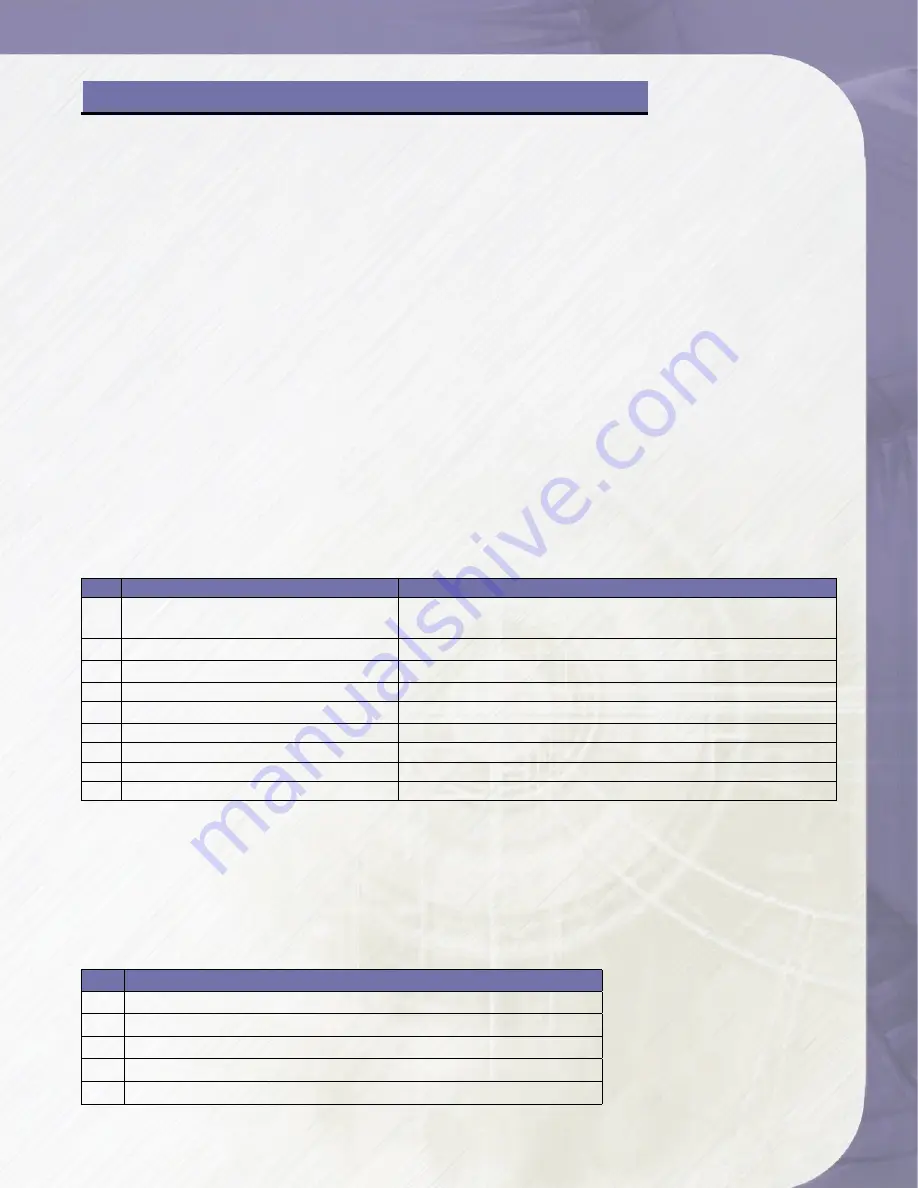
Ch Option
Description
1
Quick Volume And RAID Set Setup
Create a default configuration which is based on the
number of physical disks installed
2
RAID Set Functions
Create a customized RAID set
3
Volume Set Functions
Create a customized volume set
4
Physical Drive Functions
View individual disk information
5
RAID System Functions
Setting the RAID system configurations
6
Views System Events
Record all system events in the buffer
7
Clear Event Buffer
Clear all event buffer information
8
Hardware Monitor
Show all system environment status
9
System Information
View the controller information
3. Configuring RAID Sets and Volume Sets
You can configure RAID sets and volume sets with LCD configuration utility using Quick
Volume And RAID Set Setup, RAID Set Functions/Volume Set Functions configuration method.
Each configuration method requires a different level of user input. The general flow of
operations for RAID set and volume set configuration is:
Step Action
1
Designate hot spares/pass-through (optional).
2
Choose a configuration method.
3
Create RAID set using the available physical drives.
4
Define volume set using the space in the RAID set.
5
Initialize the volume set and use volume set in the HOST OS.
Chapter 4 - Getting a Fast Start
4-Getting a Fast Start


