background image

A61 

45 

You can set up an account on your device. You can do this by going 

to 

Application Menu 

→ 


→ 

Add account


You may add various types of accounts, depending on your 
applications. 

W

HY 

U

SE A 

G

OOGLE 

A

CCOUNT


Your Google Account lets you take full advantage of Google 
applications and services that you may want to use, such as Gmail, 
Play Store, etc. 

S

TART 

G

MAIL


You can use Gmail to read and write email from any mobile device or 
browser. All your emails are always up-to-date and available no 
matter where you check it from. 

As Gmail is not only limited to mailing. Your Gmail name and 
password signs you into many Google applications and services.  

C

ONFIGURING 

E-M

AIL


To set up Email: 

1.


Go to the 

Settings

 section and scroll down to the 

Accounts

 section. 

2.


Tap 

+ Add account

 and select 

Email

 from the displayed 

list. 

3.


Type the email address and password in the respective 
fields and tap 

Next

4.


Set account settings, as required and tap 

Next

.  

5.


Provide your account name and your name and then tap 

Next

 to successfully finish account configuration. 

The server will check for online settings automatically and your 
account will be set up. If not, please check your Internet settings 

Содержание A61

Страница 1: ...lications simultaneously 3G Support Browse and download data at a faster speed with 3G network 4 0 Inch screen Gives you an intuitive and friendly interface allowing you to operate your phone with ease Gravity Sensors Ensures that your phone responds automatically to various motions and orientations Dual SIM Your handset supports dual SIM Wi Fi The Wi Fi features lets you connect wirelessly and se...

Страница 2: ... MEMORY CARD 9 TURNING YOUR PHONE ON OFF 9 CHARGING THE BATTERY 10 LOCKING UNLOCKING THE PHONE 11 PLACING AND RECEIVING CALLS 13 MAKE A CALL 14 IN CALL OPTIONS 14 CONFERENCE CALL 15 MAKE AN INTERNATIONAL CALL 16 END A CALL 16 DISABLE PHONE CALLS 16 HEADSET 16 CHANGING THE PHONE S VOLUME 17 SENSORS 17 USING THE TOUCH SCREEN 19 TAP AND HOLD 20 DRAG AN ITEM 20 ...

Страница 3: ...EENS 25 REARRANGE ITEMS ON THE HOME SCREEN 26 CUSTOMIZE HOME SCREEN 26 MANAGING NOTIFICATIONS 28 OPEN THE NOTIFICATIONS PANEL 29 RESPOND TO NOTIFICATIONS 29 CLOSE NOTIFICATIONS PANEL 29 NOTIFICATION S SHORTCUT ICONS 30 MESSAGING 31 CREATE AND SEND MULTIMEDIA MESSAGE 32 FORWARD A MESSAGE 32 LOCK A MESSAGE 33 USING THE ONSCREEN KEYBOARD 34 MULTIMEDIA 35 CAMERA 36 GALLERY 37 MUSIC 37 FM RADIO 38 RECO...

Страница 4: ...A GOOGLE ACCOUNT 45 START GMAIL 45 CONFIGURING E MAIL 45 USING E MAIL 46 GOOGLE SEARCH 46 SYNCHRONIZE CONTACT LIST 47 USING APPLICATIONS AND WIDGETS 48 DOWNLOAD APPLICATIONS FROM ANDROID MARKET 49 WIDGETS 49 TASKBAR 50 SAFETY PRECAUTIONS 53 TAKING CARE OF YOUR DEVICE 54 BATTERY RECOMMENDATIONS 55 RECYCLE YOUR PHONE 55 COPYRIGHT 55 ...

Страница 5: ...fully before using your device to ensure safe and proper use The descriptions in this manual are based on the default settings of your device Available features and additional services may vary by device software or service provider Applications and their functions may vary based on the country region software or hardware specifications Micromax is not liable for performance issues caused by third...

Страница 6: ...he network service content providers SIM cards compatibility of the devices used and the content formats supported Other product logos and company names mentioned herein may be trademarks or trade names of their respective owners Operator tariff shall be applicable for SMS Micromax privacy policy is available at www micromaxinfo com INSTRUCTIONAL ICONS Before you start please familiarize yourself ...

Страница 7: ...A61 7 G GE ET TT TI IN NG G S ST TA AR RT TE ED D ...

Страница 8: ...8 PHONE LAYOUT INSERTSIMCARD To insert the SIM card 1 Switch off your phone and remove the rear cover and battery as illustrated below 2 Insert the SIM card correctly in the card slot s as illustrated below ...

Страница 9: ... memory card 1 Switch off the mobile phone and then remove the rear cover and battery 2 Insert the memory card into the slot as illustrated below 3 Place back the battery and rear cover of the mobile phone Use only compatible memory cards approved by Micromax with this device Incompatible memory cards may damage the card or the device and corrupt the data stored in the card TURNINGYOURPHONE ON OFF...

Страница 10: ...harge the battery You can charge the device with a travel adapter or connecting the device to a PC with a USB cable Tip You can also use a compatible USB charger to charge your battery Use only Micromax approved chargers and cables Unapproved chargers or cables can cause battery to ...

Страница 11: ...e up the phone 2 Hold and drag the Micromax icon towards the unlock icon You may be required to unlock your phone based on the unlock method in settings To set the unlock method 1 Go to Application Menu Security Screen lock 2 Choose the type of locking as desired You can set your screen lock based on sliding pattern PIN Password or none Using the Pattern Lock Pattern Lock is a security feature you...

Страница 12: ...n also set other locking methods as desired from Screen lock Other screen locking methods available in your A61 include Slide Just wake up the screen and slide the Micromax icon towards the unlock icon to unlock your phone PIN You may enter a PIN and set it as your screen unlocking password Password You may enter any desired password and set it as your screen unlocking password ...

Страница 13: ...A61 13 P PL LA AC CI IN NG G A AN ND D R RE EC CE EI IV VI IN NG G C CA AL LL LS S ...

Страница 14: ...een inserted into the device a pop up appears asking you to select the SIM via which the call is to be made Select the desired SIM card to make the call INCALLOPTIONS Press the Volume up down keys on the right side to adjust the call volume Tap to add another person to the call Tap to mute your voice so that the phone s MIC will not transmit voice to the other end You can resume transmitting your ...

Страница 15: ...n merge the calls into a conference call To make a conference call 1 Make a call to the first participant 2 When you are connected tap and dial the number The first participant is put on hold You can make the next call from the phone tab the call log or your contacts 3 When you are connected tap to start the conference call You can also swap calls by tapping During the conference call tap MANAGE C...

Страница 16: ...the Volume Up down keys on the right side to adjust the call volume ENDACALL To end a call tap the icon DISABLEPHONE CALLS Some locations may require you to disable all the wireless features of your mobile The Airplane Mode enables you to disable all incoming and outgoing calls Wi Fi and Bluetooth connections To activate the airplane mode 1 Press and hold the Power button and then select Airplane ...

Страница 17: ...he FM radio CHANGING THEPHONE SVOLUME You can adjust the volume of your handset by using the volume keys on the right side of the handset as shown SENSORS Your phone has gravity sensors to detect gravity and display correct orientation based on the motion You can disable the auto rotate feature from Application Menu ...

Страница 18: ...A61 18 Settings Display Auto rotate screen ...

Страница 19: ...A61 19 U US SI IN NG G T TH HE E T TO OU UC CH H S SC CR RE EE EN N ...

Страница 20: ... the following image DRAG AN ITEM Tap and hold an item and move your finger on the screen until you reach the target position The item follows your finger You can generally drag items from one location to another on the home screen Also you can delete items from the home screen by holding the item and dragging it to the Remove label that becomes available only when you hold the item on the Home sc...

Страница 21: ...ce a finger on the screen and steadily slide your finger in the desired direction For example when you are viewing a picture to view the next picture swipe left USING THEPINCHZOOM You can open any image or web page and then use your thumb and index finger to zoom the display through the pinch gesture as illustrated in the following image ...

Страница 22: ... also double tap to control the Camera zoom and in some other applications CHANGE THE ORIENTATION On most screens the orientation of the screen changes as you rotate the phone You can turn this feature on and off from Application Menu Settings Display Auto rotate screen The screen orientation changes on rotating the handset as illustrated in the following image ...

Страница 23: ...open closes the keyboard Menu Opens a menu with items that affect the current screen or application Home Opens the Home screen If you are viewing the left or right extended Home screen opens the central Home screen Opens the most recently used applications THE HOME SCREEN When you start up the home screen opens You can personalize your home screen with shortcuts widgets themes wallpapers and other...

Страница 24: ...part from the launcher icon you can add or remove other launcher icons as required LAUNCHERICONS There are total five launcher icons that will be present on the home screen of your A61 as shown in the following image Apart from the launcher icon you can add remove or move other launcher icons from the home screen The phone also provides you with Context menus and Options menus for accessing the fe...

Страница 25: ... screen You need to tap and hold an item on the screen to view the option list For example message options appear on taping and holding any received message as shown in the following image Note Not all items have options menu SWITCHBETWEENHOMESCREENS You can view the left or right extended home screen by swiping the home screen to the left or right as shown in the following image Context Menu ...

Страница 26: ...place desired indicator icons widgets shortcuts to applications and other items on the home screen Add Widgets and Icons to Home Screen You can personalize the default home screen by adding shortcuts to applications or items in applications widgets or folders To add items to the home screen tap to view the list of apps and widgets Long press and hold the application or widget and then release your...

Страница 27: ...ew location on the screen Press and hold on an icon in the home screen and then drag the widgets or application to the Remove label at the top center of the screen Changing the Wallpaper You can change your wallpaper by long pressing on the home screen A list of choices will get displayed in a popup from where you can choose the location of your desired wallpaper ...

Страница 28: ...A61 28 M MA AN NA AG GI IN NG G N NO OT TI IF FI IC CA AT TI IO ON NS S ...

Страница 29: ...splays your network provider s name and a list of your current notifications RESPONDTO NOTIFICATIONS Open the notification panel and tap a notification to respond to it What happens next depends on the notification CLOSE NOTIFICATIONS PANEL Drag the Notifications panel from bottom to the top of the screen or just tap the back button The panel also closes when you tap a notification to respond to i...

Страница 30: ...ut icons will be displayed Icons Description Turn Wi Fi on and off instantly Turn Bluetooth on and off Turn data connection on and off Tap to manage the sound profile of the phone Tap to adjust the display brightness Turn airplane mode on and off Enable or disable configured account synchronization ...

Страница 31: ...A61 31 M ME ES SS SA AG GI IN NG G ...

Страница 32: ...types to files that can be attached and tap the desired type of multimedia file 3 Tap to select the composition text box and enter your message body in it 4 Enter the contact name if it exists or enter the phone number 5 You can also tap the icon to view and select contact s from the contact list 6 Tap to send the multimedia message FORWARDAMESSAGE To forward a message 1 Open a message and then ta...

Страница 33: ...ew message details and delete message from the list of options LOCKA MESSAGE You can lock a message to protect it from getting deleted when you reach your storage limits To lock a message 1 Tap and hold message in a message conversation window to view the list of options as illustrated below 2 Tap Lock to lock the selected message Tap to forward the message Tap to lock the message ...

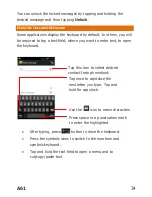
Страница 34: ...o enter text to open the keyboard After typing press button to close the keyboard Press the symbols icons to switch to the numbers and symbols keyboard Tap and hold the text field to open a menu and to cut copy paste text Press space or a punctuation mark to enter the highlighted suggestion Tap this icon to select desired contact from phonebook Tap once to capitalize the next letter you type Tap a...

Страница 35: ...A61 35 M MU UL LT TI IM ME ED DI IA A ...

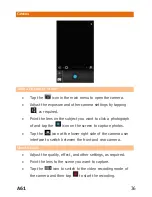
Страница 36: ...click a photograph of and tap the icon on the screen to capture photos Tap the icon at the lower right side of the camera user interface to switch between the front and rear camera Shoot Videos Adjust the quality effect and other settings as required Point the lens to the scene you want to capture Tap the icon to switch to the video recording mode of the camera and then tap to start the recording ...

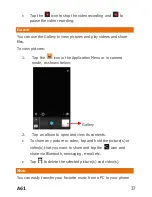
Страница 37: ...icon in the Application Menu or in camera mode as shown below 2 Tap an album to open and view its contents To share any picture or video tap and hold the picture s or video s that you want to share and tap the icon and share via Bluetooth messaging e mail etc Tap to delete the selected picture s and video s MUSIC You can easily transfer your favorite music from a PC to your phone Gallery ...

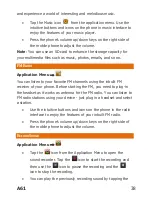
Страница 38: ... the inbuilt FM receiver of your phone Before starting the FM you need to plug in the headset as it works as antenna for the FM radio You can listen to FM radio stations using your device just plug in a headset and select a station Use the intuitive buttons and icons on the phone in the radio interface to enjoy the features of your inbuilt FM radio Press the phone s volume up down keys on the righ...

Страница 39: ...9 icon on the recorder After every recording options will be displayed to save or discard the recording you can tap any of the options and proceed Tap the icon to view the play the list of stored recordings ...

Страница 40: ...A61 40 C CO ON NN NE EC CT TI IN NG G T TO O N NE ET TW WO OR RK KS S A AN ND D D DE EV VI IC CE ES S ...

Страница 41: ...ork provider sends the access point name settings via SMS or it comes with your SIM card You may need to install these settings After this you can choose from the listed access point names If the access point names are not listed by default please contact your network provider for the same After you have selected or configured the access point name go to Application Menu Dual SIM Settings Data Con...

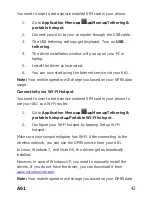
Страница 42: ...e Connectivity via Wi Fi Hotspot You need to insert a data service enabled SIM card in your phone to use your A61 as a Wi Fi router 1 Go to Application Menu More Tethering portable hotspot Portable Wi Fi hotspot 2 Configure your Wi Fi hotspot by tapping Set up Wi Fi hotspot Make sure your computer laptop has Wi Fi After connecting to the wireless network you can use the GPRS service from your A61 ...

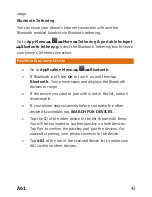
Страница 43: ...rn it on and then tap Bluetooth Your phone scans and displays the Bluetooth devices in range If the device you want to pair with is not in the list make it discoverable If your phone stops scanning before you make the other device discoverable tap SEARCH FOR DEVICES Tap the ID of the other device in the list to pair with them You will be prompted to confirm passkey on both devices Tap Pair to conf...

Страница 44: ...A61 44 M MA AN NA AG GI IN NG G A AC CC CO OU UN NT TS S ...

Страница 45: ...no matter where you check it from As Gmail is not only limited to mailing Your Gmail name and password signs you into many Google applications and services CONFIGURING E MAIL To set up Email 1 Go to the Settings section and scroll down to the Accounts section 2 Tap Add account and select Email from the displayed list 3 Type the email address and password in the respective fields and tap Next 4 Set...

Страница 46: ... name a list of matching names are displayed Select the matching name For multiple recipients separate the names by a comma or a semi colon To delete a recipient tap the delete icon Tap Done in the keypad when you are done 4 Now add the subject of the mail in the Subject field and type the message you want to send in the Compose email field 5 To add an attachment cc bcc tap the menu button on the ...

Страница 47: ...ist 1 Tap to open the list of contacts 2 Tap the button of the phone and select Accounts 3 Select the account s with which contacts list is to be synchronized 4 You can auto sync contacts by selecting the Auto sync app data check box 5 Tap Add account to add account s with which contact list is to be synchronized For this feature to work you need to have Internet connectivity via your SIM or Wi Fi...

Страница 48: ...A61 48 U US SI IN NG G A AP PP PL LI IC CA AT TI IO ON NS S A AN ND D W WI ID DG GE ET TS S ...

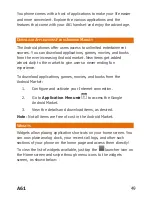
Страница 49: ...never ending fun experience To download applications games movies and books from the Android Market 1 Configure and activate your Internet connection 2 Go to Application Menu to access the Google Android Market 3 View the details and download items as desired Note Not all items are free of cost in the Android Market WIDGETS Widgets allow placing application shortcuts on your home screen You can no...

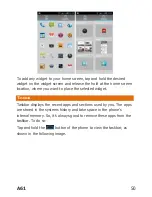
Страница 50: ...re you want to place the selected widget TASKBAR Taskbar displays the recent apps and sections used by you The apps are stored in the systems history and take space in the phone s internal memory So it s always good to remove these apps from the taskbar To do so Tap and hold the button of the phone to view the taskbar as shown in the following image ...

Страница 51: ...p from the list tap the app to be removed and slide on either side as shown in the following figure Or you may also tap and hold the same and an option Remove from list will appear Tap the option and the app will be removed ...

Страница 52: ...A61 52 ...

Страница 53: ... on them could be lost Permanent hearing loss may occur if you use earphones at high volume for prolonged periods Set your volume to a safe level If you experience discomfort in your ears reduce the volume or discontinue the use of your earphones Ring tones info tones and hands free talking are reproduced through the loudspeaker Do not hold the phone to the ear when it rings or when you have switc...

Страница 54: ...y to suffer a huge risk when you install or repair this phone by yourself which also goes against the warranty rules T TA AK KI IN NG G C CA AR RE E O OF F Y YO OU UR R D DE EV VI IC CE E Your device is a product of superior design and craftsmanship and should be handled with care The following suggestions will help you protect your phone Keep the device dry Precipitation humidity and all types of...

Страница 55: ... your local environmental laws and guidelines RECYCLEYOURPHONE The WEEE logo shown at the left appears on the product battery handset and charger to indicate that this product must not be disposed off or dumped with your other household wastes You are liable to dispose of all your electronic or electrical waste equipment by relocating over to the specified collection point for recycling of such ha...

Страница 56: ...A61 56 strictly prohibited ...

Отзывы: