Micromark MM23207 Скачать руководство пользователя страница 6

6

FITTING PIRs AND DOOR CONTACTS

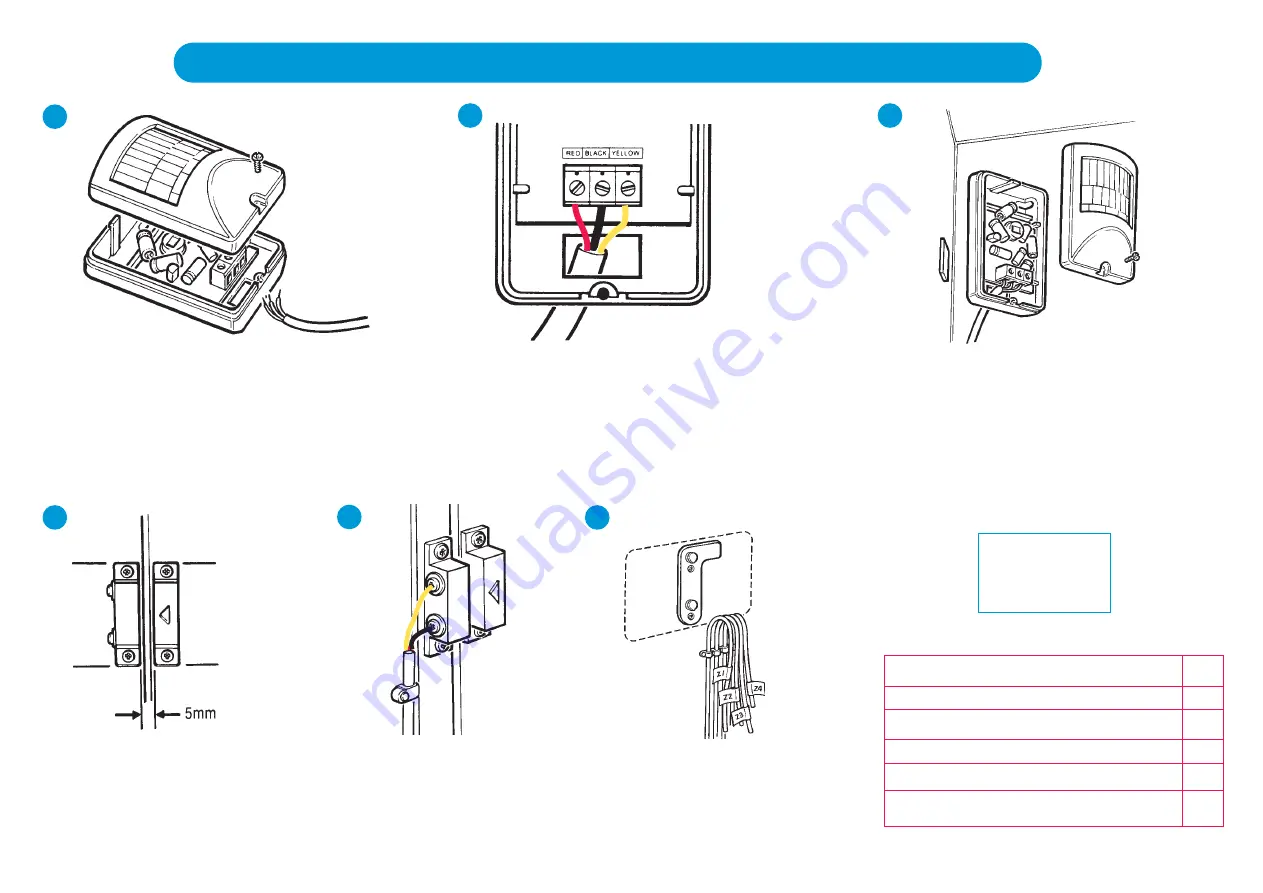
Walk to the proposed position of the PIR sensor.
Allow enough cable to reach the control panel.
Unscrew the fixing screw at the base of the PIR and
remove the front cover. Remove the knockout at the
base of the back casing. Strip the wires to bare the
ends.

1

Fit the door contact with the screws
supplied, and leave a gap of 5mm
between the leading edges Fix the
wireable contact to the frame.

4

Follow the same procedure for each of
the zones. At the control panel m

ma

arrkk

tth

he

e  w

wiirre

ess  w

wiitth

h  tth

he

e  zzo

on

ne

ess  ffrro

om

m  w

wh

hiicch

h

tth

he

eyy  a

arre

e  ffrro

om

m..

6

Thread the stripped cable through and connect the
wires to the terminal block observing the colours. 

Replace the cover and screw.
Use a sticky pad and secure the PIR to the mounting
surface. Run the cable back to the control panel
taking the shortest route and secure it with cable
clips. Repeat for the next PIR.

2

CHECK LIST

Are PIRs wired correctly?

Are the PIRs securely mounted?

Is the gap between door contacts correct?

Are the door contacts wired correctly?

Are the wires marked with their zones?

Run the wiring to the door contacts
(see wiring diagrams page 3). The
picture shows door contacts wired
directly to the control panel. Cut back
the red wire to the insulation and tape
the end. Repeat for next door contact.

5

PIRs

DOOR CONTACTS

AT THE CONTROL PANEL

3

If additional cable is
required, use 4-core
alarm cable (see
accessories) and cut
short the blue wire.

www.ukpanels.com

Содержание MM23207

Страница 1: ...all an Alarm System Since the requirements of each Authority differ we suggest that you contact the Environmental Officer of your local Borough for full information about your local area s by laws Ple...

Страница 2: ...above a heat source such as radiator or in conservatories or draughty areas When this system is armed keep pets out of areas protected by PIR sensors Position control panel near a power socket Now st...

Страница 3: ...N EXISTING DOOR CONTACT TYPICAL WIRING DIAGRAM SHOWING PIR AND DOOR CONTACTS WITHIN ZONE 1 THE ENTRY EXIT ZONE BLACK WIRES TWISTED AND TAPED TOGETHER TRIM RED WIRES BACK TO INSULATION AND COVER WITH T...

Страница 4: ...ing and pipework When planning the wiring avoid awkward cable runs to the control panel siren box PIRs and door contacts 1 Install the control panel out of reach of young children Mark for two vertica...

Страница 5: ...y plugs 9 Bring the cable to the positon of the siren box and cut the cable allowing enough surplus for wiring into the siren terminal block Strip the wires and connect them to the teminal block as sh...

Страница 6: ...ed cable through and connect the wires to the terminal block observing the colours Replace the cover and screw Use a sticky pad and secure the PIR to the mounting surface Run the cable back to the con...

Страница 7: ...m cable see accessories and cut short the blue wire Anti tamper spring Tape down the anti tamper spring Figure 5 before connecting the back up battery otherwise as soon as the back up battery is conne...

Страница 8: ...it t p pr ro og gr ra am mm mi in ng g P Pr re es ss s P P 6 6 E E All zones LEDs will flash with the control panel siren and the outside siren sounding for 15 seconds P Pr re es ss s P P 0 0 E E t to...

Страница 9: ...to exit after arming the system with the password before the sirens sound The exit time is set by the factory to 15 seconds but this can be changed to a choice of 7 other exit times to suit you If for...

Страница 10: ...s s P P 1 11 12 22 2 E E t to o e en nt te er r p pr ro og gr ra am mm mi in ng g Status LED flashes 3 1 E E SETTING UP CHECK LIST Have you done the walk test Have you done the bell test Have you set...

Страница 11: ...re es ss s P P a an nd d E E together until alarm sounds status LED on E En nt te er r p pa as ss sw wo or rd d to stop alarm E En nt te er r p pa as ss sw wo or rd d again to reset system 1 2 Should...

Страница 12: ...L La an ne e L Lo on nd do on n N N1 17 7 7 7R RQ Q Micromark continuously tries to improve its products for the benefit of its customers For this reason we reserve the right to make changes to any pr...

Отзывы: