MICROIDEA EPFCB Скачать руководство пользователя страница 13


13 / 16 


- ITALY - Tel. +39.035.773 925 - Fax +39.035.773 933 - e-mail: [email protected] - Web: www.microidea.it 

RS485 / ETHERNET COMMUNICATION (optional)


DETAIL SETTING RS485: 

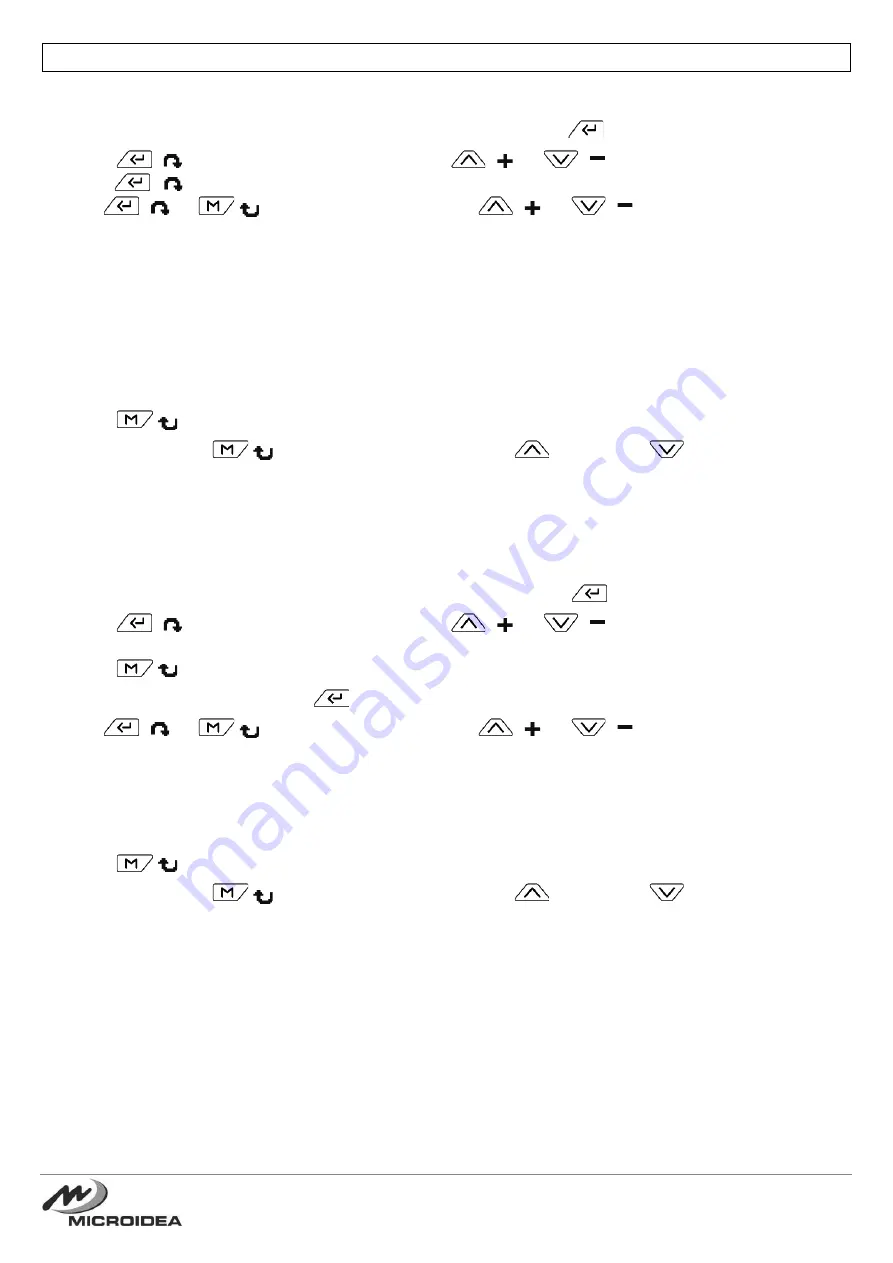
1) In the Advanced Menu select "A.04 Data communication" and press 

 to access. 

2) Press 

 (


) to select the voice "Type", now use 

 (


) or 

 (


) to set to RS485 (default), 

press 

 ( 

) again to go to the next parameter A.05. 

3) Use 

 (


) or 

(


) to select the parameter, use 

 (


) or 

 (


) to set the selected value. 

4) Within the 

“A.05 RS485” 

there are the following settings for communication: 

- Address:

 set the device address. 

- Protocol: 

*


Proprietary: to be used for communication with our EPFController software (default). 

*Modbus: standard Modbus RTU communication protocol. 

- Bauds:

 set the desired serial communication speed (default 9600). 

- Parity: 

set the type of control desired (default EVEN). 

- Delay:

 time between the end of the Master's call and the Slave's response (default 100ms). 

5) Press 

(


) for about 1s to return to the parameter list of the Advanced Menu. 

6) Press and release  

(


), when prompted to save, press 

 to confirm or 

 to cancel. 

7) The device will restart, and will be possible to communicate in RS485 with the set parameters. 


DETAIL SETTING ETHERNET (optional): 

1) In the Advanced Menu select "A.04 Data Communication" and press 

 to access. 

2) Press 

 (


) to select the voice "Type", now use 

 (


) or 

 (


) to set to ETHERNET 

(Modbus TCP protocol). 

3) Press 

(

 ) for about 1s to return to the parameter list of the Advanced Menu. 

4) Select 

“A.06 Ethernet” 

and press 

 to access. 

5) Use 

 (


) or 

(


) to select the parameter, use 

 (


) or 

 (


) to set the selected value. 

6) Within the 

“A.06 Ethernet” 

there are the following settings for communication: 

- IP address:

 set an IP address of the network (default 192.168.000.100). 

- Gateway:

 set the IP address of the network gateway (default 192.168.000.001). 

- Port: 

set up TCP for Modbus TCP (default 502). 

7) Press 

(

 ) for about 1s to return to the parameter list of the Advanced Menu. 

8) Press and release  

(


), when prompted to save, press 

 to confirm or 

 to cancel. 

9) The device will restart, and will be possible to communicate in ETHERNET with the set parameters. 


Содержание EPFCB

Страница 1: ...e asupra dispozitivului ndep rta i toate tensiunile de la intr rile de m surare i de alimentare i scurtcircuita i bornele de intrare CT Produc torul nu poate fi considerat responsabil pentru siguran a...

Страница 2: ...connection device See note in the box in the upper right corner of the wiring diagrams The value has to be calculated according to the VT used NOTE The transformer VT is used To isolate the controller...

Страница 3: ...onnection type Press to go to voltage value Use to set the desired value Press to save and exit Press to discard and go back to the previous page Now the instrument shows the home page with the system...

Страница 4: ...he instrument to follow precisely the settled Cosj Press for 1s to switch between modes IMPORTANT it s possible to access the settings menu only in MAN mode Capacitors overload value Step config visua...

Страница 5: ...SETTINGS ALARMS If no key is pressed for 30s the instrument goes back to the home page unless the instrument is into a config page In this case a timeout is configurable by using A 11 parameter When t...

Страница 6: ...of function of the keys return to menu increase the value or change the data decrease the value or change the data go to the next parameter In the intermediate pages press go to previous parameter if...

Страница 7: ...Web www microidea it Now press to go back to the settings menu If you have changed the values or settings when prompted to save press to confirm or to cancel Press again to return to navigation pages...

Страница 8: ...ated respectively the voltage and current THD distorsion by the use of vertical bars for each harmonic up to the 30th Press to show details of the single harmonics use to scroll page GRAPHS This is a...

Страница 9: ...are indicated INFO STEP This page shows details of configurations and working cycles of every configured and connected step A Step number B Nominal reactive power C Working hours D Insertion number Pr...

Страница 10: ...ase L1 DIRECT REVERSE L2 DIRECT REVERSE L3 DIRECT REVERSE L1 DIRECT A 03 Frequency Hz 50 60 50 Hz A 04 Data communication Type RS485 ETHERNET RS485 A 05 RS485 Address DISABLED 1 199 1 n Protocol MODBU...

Страница 11: ...the overload is lower than Thresh 1 the alarm will not be generated When the overload is equal to Thresh 1 the delay time is equal to the one set When the overload increases the delay time decreases p...

Страница 12: ...e access to all menu items will remain active for 5m To deactivate the password enter the value 00000 and save SETTING STEPS You can set the steps manually or perform automatic acquisition In the Sett...

Страница 13: ...to the parameter list of the Advanced Menu 6 Press and release when prompted to save press to confirm or to cancel 7 The device will restart and will be possible to communicate in RS485 with the set...

Страница 14: ...ed voltage 250V Maximum current at contact common 10A C1 C2 8A 13 14 Insulating category Rated voltage VDE0110 C 250 B 400 Electrical contact Life 20 x 1006 ops Mechanical contact Life 100 x 103 ops A...

Страница 15: ...15 16 ITALY Tel 39 035 773 925 Fax 39 035 773 933 e mail microidea microidea it Web www microidea it BACK PANEL CONNECTIONS DIMENSIONS FRONT VIEW SIDE VIEW MOUNTING HOLE...

Отзывы: