


2.
Getting Started
2.1
Connecting the Board to the Host PC
The AVR-IoT WA development board can be connected to a computer using a standard Micro-USB cable. Once
plugged in, the LED array at the top right-hand corner of the board should flash twice in the following order: Blue,
Green, Yellow, and Red. When the board is not connected to Wi-Fi , the blue LED will blink continuously. The board
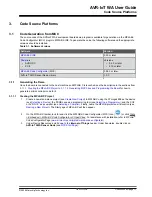
will appear as a Removable Storage Device on the host PC, as shown in
Curiosity Board as Removable Storage
Double click the
CURIOSITY
drive to open it and get started.
Note:
All procedures are identical for Windows
®
, Mac OS
®
, and Linux
®
environments.
Figure 2-1. Curiosity Board as Removable Storage
The CURIOSITY drive should contain the following five files:
• CLICK-ME.HTM – redirects the user to the AVR-IoT web demo application
• KIT-INFO.HTM – redirects the user to a site containing information and resources about the board
• KIT-INFO.TXT – a text file with details about the PKOB nano firmware and the board’s serial number
• PUBKEY.TXT – a text file with the public key used for data encryption
• STATUS.TXT – a text file with the status of the board
Double click on the
CLICK-ME.HTM
file to enter the dedicated web page to access the web application.
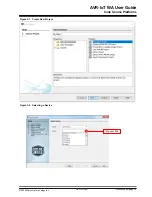
2.2
The AVR-IoT Web Page
shows an image of the AVR-IoT WA web page. This page displays the sensor data and allows
the user to regenerate the Wi-Fi credentials as a file labeled WIFI.CFG. This can be loaded onto the board, acting as
a storage device to reconfigure access point parameters.
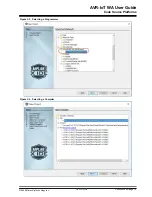
The status markers in the middle of the page, as shown in
, indicate the progress of the
system setup. These markers will light up once each stage has completed successfully.
AVR-IoT WA User Guide
Getting Started
©
2020 Microchip Technology Inc.
User Guide
DS50002998A-page 5


