background image


 Software Re-Installation 


22 

SureThing Labeler Software Re-Installation 

There are 3 methods of reinstalling SureThing should the need arise: 

A. 

(Recommended) 

Insert the Microboards MX Disc Publisher Installation CD into the CD/DVD 

ROM drive on your computer and select the 

Repair

 option when the installer starts.  Click the 

SureThing Disc Labeler

 button to reinstall SureThing.  Clicking the 

Install All Applications


button will reinstall Zulu2, SureThing, and the Toolbox. 

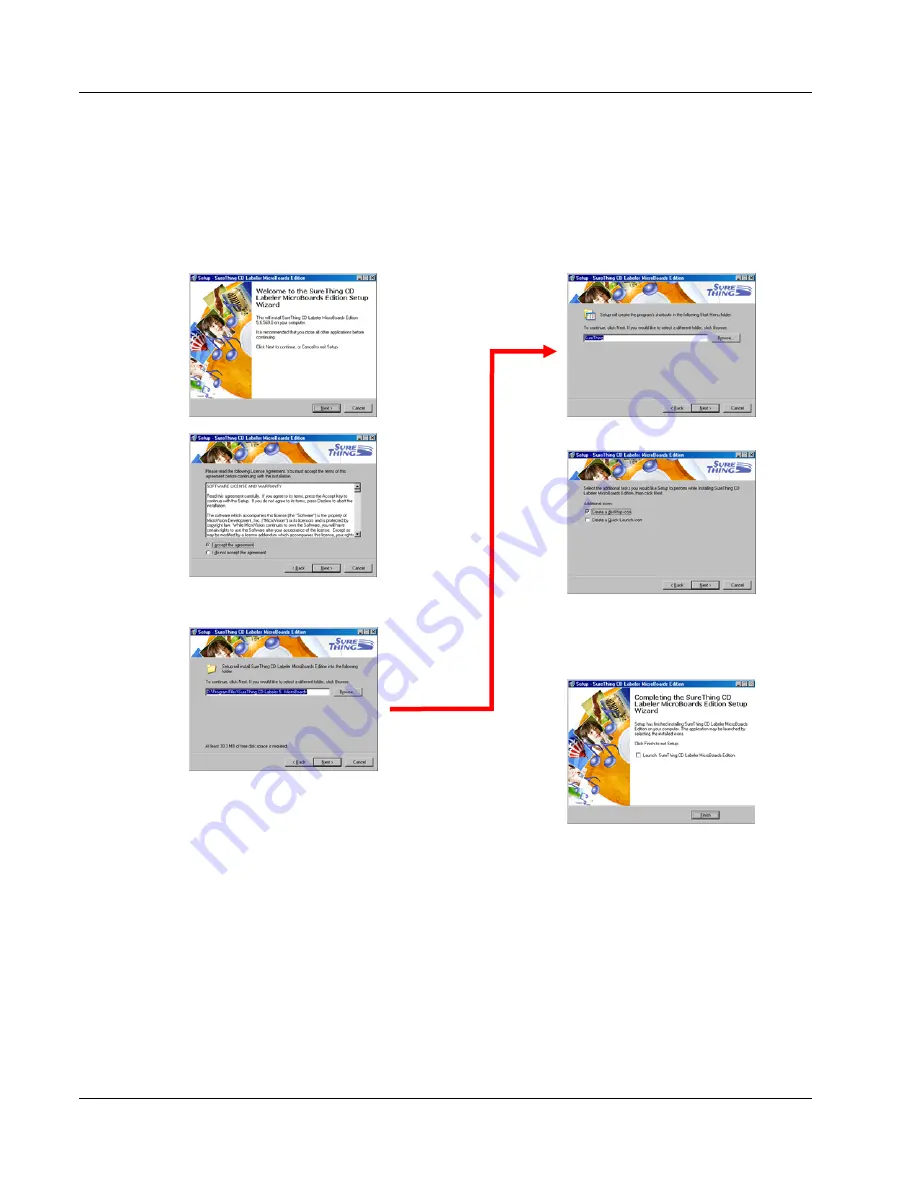
Follow these steps once the SureThing installer launches: 


1. Click 

Next 

to continue. 


2. Once the User License screen 

appears, select 

I Accept 

and click 

the 

Next 

button. 


3.  If you wish to change the default 

Install directory, it can be done here.  
Click 

Next

 when completed. 


4. Click 

Next

 to add a shortcut in the 

Start Menu. 


5.  Choose to add an icon to your 

desktop and/or a folder in the Start 
Menu.  Once selected, click 

Next

6. Click 

Install

 to begin copying the 

files.   


7. Remove the check to launch 

SureThing at this time, then click 

Finish


B.  Alternately, you can open the 

Applications

 directory on the Installation CD and run 

SureThing.exe

 to install SureThing manually.  Follow the on-screen instructions as shown in 

steps 1-7 above. 

C.  The SureThing installer was also added to your hard drive in the event that you need to 

reinstall but do not have access to the Installation CD.  Run 

SureThing.exe

 in the 

C:\Program Files\Microboards\MX Installer\Applications

 directory on your hard drive.  

Follow the on-screen instructions as shown in steps 1-7 above. 

Содержание MX SERIES

Страница 1: ...MX Disc Publisher For Microsoft Windows Vista XP and 2000 Users Manual Microboards Technology LLC Version 1 02...

Страница 2: ...Introduction 2...

Страница 3: ...14 UTILITY TAB 14 ABOUT TAB 14 THE MICROBOARDS PRINTER TOOLBOX 15 PRINT TEST PAGE 15 ALIGN THE PRINTHEADS 15 CLEAN THE PRINTHEADS 16 Printhead Maintenance 16 INK LEVEL 16 PEN HEALTH 17 USING SURETHING...

Страница 4: ...Introduction 4...

Страница 5: ...fill a need in the high volume arena it also has the ability to print at 4800 x 1200 dpi on both DVD and CD media With the included design software users can enjoy its benefits whether making a few d...

Страница 6: ...ause the system to perform slowly USB Connection USB 2 0 is required Assembly and Installation Assembly Instructions MX Disc Publisher Assembly Remove the MX Disc Publisher system from the shipping bo...

Страница 7: ...idges pressurize and the Media Feed button LED goes out Installing Replacing Printheads The 2 Printheads are not installed when you receive the MX Disc Publisher and must be installed prior to using t...

Страница 8: ...ndicators and Buttons 1 Power Button and LED The Power button turns the MX Disc Publisher on and off It may take a few seconds for the MX Disc Publisher to turn on after you press the Power button The...

Страница 9: ...on should always be done when logged in as a user with full Administrator rights Connecting to a PC DO NOT CONNECT YOUR MX PRINT FACTORY TO A COMPUTER BEFORE RUNNING THE INSTALLER LOCATED ON THE INSTA...

Страница 10: ...need to be installed using the Hardware Wizard Please follow the directions below Windows XP Hardware Installation The Windows Found New Hardware Wizard will appear during any installation including...

Страница 11: ...xt 6 Click Next 7 Click Finish The next screen will appear 8 Select No not this time and click Next The following screen will appear 9 Click the Next button and the files will be copied from the CD 10...

Страница 12: ...e print resolution Print Quality Max DPI Photo Only Best Normal Print Modes Draft Text and Graphics Photo Printing Recommendations Draft mode is extremely fast but should only be used for minimal text...

Страница 13: ...hould be printed in grayscale or printed in sepia You also have access to the Advanced color settings from this tab Advanced Color Settings Saturation Brightness and Color Tone allow you to fine tune...

Страница 14: ...remain on the 0 1mm setting for maximum precision Utility Tab The Utility tab allows you to change the printer alignment settings The Resolution setting should always be set at 1mm for best results Al...

Страница 15: ...ed into the output hopper Align the Printheads Printhead alignment should be performed when a new printhead is installed If you experience a decrease in print quality with an installed printhead you m...

Страница 16: ...s 1 Remove the printheads from the carriage please see Installing Replacing Printheads page 7 2 Use ionized water to lightly dampen a lint free cloth 3 Place the cloth on a level surface 4 Holding the...

Страница 17: ...or more information on using SureThing please refer to the SureThing Help menu Creating New Labels Any label you create in SureThing must use the Microboards template to print correctly 1 To create a...

Страница 18: ...system This only needs to be done the first time the software is used When launching Zulu2 for the first time the following screen appears the MX 2 will have 2 drive selections When the MX Disc Publi...

Страница 19: ...ressed for the COM Port the elevator will move up and down When the T is pressed for the recorder the tray will open and then close When the T is pressed for the Printer the belts will move in reverse...

Страница 20: ...tilities Click the Print Only Mode button to force Zulu2 to release the robotics Please note that if you start another Zulu2 action the robotics will be controlled through Zulu2 again Click OK to clos...

Страница 21: ...that time but the successful installation of the Toolbox can be verified by the presence of the Toolbox icon in the tool tray in the lower right corner of your Windows desktop 1 Load the MX Disc Publ...

Страница 22: ...nge the default Install directory it can be done here Click Next when completed 4 Click Next to add a shortcut in the Start Menu 5 Choose to add an icon to your desktop and or a folder in the Start Me...

Страница 23: ...ge to install the default is English Click Next The files will now be copied from the CD to the operating system Once finished this screen will appear When reinstalling over an existing installation o...

Страница 24: ...any discs on the front deck of the MX Disc Publisher Remove any discs found on the belts Close the cover 3 Next reload the input bin and click the OK button on the error message to continue The system...

Страница 25: ...er is powered on After verifying the connection and the printer power you should restart the Toolbox as it monitors the printer s ink levels and door status A shortcut to the PF Pro Toolbox was placed...

Страница 26: ...PF 3 Print Factory available when contacting Technical Support Any unauthorized modification to this equipment may result in the revocation by the FCC of the user s authority to operate this equipmen...

Отзывы: