How
to
Set
Up
and
Run
the
FG5
3
3.1.9.REFERENCE HEIGHT
41. Hang the measuring scale from the Superspring mounting ring under the
interferometer base. Loosen the clamp and slide the scale down until it
touches the floor, then clamp it in place. Make sure the scale is straight.
Read the value at the bottom side of the clamp (Figure 3-1). This value is
nominally 495 to 510 mm. Record the value (cm) for later entry in the
system check log.
Clamp
Note this Value
Figure 3-1
Measuring Scale
3-11
42. The brass V-posts on the bottom of the tripod are marked with concentric
rings 1 mm apart, the red ring being 0 (see Figure 3-2). Estimate the
distance the tripod has moved upward (+) or downward (-) and add this
to the value read with the scale. If our setup procedure has been followed
correctly, the dropping chamber will be 1 ring (1 mm) above the zero
position. Record this value (the Superspring reference height added to the
vertical distance indicated by the brass V-posts in cm) in the system check
log as the reference height. It must be entered in the FG5COMND.DAT
file before beginning observations. Consult the FG5 Software Manual for
instructions.
Содержание FG5
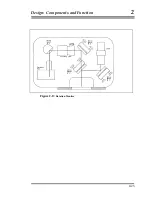
Страница 19: ...Design Components and Function 2 Figure 2 8 Top view of interferometer optics and beam path 2 11 ...
Страница 20: ...Design Components and Function 2 Figure 2 9 Side view of interferometer optics and beam path 2 12 ...
Страница 22: ...Design Components and Function 2 Figure 2 10 The Superspring 2 14 ...
Страница 31: ...Design Components and Function 2 Figure 2 13 Rotation Monitor 2 23 ...
Страница 32: ......
Страница 42: ...How to Set Up and Run the FG5 3 3 10 ...
Страница 44: ...How to Set Up and Run the FG5 3 Figure 3 2 V Post 3 12 ...
Страница 53: ...How to Set Up and Run the FG5 3 1 Backup the data 2 Shut off computer power 3 21 ...
Страница 87: ...Adjustment and Maintenance 4 4 29 ...
Страница 91: ...Adjustment and Maintenance 4 4 33 ...
Страница 104: ...Troubleshooting 5 5 2 ...
Страница 117: ...Troubleshooting 5 5 15 ...
Страница 131: ...Checklists and Logs Appendix D 9 3 ...
Страница 140: ...Checklists and Logs Appendix D Table 9 6 Replacing Drive Belt 9 12 ...
Страница 145: ...Checklists and Logs Appendix D Table 9 10 Replace Linear Bearings 9 17 ...
Страница 149: ...Checklists and Logs Appendix D Table 9 13 Replace Shaft Encoder 9 21 ...

