background image

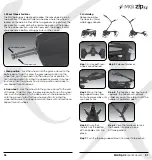
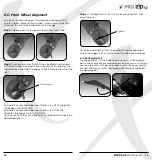
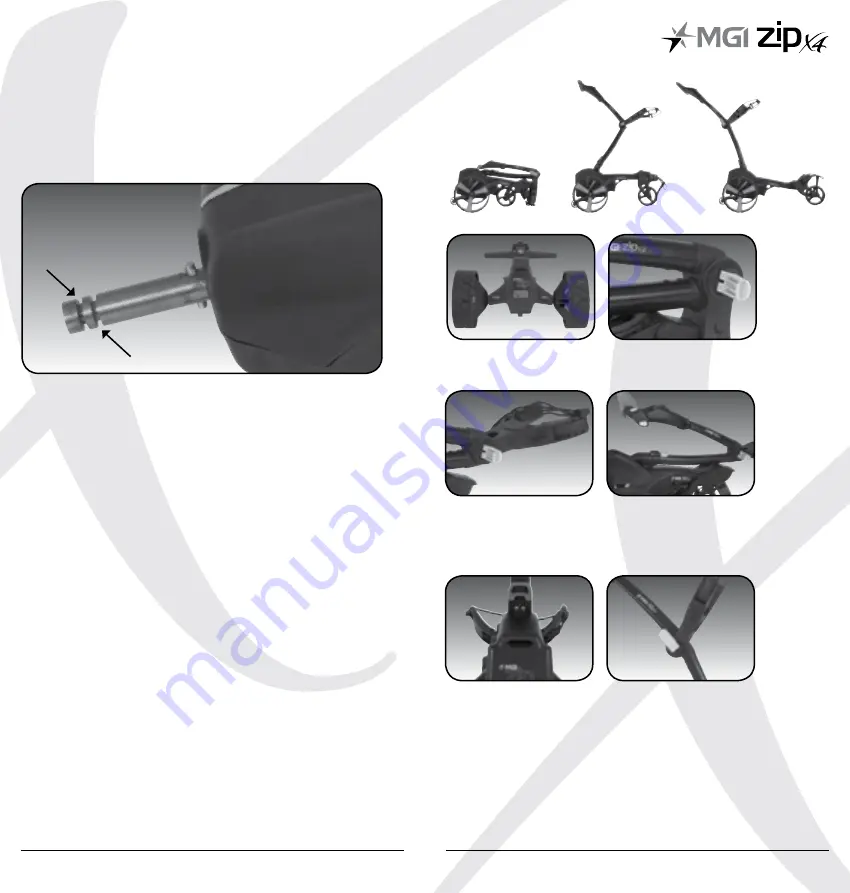
3.2 Rear Wheels Positions

The MGI Zip buggy is designed to allow the rear wheels to be in 
two positions. The position is determined by where the wheel is 
locked on the axle in either of the two grooves [see picture]. The 
drive position is used during the normal operation of the buggy. 
The free wheel position is used to freely push the buggy should 
you experience battery or buggy issues on the course.

i. Drive position


– Lock the wheel onto the groove closest to the 

battery base

. To do this, press the grey release button on the 

wheel hub, push the wheel on to the axle as far as possible. To 
test for drive position try rolling the wheel backwards. If you feel 
resistance then the wheel is now in drive position and ready to 
use. Repeat for both wheels.

ii. Free wheel

 – 

Lock the wheel into the groove closest to the end 

of the axle. To do this, press the grey release button on the wheel 
hub, push the wheel on to the axle and push the release button 
onto the groove. To test for free wheel position try rolling the 
wheel backwards. The wheel should spin freely with no resistance. 
Repeat for both wheels.

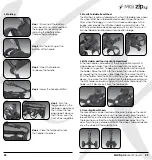
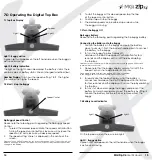
3.3 Unfolding

Please see below  
the steps to unfold  
a Zip Buggy Handle.

Step 7:

 Push the top bag support down to move it into position.


MGI Zip X4 

User Manual


07

06

Free wheel position

Drive position

Step 1:

 Ensure both rear 

wheels are attached.

Step 2:

 Release fold lever.

Step 4:

  The handle is now free to pull 

upwards. The handle will naturally 
unfold as you continue to pull until the 
handle is completely open.

Step 6:

 Close the fold lever to lock 

the handle into place in one  
of three positions. 

Step 5:

 Ensure that  

the latch at the bottom 
of the handle clicks into 
place. 

Step 3:

 Move the top 

bag support away from 
front wheel assembly until 
you hear it click.

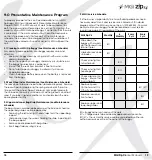
Содержание ZIP series

Страница 1: ...User Manual VERSION 1 0 ...

Страница 2: ...What Is Included 04 3 0 Assembling Your Buggy 05 3 1 Attaching the Rear Wheels 05 3 2 Rear Wheel Positions 06 3 3 Unfolding 07 3 4 Folding 08 3 5 Fourth Foldable Rear Wheel 09 3 6 GPS Holder and Top Handle Compartment 09 3 7 Inverting Rear Wheels 09 4 0 Battery Charging Connection 10 4 1 Initial Charge 10 4 2 Connecting the Battery onto the Buggy 10 4 3 Charging the Battery after Use 11 5 0 Fittin...

Страница 3: ... You may be required to show proof of purchase so we recommend you keep your receipt with this manual 2 0 What is Included MGI Zip Buggy 24v Lithium Battery Battery Charger GPS Holder MGI Pouch with User Manual Accessory Guide 3 0 Assembling Your Buggy 3 1 Attaching the Rear Wheels On the wheel press the grey release button on the wheel hub Place the wheel onto the axle You will notice you need to...

Страница 4: ...heel into the groove closest to the end of the axle To do this press the grey release button on the wheel hub push the wheel on to the axle and push the release button onto the groove To test for free wheel position try rolling the wheel backwards The wheel should spin freely with no resistance Repeat for both wheels 3 3 Unfolding Please see below the steps to unfold a Zip Buggy Handle Step 7 Push...

Страница 5: ...from the folding panel lid push the GPS holder outwards using your two thumbs underneath the holder until it disconnects from the top box lid 3 7 Inverting Rear Wheels The rear wheels can be inverted on the axle to reduce the size of the buggy when folded To invert the rear wheels press the grey release button on the wheels hub and remove from the axle Invert the rear wheels so that the wheels hub...

Страница 6: ...l is switched on 4 3 Charging the Battery after use Disengage the battery by lifting the handle The battery can be left on or removed from the buggy for charging Plug the charger AC lead into a powerpoint the green LED illuminates to indicate the charger is on Plug the charger output connection into the connector on the front of the battery the red LED illuminates to indicate charging When the cha...

Страница 7: ...ew UP to straighten the buggy more to the LEFT Roll the left or right hand side silver thumb screw DOWN to straighten the buggy more to the RIGHT You can roll the screws simultaneously or individual to achieve the desired alignment Step 3 Once alignment is set turn the lever and tighten Then close the lever TIP When adjusting the front wheel and testing the alignment ensure the buggy is run on a f...

Страница 8: ...Turn the Buggy Off Zip Buggy Battery Please note the following points regarding the Zip buggy battery Connecting the Battery onto the Buggy 1 Position the battery on the buggy and push the battery down to secure it Push the battery handle down to connect the battery to the buggy 2 To turn the buggy Top Box Display off Hold down the Start Stop Speed Control Button for four seconds and the display w...

Страница 9: ...rol 8 0 Warranty 8 1 Warranty Policy Your MGI ZIP buggy is covered by a Limited manufacturer s warranty from the date of purchase Duration of this warranty is 2 years on parts 2 years on Lithium batteries and chargers MGI or an authorised service centre will repair or replace any parts found to be defective in materials or workmanship under normal use provided that 1 The MGI Zip buggy has been pro...

Страница 10: ...e wheel Apply Petroleum Jelly or light grease to the stub axles Use a very small amount as the grease can attract sand If you play in sandy conditions you should clean the axle and regrease monthly 9 3 Upper and Lower Bag Strap Maintenance See Maintenance Schedule The bag straps should be replaced as per the Service Schedule The upper bag strap can be replaced by Removing the left and right hand s...

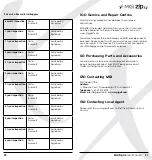
Страница 11: ...ice and Repair Centres For all servicing please do not go back to your place of purchase MGI offers the largest network of service centres in Australia and New Zealand To find your nearest service centre visit www mgigolf com For warranty repairs to be authorised you MUST provide proof of purchase Please keep this with you as well as your serial number you can record in this manual It is most impo...

Страница 12: ...aligning the front wheels Q I would like to have my MGI buggy serviced Who do I call A Visit www mgigolf com to find your nearest Service Centre using your postcode within Australian and New Zealand You can also call MGI Head office using any of the contact details See Section 12 0 for details Internationals please call your local agent as per Section 13 0 ...

Страница 13: ... mgigolf com International T 613 8872 6700 F 613 9873 1433 E international mgigolf com Follow us on Absolute attention has been taken to ensure this manual is correct at time of printing Specifications images and statistics may change at any time Visit www mgigolf com for the most current model information 06 19 Version 1 0 ...

Отзывы: