background image


Hand Controls 

All of the drive controls for the scooter are to be found on the Tiller 

Control Box (Photo 6.1). 


The Preset Speed Knob 

Turning this knob to the left, reduces your available maximum speed. 

Turning it to the right, increases the available maximum speed. 


The Battery Gauge 

This gives an approximation of battery charge and is illuminated for 

clarity. 

The gauge is “RED” empty, to “YELLOW” charge required, to 

“GREEN” charged. 

As the scooter moves over differing terrain, the Battery Gauge will dip 

up  and  down,  this  is  normal.  For  a  more  accurate  indication,  stop  the 

scooter  and  note  the  reading.  In  cold,  damp  weather  the  gauge  will  dip 

more  often  as  the  capacity  and  efficiency  of  all  batteries  drops  in  such 

conditions. 


TIP: 

If  your  battery  gauge  has  gone  into  the  “RED”  section  you  can  increase 
your  remaining  range  by  reducing  your  maximum  speed.  Remember  you 

MUST charge your battery overnight as soon as you can to prevent battery 

damage. 


Operating the Lights 

The lights are operated by pressing the blue button on the front fascia 

panel. Press the button once to illuminate the lights, press the button again 

to switch the lights off. Switch the lights on to make yourself more visible in 

low levels of light, day or night. 

6. Control Panel


Содержание M1 Plus

Страница 1: ...Owner s Manual M1 Plus ...

Страница 2: ...ter will reach you in excellent condition having been personally inspected before leaving the factory By following the guidelines for maintenance your scooter will maintain its first class condition and give you years of complete reliability and satisfaction ...

Страница 3: ...heel Mechanism page13 9 Seat Removal and Adjustment page13 10 Tiller and Battery and Charging page16 11 Transportation page19 12 Guidance for Safe Operation and Use page21 13 Battery and Charging Information page25 14 General Warnings page28 15 EMC EMI Warnings page32 16 Specifications page40 17 Routine Maintenance page42 18 Service History page43 19 Trouble Shooting Guide page45 20 Guarantee page...

Страница 4: ...o may have difficulty walking distances or for periods of time It is ideal for outdoor use and suitable for users up to 120kg in weight 264lbs Differing user weights can cause performance variation Maximum user weight tested using a 120kg test dummy The scooter is designed to be driven on footpaths and to cross roads It has been manufactured to comply with the requirements of the Medical Device Di...

Страница 5: ...aking such choices to decide which scooter is suitable for the user s intended purpose With regards to restraints seat positioning straps posture correction or other positional aids and accessories it is the obligation of the qualified healthcare professional in conjunction with the dealer to ensure the suitability of such equipment for the safe operation of the scooter Serious injury can occur in...

Страница 6: ... battery has been fully charged as failure to do this will result in battery damage Connect the battery charger to the mains supply and the charging socket located on the battery pack Switch on the mains supply and then switch on the battery charger RED light Power On YELLOW Light Charging GREEN Light Charge Complete Charge the scooter overnight after each use to maintain battery condition If you ...

Страница 7: ...tely 4 Lower the tiller using the folding knob to its lowest setting locking in the basket Make sure that there is at least 30mm between Tiller and battery pack 5 using the lifting handles provided carefully lift the scooter safely and securely into the luggage compartment of the vehicle TIP Using the front bumper and rear lifting handle provided carefully lift the scooter To reassemble the scoote...

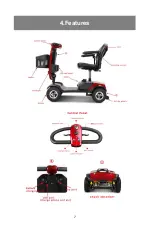
Страница 8: ...7 4 Features ...

Страница 9: ...e seat swivel lever and gently swivel the seat to face Forward Photo 5 4 5 Ensure that both feet are placed firmly on the floorboard of the scooter and the seat is secure Photo 5 5 Getting off your scooter 1 Bring your scooter to a stop and turn the key switch to off 2 Push forward the seat swivel lever located under the seat on the right hand side and rotate the seat 90 degrees to Exit Photo 5 2 ...

Страница 10: ...normal For a more accurate indication stop the scooter and note the reading In cold damp weather the gauge will dip more often as the capacity and efficiency of all batteries drops in such conditions TIP If your battery gauge has gone into the RED section you can increase your remaining range by reducing your maximum speed Remember you MUST charge your battery overnight as soon as you can to preve...

Страница 11: ...10 P6 1 ...

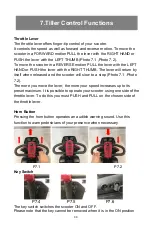
Страница 12: ... released and the scooter will slow to a stop Photo 7 1 Photo 7 2 The more you move the lever the more your speed increases up to its preset maximum It is possible to operate your scooter using one side of the throttle lever To do this you must PUSH and PULL on the chosen side of the throttle lever Horn Button Pressing the horn button operates an audible warning sound Use this function to warn ped...

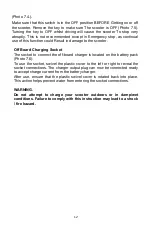
Страница 13: ...cket The socket to connect the off board charger is located on the battery pack Photo 7 6 To use the socket swivel the plastic cover to the left or right to reveal the socket connections The charger output plug can now be connected ready to accept charge current from the battery charger After use ensure that the plastic swivel cover is rotated back into place This action helps prevent water from e...

Страница 14: ...y someone illegally when parking By pushing BACKWARD the lever that is located on the right hand side of the scooter rear panel can engage the motor for you to drive P8 P 8 WARNING Use extreme caution in the freewheel mode especially on slopes inclines Letting go of your scooter whilst it is in freewheel can cause the scooter to roll unexpectedly ALWAYS re engage the freewheel device after use fai...

Страница 15: ...ertically keeping your back straight Bend knees ifrequired Photo 9 3 4 Place seat at desired location for stowage keeping back posturestraight at all times bend knees where required Photo 9 4 Note Exercise caution when lifting the seat P9 1 P9 2 P9 3 P9 4 Seat Adjustment 1 To adjust seat height remove the seat as described Photo 9 5 2 Move the seat post to the new position and refit the seat pin 3...

Страница 16: ...t 1 Pull the lock pin out from the seat base photo 9 7 2 Loose the adjustable bolt photo 9 8 3 Moving the armrests to the desired position andre tightening the thumbwheel knobs to adjust the width of the armrest P9 7 P9 8 ...

Страница 17: ...ob is located on the bottom of the tiller 1 Support the tiller with your left hand 2 Rotate the folding knob anticlockwise to release the tiller Photo 10 1 10 2 3 Move the tiller to the desired location 4 Rotate the folding knob clockwise to lock the tiller Photo 10 2 P10 1 P10 2 P10 3 Battery Removal It is important to remove the seat and seat post first to allow better access to the batteries Li...

Страница 18: ...zed dealer should be used 1 Switch your scooter off at the key switch Photo 7 5 2 Swivel the charge connector cover located on the batter pack and connect the charger Photo 10 6 Photo 3 Ensure that the charger plug is dry and intact before connecting it to the mains and switching it on 4 A reset button is located on the battery Please check that the button is pressed in Photo 10 7 P10 4 P10 5 P10 ...

Страница 19: ...tery to bomb Don t press the battery or stab it or let it endure any high pressure which may cause short circuit or overheating WARNING NO SMOKING OR NAKED FLAMES WHEN CHARGING BATTERIES DO NOT TOUCH BATTERY PACK TERMINALS WITH METAL OBJECTS ONLY USE APPROVED REPLACEMENT BATTERIES IF DAMAGE TO BATTERIES OR BATTERY BOXES IS EVIDENT CONTACT YOUR LOCAL DEALER IMMEDIATELY DO NOT ATTEMPT TO SERVICE THE...

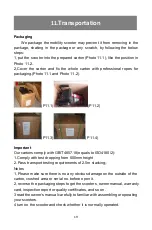
Страница 20: ... Our cartons comply with GB T4857 18 equals to ISO4180 2 1 Comply with test dropping from 500mm height 2 Pass transport testing requirements of 2 5m stacking Notes 1 Please make sure there is no any obvious damage on the outside of the carton crushed area or serial no before open it 2 reverse the packaging steps to get the scooters owner manual warranty card inspection report or quality certificat...

Страница 21: ...insure the safe transportation 2 To reverse the above steps to reassemble your scooter Important When reassembling the scooter remember to insert the battery locking pin because failure to do so may result in the batteries disengaging during use Always secure your scooter parts before transportation Remember to engage the drive unit by pushing the freewheel lever forwards to stop the scooter from ...

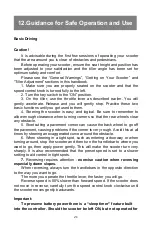
Страница 22: ... Shortcutting a pavement corner can cause the back wheel to go off the pavement causing problems if the corner is very rough Avoid this at all times by steering an exaggerated curve around the obstacle 6 When steering in a tight spot such as entering a doorway or when turning around stop the scooter and then turn the handlebar to where you want to go then apply power gently This will make the scoo...

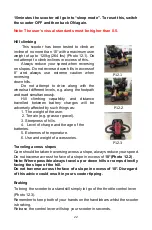
Страница 23: ...ry charges will be adversely affected by such things as 1 The weight of the user 2 Terrain e g grass or gravel 3 Steepness of hills 4 Level of charge and the age of the batteries 5 Extremes of temperature 6 Use and weight of accessories Traveling across slopes P12 1 P12 2 P12 3 Care should be taken traversing across a slope always reduce your speed Do not traverse across the face of a slope in exc...

Страница 24: ... of freezing conditions i e greater than 0 C Use on the footpath When using your scooter on the footpath always be aware of pedestrians and situations which might require extra care For example young children and pets Remember especially when driving in public places to drive with caution and regard for others at all times When maneuvering in confined areas including shops ensure the minimum speed...

Страница 25: ...ems If mobile phones or mobile radios are required to be used the vehicle must be brought to a halt and the power turned off before any such device is used Tyres Your scooter has solid tyres all round It is good practice to inspect the tyres for damage or wear regularly Emergency Braking Turning off the power switch whilst moving will switch off the power causing immediate and full braking This me...

Страница 26: ...teries Your scooter is fitted with batteries that require no maintenance other than regular charging If a battery is physically damaged please use extreme caution when handling it Beware Battery fluids are corrosive and care should be taken at all times to avoid contact with it If it comes into contact with the skin or clothing wash immediately with soap and water If it comes into contact with the...

Страница 27: ... 3 Do not interrupt the charging cycle 4 If your mobility device is not required for use it should remain on charge This will not damage the batteries so long as the mains socket plug is left switched on Do not leave the charger still connected to the batteries when the mains has been switched off This will eventually deplete the battery charge 5 If you leave your vehicle for an extended period mo...

Страница 28: ...ion Theoretical Range The range figures stated should be seen as a theoretical maximum and could be reduced if any single or combination of the following circumstances occur 1 User weight heavier than 120kg 2 Batteries whose age and condition are less than perfect 3 The terrain is difficult or unsuitable e g very hilly sloping muddy ground gravel grass snow and ice 4 The vehicle climbs ramps regul...

Страница 29: ...OT use an escalator to move the mobility scooter between floors as serious bodily injury could arise from such actions DO NOT drive on the road dual carriageways or motorways DO NOT drive up down or across inclines that have water ice oil or any other slippery substance on the surface Failure to note the above conditions could cause loss of control DO NOT attempt to drive over kerbs or obstacles i...

Страница 30: ... operate your mobility scooter if your vision is seriously impaired If you have any doubts about medical conditions health problems or treatments that may affect your ability to operate the mobility scooter safely please consult your healthcare professional We specifically disclaim responsibility to all personal injury and property damage that may occur during use which does not comply with the re...

Страница 31: ...t to reverse down slopes in excess of 8 degrees When negotiating ramps or inclines if the throttle lever is released a roll back will occur In FORWARD or REVERSE motion the scooter will ROLLBACK approximately 30cms 1ft before the brake engages Check that all electrical connections are secure before using your scooter DO NOT under any circumstances disconnect cut extend or otherwise modify ANY of t...

Страница 32: ...rain sea spray or moisture could cause the mobility scooter to malfunction electrically and mechanically and may cause rusting Maximum User Weight Limitations SW1000S Plus 120Kg 264lbs Running noisy 70db DISPOSAL The symbol above means that in accordance with local laws and regulations your product should be disposed of separately from household waste When this product reaches the end of its life ...

Страница 33: ...immunity level the greater the protection Current technology offers useful protection of at least 20 V m which provides protection from the more common sources of radiated EMC There are a number of relatively strong electromagnetic fields present in the everyday environment Most of these sources are obvious and easy to avoid others are not so obvious and can be unavoidable By following the warning...

Страница 34: ...ld transceivers such as CB radio or turn ON cellular phones whilst your mobility scooter is turned ON 2 Be aware of nearby radio or television transmitters and try to avoid coming too close to them 3 If you experience unintended movement or brake release switch your scooter OFF as soon as it is safe to do so 4 Adding accessories components or modifying the mobility scooter may increase susceptibil...

Страница 35: ...lectromagnetic environment specified below The customer or the user of the SW 1000S Plus scooter should assure that it is used in such an environment Emission Test Compliance Electromagnetic environment guidance RF Emission CISPR 11 Group 1 SW 1000S Plus scooter use RF energy only for its internal function Therefore it s RF emissions are very low and are not likely to cause any interference in nea...

Страница 36: ...35 Voltage fluctuation flicker emissions IEC 61000S 3 3 complies supply network that supplies buildings used for domestic purposes ...

Страница 37: ...6 kV contact 8 kV air 6 kV contact 8 kV air Floors should be wood concrete or ceramic tile If floors are covered with synthetic material the relative humidity should be at least 30 Electrical fast transient burst IEC 61000S 4 4 2kV for power supply lines 1kV for input output lines 2kV for power supply lines 1kV for input output lines Mains power quality should be that of a typical commercial or ho...

Страница 38: ...ded that the SW 1000S Plus scooter be powered from an uninterruptible power supply or a battery Power frequency magnetic fields should be at levels characteristic of a typical location in a typical commercial or hospital environment Power frequency 50 60Hz magnetic field IEC 61000S 4 8 3A m NOTE UT is the a c mains voltage prior to application of the test level Guidance and manufacturer s Declarat...

Страница 39: ...38 Immunity test IEC 60601 test level Complian ce level electromagnetic environment guidanc e ...

Страница 40: ...equency of the transmitter Recommended separation distance d 1 2 P d 1 2 P 80 MHz to 800 MHz d 2 3 P 800 MHz to 2 5 GHz Where P is the maximum output power rating of the transmitter in watts W according to the transmitter manufacturer and d is the recommended separation distance in the meters m b Field strengths from fixed RF transmitters as determined by an electromagnetic site survey should be l...

Страница 41: ...e is observed additional measures may be necessary such as reorienting or relocating the SW 1000S Plus scooter b Over the frequency range 150 kHz to 80 MHz field strengths should be less than 3 V m Recommended separation distances between portable and mobile RF communications equipment and the SW 1000S Plus scooter The SW 1000S Plus scooter is intended for use in an electromagnetic environment in ...

Страница 42: ...uency of the transmitter where P is the maximum output power rating of the transmitter in watts W according to the transmitter manufacturer NOTE 1 At 80 MHz and 800 MHz the separation distance for the higher frequency range applies NOTE 2 These guidelines may not apply in all situations Electromagnetic propagation is affected by absorption and reflection from structures objects and people ...

Страница 43: ...WEIGHT 12 5kg BATTERY WEIGHT 5 0kg FRONT BASKET WEIGHT 0 8kg GROUND CLEARANCE 45mm CONTROLLER Dynamic DR50 A01 Programmable by Dealer According to prevent electric shock category classification A 1 4 Internal power class According to prevent electric shock category classification B class According to the classification on the degree of protection into the liquid IPX4 In mixture with air of flammab...

Страница 44: ...er before use to ensure batteries carefully charged Wipe over with a damp cloth Use a damp soft cloth and mild detergent on panels battery wells tiller and seat Check tyres Each tyre should be free of debris oil deep cuts or distortion Long overnight battery charge Please ensure that the batteries are charged for a minimum of 8 hours Check tyres for wear See Fig A and Fig B Look at the tyres to en...

Страница 45: ...tteries for 12 hours and then disconnect the batteries to minimize battery discharge Electronic faults Do not attempt to investigate faults in the control box the control pod or charger as the design and set up of the electronics is of a safety critical nature Spare parts and service are available from authorized dealers Replacing LED where fitted Caution Disconnect batteries before changing LED W...

Страница 46: ...hould accompany the scooter when service or repair work is carried out The Service Agent will complete this section and return the manual to you Customer Name Date scooter purchased Address Model Color Postcode Serial No YEAR 1 2 3 4 YEAR 1 2 3 4 Service dates Service dates Controller Upholster y On off switch Seat Output plug Back Operation Armrest Dynamic braking Wheels tyr es Programma ble sett...

Страница 47: ...ction s Right turn Brake Up down slope Brushes Over obstacle Chassis Parking brake where fitted Condition List items repaired adjusted Steering Electrics Connection s Lights wher e fitted Dealer stamp Date Signed Dealer stamp Date Signed Dealer stamp Date Signed Dealer stamp Date Signed ...

Страница 48: ... wall socket in a different room No output from wall outlet Unplug from wall change fuse Fuse in charger mains plug blown Switch off and press button back in Button on battery pack has popped out Switch off and press button back in Output fuse in charger blown Unplug from wall and contact dealer Battery charging current high Faulty batteries Replace battery pack Scooter switched on during charging...

Страница 49: ...Y CRITICAL AND THERE ARE NO USER SERVICEABLE PARTS Your scooter is fitted with a self diagnostic controller that will give a sequence of audible beeps when an error is detected to help you or the authorized service agent determine the drive electronics fault Should you switch on the scooter and hear the beeps note the number of beeps separated by a short delay between each sequence and refer to th...

Страница 50: ...n Make sure the accelerate variable resistor is on the neutral position Accelerate variable resistor may need to recalibration 7 Speed limited variable resistor issue accelerate variable resistor Speed limited variable resistor or other wiring issue Check all the accelerate variable resistor Speed limited variable resistor or other wiring 8 Motor voltage issue Motor and other relative wirings issu...

Страница 51: ...thorized service agent Note This guarantee is not transferable 4 Any repaired or replaced part will benefit from these arrangements for the balance of the warranty period applicable to the scooter 5 Parts replaced after the original warranty has expired are covered for a further three months 6 Items of a consumable nature will not generally be covered during the normal warranty period unless such ...

Страница 52: ...ct them and try to give all relevant details so they can help you quickly The scooter shown and described in this manual may not be exactly the same in every detail as your own model However all instructions are still entirely relevant irrespective of detail differences The manufacturer reserves the right to alter without notice any weights measurements or other technical data shown in this manual...

Отзывы: