background image

Troubleshooting 

We occasionally have to speak with end users regarding issues that arise. 
The vast majority of issues relate to connection, or lack there of. 

The first thing to find out is –  

When the EKP unit is switched to on, does the red light next to the ON OFF switch 
illuminate, and can you hear/feel the fans running? 
If the light illuminates and the fans are running but the user is getting no “cleaning 
power at the brush”, there is a very good chance that there is a connection issue 
somewhere.  
These connection issues will most likely be at either the brush or the clamp.  

Things to try/test – 

Unscrew brush and check the thread (clean if need to). Screw back in and try 
again. 

Have a look at the clamp teeth. Is there a blue build up (copper phosphate)? 
This will inhibit connection. Wire brush the teeth, wash with water and try 
again. Also check where the cable lug attaches. 

Are the dinse connectors secured correctly? Also check for and 
corrosion/debris. 

The other issue that may arise (usually first time users) is the user gets a black 
stain on their work piece. This is usually because the clamp and handle are around 
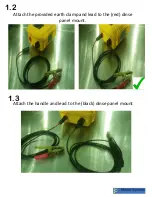
the wrong way (reverse polarity). The red tagged lead (clamp) must go into the red 
tagged dinse panel mount and obviously the brush lead into the other. 


Ensure ‘

RED

’ 

marked lead 

is connected 

to ‘

RED

’ 

marked 

terminal. 

Содержание EASYKleen Pro S-10

Страница 1: ...Commissioning Operation Manual This document outlines the procedure to commission the EASYkleen TEC Brush EKT and also an illustrated step by step operation guide...

Страница 2: ...5VDC Duty Cycle 100 Power Source Transformer Driven Case and Lead Specs Material High impact structural polymer Dimensions 300mm x 260mm x 130mm Weight 5kgs Leads 8mm PVC 10ft in length Technical Bene...

Страница 3: ...OH S PVC or nitrile gloves required to be worn Eye Protection must be worn Use in well ventilated areas Protective clothing should be worn Face protection can be worn Enclosed footwear at all times...

Страница 4: ...Front Panel Information ON OFF Switch Green Indicator Light Cooling 12V Fans...

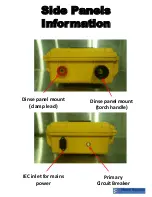
Страница 5: ...Side Panels Information IEC inlet for mains power Primary Circuit Breaker Dinse panel mount torch handle Dinse panel mount clamp lead...

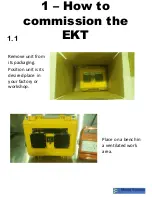
Страница 6: ...1 How to commission the EKT 1 1 Remove unit from its packaging Position unit is its desired place in your factory or workshop Place on a bench in a ventilated work area...

Страница 7: ...Attach the provided earth clamp and lead to the red dinse panel mount 1 2 pic 1 3 Attach the handle and lead to the black dinse panel mount...

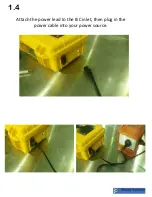
Страница 8: ...1 4 Attach the power lead to the IEC inlet then plug in the power cable into your power source...

Страница 9: ...sh The Spot brush is designed for cleaning spot welds and precision cleaning Best used with a heat resistant bristle sleeve that reduces the splaying of bristles Rapid Brush Reduces bristle splay when...

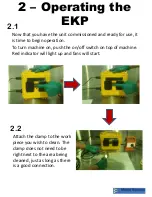
Страница 10: ...to begin operation To turn machine on push the on off switch on top of machine Red indicator will light up and fans will start Attach the clamp to the work piece you wish to clean The clamp does not n...

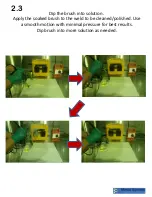
Страница 11: ...2 3 Dip the brush into solution Apply the soaked brush to the weld to be cleaned polished Use a smooth motion with minimal pressure for best results Dip brush into more solution as needed...

Страница 12: ...2 4...

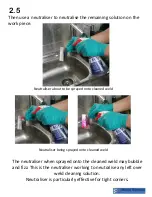
Страница 13: ...to be sprayed onto cleaned weld Neutraliser being sprayed onto cleaned weld The neutraliser when sprayed onto the cleaned weld may bubble and fizz This is the neutraliser working to neutralise any le...

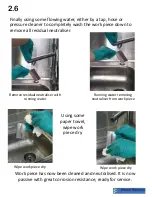
Страница 14: ...ll residual neutraliser Remove residual neutraliser with running water Running water removing neutraliser from work piece Wipe work piece dry Wipe work piece dry Using some paper towel wipe work piece...

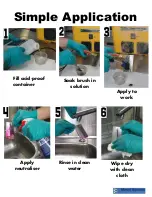
Страница 15: ...Simple Application Fill acid proof container Soak brush in solution Apply to work Apply neutraliser Rinse in clean water Wipe dry with clean cloth...

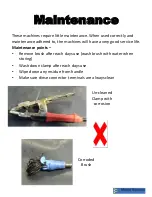
Страница 16: ...e machines will have a very good service life Maintenance points Remove brush after each days use wash brush with water when storing Wash down clamp after each days use Wipe down any residue from hand...

Страница 17: ...e brush when machine is connected to power supply Touch the brush or unscrew brush immediately after use as it will be hot Touch the work piece near the weld polished area just after it has been polis...

Страница 18: ...h or the clamp Things to try test Unscrew brush and check the thread clean if need to Screw back in and try again Have a look at the clamp teeth Is there a blue build up copper phosphate This will inh...

Страница 19: ...ephone 0411 217 986 Date MSDS Prepared 05 01 15 MSDS Prepared By Metal Science Technologies Pty Ltd Phone Number 612 4474 3394 SECTION 2 COMPOSITION INFORMATION ON INGREDIENTS Hazardous Ingredients sp...

Страница 20: ...wers and ditches which lead to waterways Clean up spills immediately observing precautions in the Protective Equipment section Provide ventilation Spill may be carefully neutralized with lime calcium...

Страница 21: ...VITY Chemical Stability Stable under normal temperatures and pressures Incompatibility with Other Substances Metals strong oxidizing agents strong bases amines ammonia sulfuric acid nitromethane sodiu...

Страница 22: ...ed RCRA U Series None listed SECTION 14 TRANSPORT INFORMATION Shipping Name Phosphoric Acid Hazard Class 8 UN Number 3264 Packing Group III SECTION 15 REGULATORY INFORMATION NOHSC Classified as Hazard...

Страница 23: ...Manufactured by Metal Science Technologies Pty Ltd 43 Shelley Road Moruya NSW 2537 Australia Ph 612 4474 3394 www metalscience com au...

Отзывы: