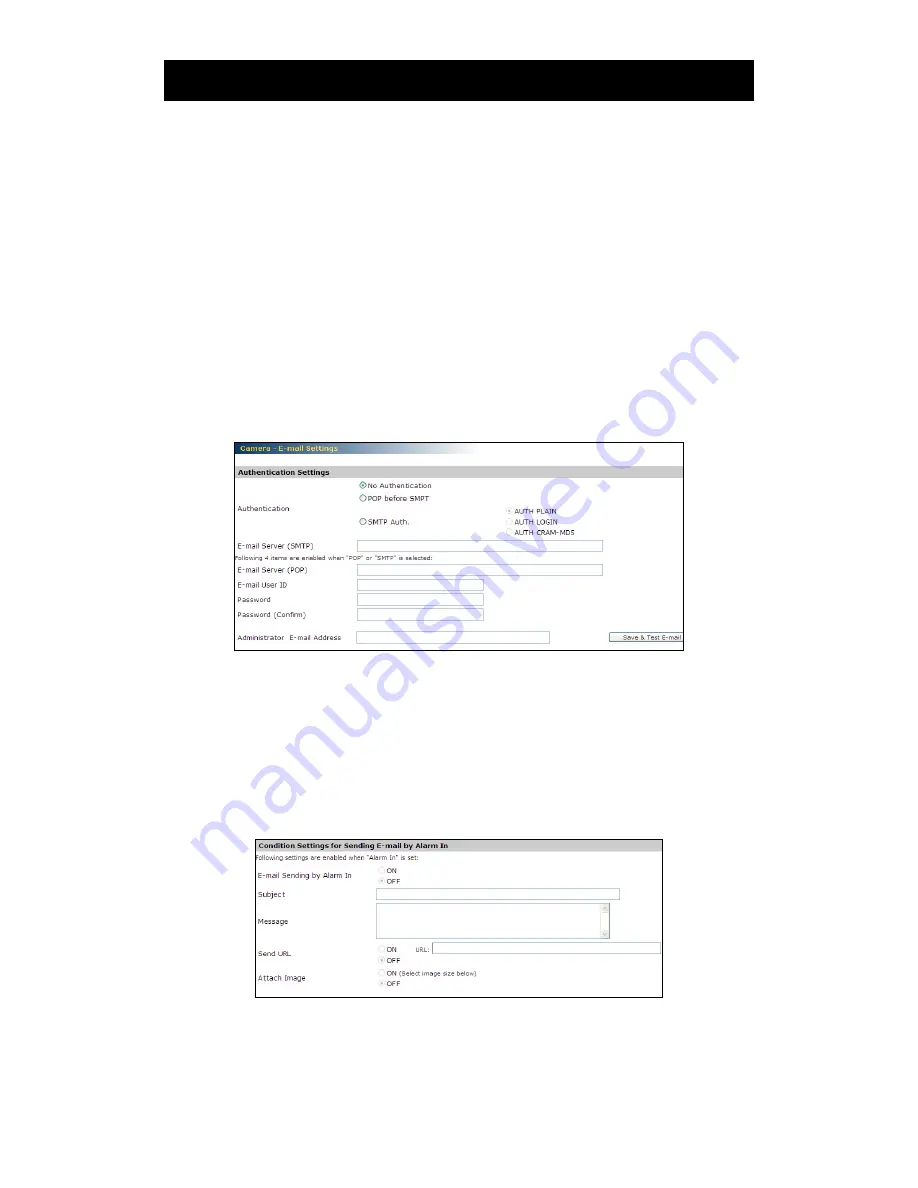
Messoa NIC830-HN5 Скачать руководство пользователя страница 35

Setting 


33

E-Mail Recording 

You can receive images by setting your e-mail account.   
 
Authentication setting 

No Authentication- no restrict rule 

POP before SMPT- the mail server restrict sending e-mail before receiving 

SMTP Auth. - Authorize plain, login, and Cram-MD5 
 
E-mail Server (SMTP) - input your outgoing mail server (SMTP) 

E-mail Server (POP) – input your incoming mail server (POP) 

E-mail User ID – input your e-mail account ID number 

Password – input your e-mail account password 

Password (Confirm) – confirm your e-mail password 

Administrator E-mail Address – input your e-mail address 


Press “save & test e-mail” button to save your setting and to test your e-mail setting 


Condition settings for sending e-mail by alarm in 

You can setup mailing condition when alarm has been triggered.   

E-mail Sending by alarm in – select ON to active Alarm in mailing function, 

otherwise, select off. 

Subject – input your subject title for your sending e-mail 

Message – input the alarm message as a notification 

Send URL – You can send images to URL when you select ON to active the function.   

Attach Image – attach image files to your e-mail notification 


Condition settings for sending e-mail by motion detection 

You can setup mailing condition when motion has been detected. 

E-mail Sending by Motion Detection – Select ON to enable sending e-mail when 

motion has been detected 

Содержание NIC830-HN5

Страница 1: ...NETWORK CAMERA Instruction Manual 830 A 8_CD ...

Страница 2: ... Camera Environment 15 1 12 Connecting the Camera and Personal Computer by Network 16 1 13 Using the Camera Search Application Camera Finder 18 1 14 Log in Screen 19 1 15 Viewing and Listening 20 Set up 2 1 Setting 22 2 2 Camera Basic Settings 23 2 3 Camera Compression Settings 26 2 4 Camera Event Settings 27 2 5 Camera SD Recording 29 2 6 Camera FTP Recording Settings 31 2 7 Camera E Mail Recordi...

Страница 3: ... and if not installed and used in accordance with the instructions may cause harmful interference to radio communications However there is no guarantee that interference will not occur in a particular installation If this equipment does cause harmful interference to radio or television reception which can be determined by turning the equipment off and on the user is encouraged to try to correct th...

Страница 4: ... Do not place this camera on an unstable cart stand tripod bracket or table The camera may fall causing serious injury to a child or adult and serious damage to the product Use only with stand tripod bracket or table recommended by the manufacturer or sold with the camera Any mounting of the product should follow the manufacturer s instructions and should use a mounting accessory recommended by th...

Страница 5: ...they may touch dangerous voltage points or short out parts that could result in a fire or electrical shock Never spill liquid of any kind on the camera 16 Servicing Do not attempt to service this camera yourself as opening or removing covers may expose you to dangerous voltage or other hazards Refer all servicing to qualified service personnel 17 Damage Requiring Service Disconnect this camera fro...

Страница 6: ...on the camera The lightning flash with arrowhead symbol within an equilateral triangle is intended to alert the user to the presence of uninsulated dangerous voltage within the product s enclosure that may be of sufficient magnitude to constitute a risk of electric shock to persons The exclamation point within an equilateral triangle is intended to alert the user to the presence of important opera...

Страница 7: ...amera may malfunction Install the camera where no video noise appears If cables are wired near electric lighting wires or a TV set noise may appear in images In this event relocate cables or reinstall equipment Check the ambient temperature and humidity Avoid using the camera where the temperature is hotter or colder than specified Otherwise the quality of images may deteriorate or internal parts ...

Страница 8: ...sories Confirm that all of the following accessories have been supplied with the network camera CD ROM x1 The instruction manual and Camera Finder are contained Quick Guide x1 2GB SD card x1 Screw set Wood screws x4 Anchor x4 ...

Страница 9: ...pplied with a purchased memory card An SD memory card can be used for the loop recording of images The life span number of rewrites possible of an SD memory card is greatly affected by the capacity of the SD memory card The use of a 128 256 or 512 MB 1 or 2 GB large capacity SD memory card is recommended for loop recording Do not use a memory card containing the data recorded by another device wit...

Страница 10: ...o other jacks as this may cause a malfunction When removing the connection cable disconnect the cable by holding its plug Do not disconnect the cable by pulling on the cable Do not drop the power adapter or subject it to strong impact Do not use the power adapter in hot and humid places Temperature increasing on the surface of the adapter is normal Before moving the adapter to another location unp...

Страница 11: ...rk Camera The NIC network camera can deliver video images and audio in real time using the Internet or an intranet The camera is equipped with Ethernet RJ 45 10BASE T 100BASE TX network interfaces It can be used in various indoor environments ...

Страница 12: ...ion goes on Built in SD memory card interface The use of SD memory cards enables the recording of images for long periods of time as well as recordings when alarms go on SD memory card 8 16 32 64 128 256 and 512 MB 1 2 GB SD memory cards 3 3 V supported Physical interface Part 1 Physical Layer Specification Version 1 01 Motion detection The camera incorporates the motion detector to generate an al...

Страница 13: ...Introduction 11 1 9 Names of Camera Parts SD card slot Default button Network Connector ...

Страница 14: ...installing on ceiling or wall 1 Make a hole in the ceiling wall where the camera is to be installed to insert the power cable LAN cable and other cables 2 Feed the power cable LAN cable and other cables through the hole 3 Loosen the locking screw To remove the cover rotate the cover counter clockwise 4 Mount the camera to the ceiling wall Screw ...

Страница 15: ...Introduction 13 5 Adjust the view angle Monitor out 6 Align the notch with position P Rotate the cover clockwise to lock the cover to the base Tighten the locking screw Base Locking Screw Notch Cover ...

Страница 16: ...The screws supplied as accessories do not provide an adequate strength with some ceiling materials For example special anchors are needed if the ceiling material is gypsum boards Please consult the building architects regarding ceiling structure and strength 7 Turn on the Power The camera has no main power switch or button To turn the power on insert the plug of the power cord into a power outlet ...

Страница 17: ...ended personal computer operating conditions Windows 2000 or XP as OS Internet Explorer Version 6 0 or later CPU Intel Pentium 4 2 0GHz or higher Memory 512MB or more Network camera Please purchase the required and appropriate number of cameras corresponding to the desired camera installation locations Connection equipment such as a hub and router suiting the network system environment and LAN cab...

Страница 18: ... it is connected The IP address of the network camera is sometimes updated or changed from time to time when the DHCP server is used For this reason the network camera sometimes cannot be connected due to an IP address change if the network camera is accessed using the previously set IP address To enable accessing the network camera in this case a fixed IP address needs be set with the network cam...

Страница 19: ...ing the LAN cable cross cable Connect AC 24V DC 12V to the power terminal 2 Set the IP address of the personal computer Set the IP address which you are not using other than 192 168 0 30 camera s IP address Set the IP address to 192 168 0 50 and subnet mask to 255 255 255 0 as an example For details on the procedure refer to the user s guide of the personal computer 3 Test the camera connection us...

Страница 20: ... for a Camera 1 From the Start menu point to Programs and NIC Network Camera and then select Camera Finder 2 Start up Camera Finder and click Search All the cameras currently connected to the network will appear To clear the results click Clear 3 Click the camera you want to login from the list of cameras The chosen camera name and IP address is displayed in the Network camera log in fields 4 Clic...

Страница 21: ...og in allows rewriting of all settings Be certain to change the administrator log in ID and password already set in the camera by default to ensure camera security Keep the new administrator log in ID and password handy for future use To change the administrator log in ID and password see Administrator Function Changing ID and Password portion User Log in 1 Search the camera by Camera Finder and c...

Страница 22: ...ble for Download of signed ActiveX control 6 Click OK Log in the camera Your browser will launch and the Camera login screen See Administrator Log in and User Log in for the log in method When the security warning screen VeriSign appears on the first use of the system click Yes NOTE Administrator authorization is needed to install Active X control Install Active X control after changing the person...

Страница 23: ... the network camera Consult the network administrator so as to avoid impacts on network camera operations Communication with the network cameras via a proxy server may cause some problem Install the network cameras after consulting the network administrator Using the network cameras via a proxy server sometimes takes a long time till images are displayed after log in or reduces the frame rate of d...

Страница 24: ...e Settings Network Settings Admin Functions Event Log or Information in the Setting Menu The sub menu of the clicked setting will show up Unless logged in as an administrator the Administrator Setup Menu will not be displayed 2 Click an item in the sub menu desired to set The setup screen for the clicked item appears on the right of the screen 3 Configure each setting items Click the Save button t...

Страница 25: ...e When B W mode is chosen camera will remain in B W mode NOTE The brightness level of images is controlled automatically by adjustment of the lens AGC and slow shutter D N delay time It is a span of time after which the camera switches into b w mode from color mode upon reaching a certain level of illumination which is regulated by D N level It has a following range of values sec 0 5 10 15 30 If i...

Страница 26: ...mes dark Black Compression Set an area for backlight compensation Backlight compensation is a function that achieves the brightness of a selected area to an optimum image level This function is effective when the auto aperture lens tends to close due to an intense light that enters in areas other than those wished to view so that areas desired to see become dark and difficult to see In this case s...

Страница 27: ...ing auto option will enable automatic setting of this parameter Lower values of White Balance more suitable for the environment of higher color temperature Higher Values of White Balance more suitable for the environment of lower color temperature IRIS adjustment High positive values are advised for light environment negative values for low light and zero value for normal setting If the image of c...

Страница 28: ...iles JPEG files varies in accordance with compression ratio Low compression This setting produces highest image quality The file size increases Mid compression Standard setting High compression This setting produces lowest image quality The file size decreases Monitor Frame Rate MPEG4 Following settings are enabled when Compression Mode is set to MPEG4 Image Size Bit Rate Unicast Streaming Unicast...

Страница 29: ... settings will not be reflected unless the Save button is clicked Alarm In 1 Set an alarm to be detected ON Detects an external alarm OFF Does not perform Alarm In 2 Set Input type for alarms if Function is set to other than OFF Normally Opened NO A no voltage contact system Set in case of normally open closed in case of an alarm Normally Closed NC A no voltage contact system Set in case of normal...

Страница 30: ...rrect detection is sometimes made due to noise if the object is dark and AGC gain is high Set the sensitivity to low Output Delay Time Set a time to hold alarm output Choose from 1 5 10 15 30 and 60 seconds This function is used when connecting to alarm output terminals and activating a siren buzzer or emergency light 2 5 Camera SD Recording ...

Страница 31: ...d Important Be certain to check Remove SD Utility card in the SD Utility Card In Out portion when removing the SD card Then click the Execute button Removing SD Card without executing Remove SD memory card may destroy data 2 Configure each setting items Event Recording Alarm In ON Images are recorded when an external alarm occurs OFF Images are not recorded when an external alarm occurs Motion Det...

Страница 32: ...memory card can be deleted 1 Click Camera Settings in the setting menu A sub menu for Camera settings will appear 2 Click SD Recording in the sub menu A setup screen for Camera Recording will appear 3 Click Delete all Delete from Alarm Recording list or Delete from Continuous Recording list in Recorded Files Clicking Delete all deletes all record files Clicking Delete from Alarm Recording list dis...

Страница 33: ...ID Password Confirm Re enter the password FTP Port Number set 21 as default FTP Mode active mode This mode is for most FTP applications PASV mode This mode is for the camera s network environment is behind a firewall FTP Connecting Method Reconnect The network camera logs in out for each file transfer Continuous Connection The network camera is always in connection File name and FTP server usage U...

Страница 34: ...etwork failure or other trouble The stored images can be transferred to the FTP server when the network status or other troubles are resolved Function ON OFF Select ON to active SD card FTP back up function Accumulation Cycle Set a time interval in seconds for recording images to be stored Time interval 1 2 5 10 15 30 60 120 300 600 900 1800 or 3600 seconds Overwrite Overwrite when SD card reaches...

Страница 35: ...dress Press save test e mail button to save your setting and to test your e mail setting Condition settings for sending e mail by alarm in You can setup mailing condition when alarm has been triggered E mail Sending by alarm in select ON to active Alarm in mailing function otherwise select off Subject input your subject title for your sending e mail Message input the alarm message as a notificatio...

Страница 36: ...ssage as a notification Send URL You can send images to URL when you select ON to active the function Attach Image you can attach images to your e mail E mail Address List You can send e mails to multiple users when either alarm in motion detection or both have occurred 2 8 Camera Audio Settings ...

Страница 37: ...ut Level HIGH Increases the audio input level MIDDLE Adjusts the audio input level to a medium level LOW Reduces the audio input level Audio Output ON The camera receives audio OFF The camera does not receive audio Set to ON when outputting audio from a speaker connected to the camera Audio Output Level HIGH Increases the audio output level MIDDLE Adjusts the audio output level to a medium level L...

Страница 38: ...our IP address here when you select DHCP off Subnet Mask Please use default number 255 255 255 0 Default Gateway leave blank as default setting It is not necessary to enter Default Gateway if it is not used Ask your Network Administrator for Default Gateway information Primary DNS Secondary DNS HTTP Port Host Name Domain Name Bandwidth Control OFF The network Camera will display images maximum fra...

Страница 39: ...our DDNS server User ID password and password confirm and then presses save to save your setting FTP Server If you wish to enable FTP function select ON to activate FTP function Input your Login ID Password Password confirm and number of maximum connection in Max Simultaneous Connections Press Save to save your setting ...

Страница 40: ...dmin ID admin Password 1234 You can adjust your own Admin ID and password up to 16 characters Date and Time Input the date time and time zone here to setup system time You can also enable Network Time Protocol NTP by selecting ON at NTP server Function Input a host name for NTP server select time adjustment period and press save and test button to start testing NTP function Select ON in Daylight s...

Страница 41: ...mation can be exported and saved to a personal computer It can also be imported from the personal computer to network cameras Export Click on Export button and choose a file directory to save file in your computer Import Click on Import button and select the configuration setting file to start importing file to your network camera Factory Default Clicking the Default button in the setup screen the...

Страница 42: ...ion for log view Select Set Condition in Display filter setting Select appropriate option in Display Condition Settings Click the save button to apply new condition 2 12 Information Information Click on Information on setting menu The information shows camera s Hardware ISP and Firmware version ...

Отзывы: