background image

51

Setting the room temperature control unit/display

Setting the internal clock time and switching times

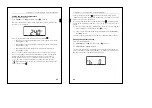
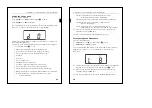
From the standard display:

1

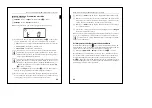
1 x both

 keys – 

long

 operation (Figure 

/

1 and 2).

2

5 x both

 keys – 

short

 operation.

The clock symbol and "t 0" are shown (t = engl. time).

3

You can now scroll through to adjust the time or switching time by 
pressing the left or right key on the display (Figure 

/

 1 or 2):

t 0

 = time (either transmitted from the external time switch or from 

the internal clock)

t 1.1 

to 

t 1.4

 = time channel 1, switching time 1-4

t 2.1 

to 

t 2.4

 = time channel 2, switching time 1-4

|

When the time is updated by an external time switch, this time 
is shown here. When you change this time manually, it is 
overwritten again during the next update by the time switch.

|

You can only use the control menu to adjust the switching times 
which have been pre-programmed via the ETS. Switching times 
which are not defined in the ETS are shown when they are called 
up in the display with "

--:--

" and cannot be set using the keys on 

the display (Figure

/

1 or 2) .

4

Keep both keys pressed down for a 

long

 time (Figure 

/

1 or 2). The 

hour display for the selected time/switching time starts to flash.

5

Press the left or right key on the display in order to set the hours as 
required (short operation = step-by-step adjustment; long operation 
= continuous adjustment).

52

Setting the room temperature control unit/display

6

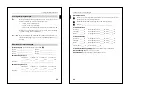
Press both keys for a 

short

 time. The minute digits now flash.

7

Press the left or right key on the display in order to set the minutes 
as required (short operation = step-by-step adjustment; long 
operation = continuous adjustment).

8

Press both keys for a 

short

 time. The selected time/switching time 

(t...) appears again.

9

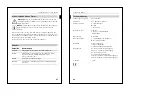
Save the new required setting by pressing both keys for a 

long

 time.

The new time/switching time is saved; the standard display reopens.

|

We recommend that you synchronise the time via an external 
time switch, in order to guarantee precision over a longer period 
of time.

Selecting the setpoint temperature or operation mode 
directly

Your electrician specified 

whether you can access and adjust the 

setpoint temperature or the operation mode directly by a right/left push-
button action, or whether none of these functions is activated.

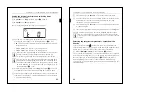
1

1 x

 key 

left/right

 – 

short

 operation (Figure 

/

1 and 2).

The "Set setpoint temperature" or "Set operation mode" menu command 
is shown with the value last set. You can change the value by pressing 
the left or right key on the display (Figure

/

1 and 2). The value is 

directly applied; you don't have to save separately. After approx. 5 
seconds, the room temperature control unit returns automatically to the 
standard display.

Содержание PLANTEC 626008

Страница 1: ...vicecenter merten de Internet www merten de Bei technischen Fragen wenden Sie sich bitte an unsere InfoLine Telefon 49 1805 212581 oder 49 800 63783640 Telefax 49 1805 212582 oder 49 800 63783630 E Ma...

Страница 2: ...BUSANKOPPLER UP 2 0 instabus EIB EIB 6902 99 A B Merten BUSANKOPPLER UP 2 0 instabus EIB EIB 6902 99 A Merten BUSANKOPPLER UP 2 0 instabus EIB EIB 6902 99 A B B Merten BUSANKOPPLER UP 2 0 instabus EIB...

Страница 3: ...ld 9 Taster mit Demontageschutz Zubeh r aufstecken Bild 9 So beschriften Sie den Taster 10 F r den Bediener Was Sie ber Voreinstellungen wissen m ssen 11 Was Sie ber das Tastenfeld wissen m ssen 11 Wa...

Страница 4: ...ar Er ist mit einem Display ausgestattet Mit dem oberen Tasten paar k nnen Sie wichtige Einstellungen vornehmen Im mittig liegenden Beschriftungsfeld k nnen Sie die Tasten individuell kennzeichnen Jed...

Страница 5: ...ass keine Fremdw rme auf das Ger t gelangt wie z B durch direkte Sonneneinstrahlung oder die N he von Fern sehern Kaminen Heizungsrohren Dimmern Steckdosen oder an deren elektrischen Verbrauchern die...

Страница 6: ...icher auf dem UP Modul montiert werden kann Das m ssen Sie vor der Montage ber cksichtigen 8 So montieren Sie den Taster Der MF Taster mit RTR ist ein Anwendungsmodul und wird auf das se parat zu best...

Страница 7: ...hmen gesi chert 10 So beschriften Sie den Taster F r den MF Taster mit RTR sind Laserdrucker Beschriftungsb gen Art Nr 623091 f r individuelle Beschriftung mit Texten Logos oder Symbo len erh ltlich M...

Страница 8: ...mit jeder Merten IR Fernbedienung steuern k nnen Jede Bet tigung einer Taste 3 8 an der Fernbedienung l st die Funktion der entsprechenden Taste am MF Taster mit RTR aus Bild 3 8 Was Sie ber Voreinste...

Страница 9: ...erreicht Der Regler heizt oder k hlt 2 Stufe 2 ist aktiviert Wird nur angezeigt wenn zweistufiges Heizen K hlen eingestellt ist Bei Heizen und K hlen 1 Der Regler heizt 2 Der Regler k hlt C Temperatu...

Страница 10: ...m Bedienermen Links Rechts langer Tastendruck Damit ver ndern Sie automatisch die einzel nen Werte schneller Vor bzw R cklauf 16 Raumtemperaturregler Displayanzeige einstellen Basisanzeige Hier sehen...

Страница 11: ...tenwechsel oder dauerhaft g ltig 18 Raumtemperaturregler Displayanzeige einstellen Ihr Installateur hat festgelegt innerhalb welcher Grenzen Sie diesen Wert ver ndern k nnen beispielsweise innerhalb v...

Страница 12: ...iebsart indem Sie beide Tasten gleichzeitig lang dr cken Die neue Betriebsart wird gespeichert die Basisanzeige ist zu sehen 20 Raumtemperaturregler Displayanzeige einstellen Arbeitstag arbeitsfreier...

Страница 13: ...peratursensor und Isttemperatur 22 Raumtemperaturregler Displayanzeige einstellen d12 Temperatur von externem Temperatursensor Isttemperatur und Uhrzeit im Wechsel d13 Ist Solltemperatur Datum sowie U...

Страница 14: ...ruck schrittweises Ver stellen langer Tastendruck kontinuierliches Verstellen 24 Raumtemperaturregler Displayanzeige einstellen 6 Dr cken Sie kurz auf beide Tasten Die Minutenziffern blinken nun 7 Dr...

Страница 15: ...___ ___ Uhr ___ ___ Uhr ___ ___ Uhr Funktion ____________________________________________ Schaltzeit 1 Schaltzeit 2 Schaltzeit 3 Schaltzeit 4 ___ ___ Uhr ___ ___ Uhr ___ ___ Uhr ___ ___ Uhr Funktion...

Страница 16: ...utzdemontageschutz f r PLANTEC Ger te 623091 PLANTEC Beschriftungsbogen f r PLANTEC Multi funktions Taster mit Raumtemperaturregler 1 Bogen f r 6 Ger te 615022 Merten Beschriftungssoftware 623299 UP M...

Страница 17: ...ismantling Figure 37 Installing the protection against dismantling accessory Figure 37 Mounting the push button with the protection against dismantling accessory Figure 37 How to label the push button...

Страница 18: ...unit can be used for heating and cooling with infinitely variable INSTABUS valve drives or to control switch actuators It is fitted with a display You can make the most important settings using the tw...

Страница 19: ...e control unit Ensure that no external sources of heat reach the device for example from direct sunlight or the proximity of televisions fireplaces heating pipes dimmers socket outlets or other electr...

Страница 20: ...on the FM module What to check before installing 36 How to mount the push button The MF push button with RTCU is an application module and is mounted onto the FM module art no 623299 which can be orde...

Страница 21: ...the middle screws B back onto the front panels through the protection against dismantling The MF push button with RTCU is now secured against easy removal 38 How to label the push button Laser printer...

Страница 22: ...keys 3 8 are pressed on the remote control the function of the corresponding key is triggered on the MF push button with RTCU Figure 3 8 What you need to know about presettings What you need to know a...

Страница 23: ...hed The controller is heating or cooling 2 Level 2 ist activated Is only shown if two stage heating cooling is set For heating and cooling 1 The controller is heating 2 The controller is cooling C Tem...

Страница 24: ...dividual values in the control menu incrementally Left right Key pressed down and held This changes the individual values automatically fast forward or back 44 Setting the room temperature control uni...

Страница 25: ...is valid either only until the operation mode is switched or permanently depending on the preset option 46 Setting the room temperature control unit display Your electrician has defined within which...

Страница 26: ...mode by pressing both keys simultaneously for a long time The new operation mode is saved the standard display reopens 48 Setting the room temperature control unit display Setting the working day non...

Страница 27: ...from external temperature sensor and actual temperature 50 Setting the room temperature control unit display d12 TTemperatur from external temperature sensor actual temperature and time alternating d1...

Страница 28: ...o set the hours as required short operation step by step adjustment long operation continuous adjustment 52 Setting the room temperature control unit display 6 Press both keys for a short time The min...

Страница 29: ...itching time 1 Switching time 2 Switching time 3 Switching time 4 ___ ___ ___ ___ ___ ___ ___ ___ Function ____________________________________________ 54 Presettings table Alarm functions Setpoint va...

Страница 30: ...ices 623091 PLANTEC labelling sheet for PLANTEC multi function push button with room temperature control unit 1 sheet for 6 devices 615022 Merten labelling software 623299 Flush mounted module for mul...

Отзывы: