background image

10

1

2

3

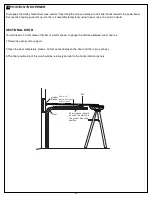
Trolley Sc

Fig. 1

5

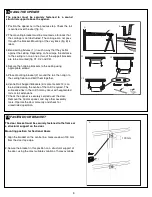
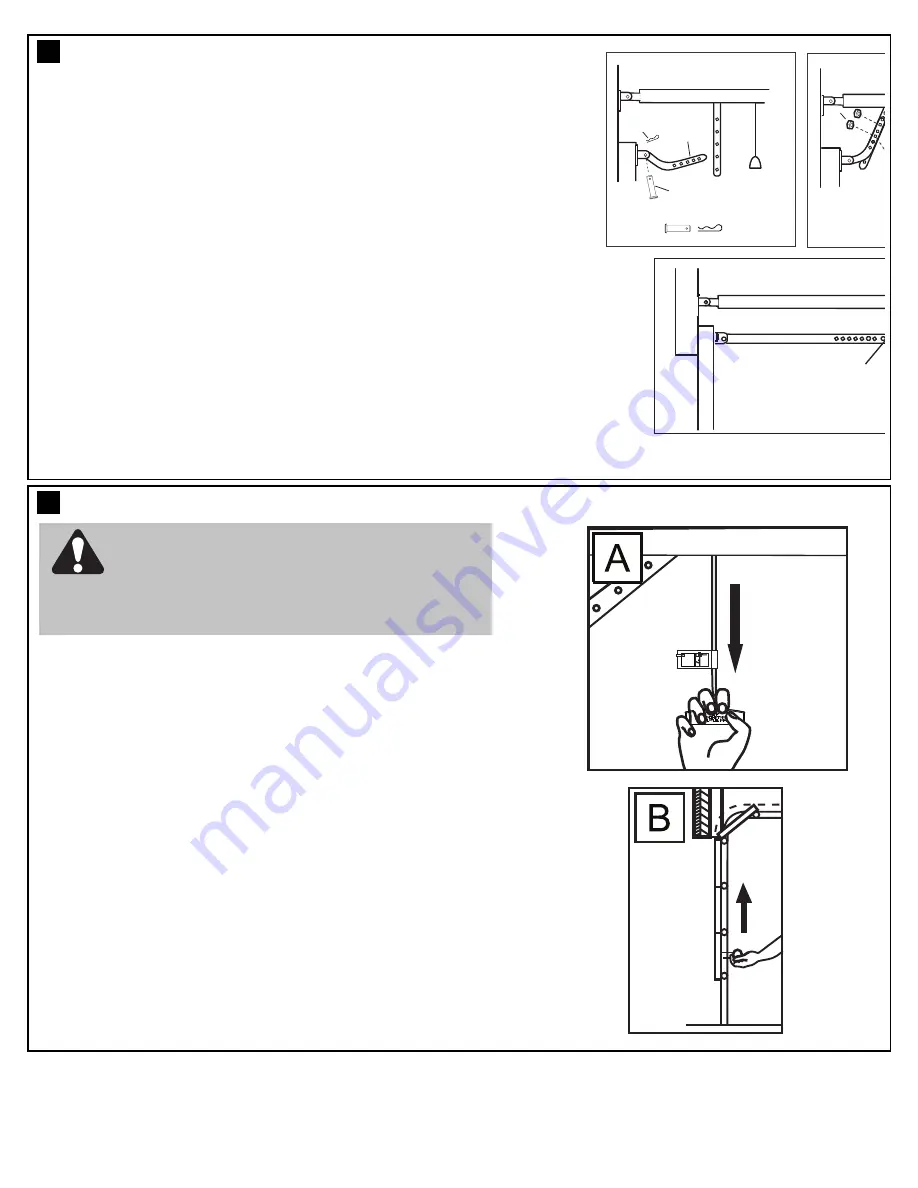
Make sure the garage door is fully closed. Pull the manual release cord

to disengage the trolley. Slide the trolley to around 300 mm from the

header bracket.

1.The straight door arm is already preassembled to the trolley.
2.Install the curved arm onto the door bracket using the Clevis pin (2)

and R-Clip (3) supplied.

3.Move the straight and curved arms together and secure using two

bolts and nuts provided (4). Ensure the angle of the straight arm is

around 20 degrees from vertical, when the door is fully closed.

.

ATTACH DOOR ARM TO TROLLEY

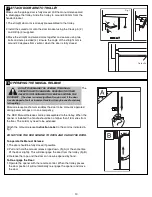
OPERATING THE MANUAL RELEASE

The

Manual release mechanism enables the door to be manually operated

during power outages or in an emergency.

The RED Manual Release cord is preassembled to the trolley. When the

opener is installed the handle should be no higher then 1.8 metres from

the floor. The cord may need to be extended.

Attach the manual release

Instruction Label

to the cord as indicated in

fig 1.

DO NOT USE THE RED HANDLE TO OPEN AND CLOSE THE DOOR.

To operate the Manual Release:

1.The door should be fully closed if possible.
2. Pull and hold the manual release rope down, (fig A) at the same time

lift the door slightly. This will disengage the door from the trolley (fig B).

3. Release the rope and the door can now be opened by hand.

To Re-engage the Door:

1.Operate the opener with the remote control. When the trolley passes

the door position it will automatically re-engage the opener and move

the door.

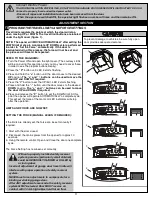
DO NOT DISENGAGE THE OPENER TO MANUAL

OPERATION WITH CHILDREN , PERSONS OR OTHER

OBJECTS INCLUDING MOTOR VEHICLES WITHIN THE

DOORWAY : (The door is under significant tension and if the door

has developed a fault or incorrect tension, it may be unsafe and may

fall rapidly.)

17

18

Содержание Entrylift MT50EVO

Страница 1: ...future reference MT50EVO Sectional Garage Door Opener Installation and Operating Instructions This manual contains IMPORTANT SAFETY information DO NOT PROCEED WITH THE INSTALLATION BEFORE READING THO...

Страница 2: ...2014 The Chamberlain Group Inc TM Trademark of The Chamberlain Group Inc Registered Trademark of The Chamberlain Group Inc...

Страница 3: ...damp or wet space exposed to weather To avoid damage to very light doors such as fibreglass aluminium or steel doors an appropriate reinforcement should be added To do so contact the door manufacture...

Страница 4: ...ce supported entirely by its springs Raise and lower the door to see if there is any binding or sticking 20 kgf is the absolute maximum allowable force to raise or lower the door in any position If yo...

Страница 5: ...3 Curved door arm 4 Hanging bracket 2 5 Rail brackets 3 6 Header bracket 7 Door bracket 8 Hardware bag 9 Rail assembly 10 Manual 11 Warning Labels 12 Rail centre bracket Your garage door opener rail...

Страница 6: ...oceed with the assembly installation and adjustment procedures in this manual you may find it helpful to refer back to this illustration of a completed installation COMPLETED INSTALLATION 9 4x 8 8x 7...

Страница 7: ...when remote controls are not available Open Stop Close 7 LEDs 1 Remote Control Indicator 2 Program DOWN indicator Door Operating Passpoint indicator 3 Program UP indicator No Function Polarity Comment...

Страница 8: ...Rail brackets 4 and the screws 5 This completes the assembly of the door opener to the rail FASTEN RAIL TO OPENER 9 10 The segmented rail is largely preassembled and consists of 3 parts The carriage p...

Страница 9: ...al lines created in the previous section for proper placement of header bracket A Wall mount centre the header bracket 1 on the vertical centre line 2 with the bottom edge of the header bracket on the...

Страница 10: ...etween door and rail 1 Raise the opener onto support 2 Open the door completely place a 50 mm spacer between the door and the rail as shown 3 The final positioning of the rail should be relatively par...

Страница 11: ...ge is not obstructed The carriage can not pass through the bracket Mounting at the very back fig B is ideal 3 Bend ceiling fixtures 1 in such a way that they lie flat against the ceiling Depending on...

Страница 12: ...opener is installed the handle should be no higher then 1 8 metres from the floor The cord may need to be extended Attach the manual release Instruction Label to the cord as indicated in fig 1 DO NOT...

Страница 13: ...e force of the motor all LED indicators will stop after this operation LIMITS AND FORCE ARE NOW SET SETTING THE FORCE MANUAL LEARN IF REQUIRED If the limits are already set the force can be set manual...

Страница 14: ...erse test When the door reverses off the 40 mm obstacle remove the obstacle and run the opener through a complete travel cycle Door must not reverse in closed position If it does repeat Program the Li...

Страница 15: ...e floor Attach bracket assemblies with carriage bolts as shown Adjust right and left side bracket assemblies to the same distance out from mounting surface Make sure all door hardware obstructions are...

Страница 16: ...22 1 service www chamber a n de nfo chamber a n de B B A 2 114A3361 For Service Call Installation Date 3 132A2900 RISK OF ENTRAPMENT Repeat Safety Reverse Test monthly Door must reverse on contact wit...

Страница 17: ...opener 2 Press and release the S button The LED 1 indicator light will glow steadily 3 Enter a 4 digit personal identification number PIN of your choice on the keypad 4 Press and hold the ENTER button...

Страница 18: ...If it is unbalanced or binding call a qualified door technician Check to be sure door opens closes fully Adjust limits and or force if necessary Repeat the safety reverse test Make any necessary adjus...

Страница 19: ...mote control 5 Model E940M 1 Channel visor remote control 6 Model E943M 3 Channel visor remote control 7 Model E945M 3 Channel mini remote control 8 Model E840M Keyless entry system 9 Model C77 The Pr...

Страница 20: ...ersons in order to avoid hazard RAIL REPLACEMENT PARTS 041A4017 Motor shaft adapter PVC 041A4021 Trolley latch chain 041A4016 Position tab chain 041A4001EV Logic Board 041A4024 Transformer 041A4033 Mo...

Страница 21: ...process and may have dislodged 1 Opener doesn t operate from either door control or remote Does the opener have electric power Plug lamp into outlet If it doesn t light check the fuse box or the circ...

Страница 22: ...3 min Door Linkage Adjustable door arm Pull cord trolley release Safety Personal Push button stop in UP and DOWN direction Automatic safety reverse in both UP and DOWN direction Electronic Automatic...

Страница 23: ...aler will provide you with either repairs to the Unit or a replacement Unit Repairs and replacement parts provided under this Chamberlain Limited Warranty are provided free of charge and are warranted...

Страница 24: ...TM Trademark of The Chamberlain Group Inc Registered Trademark of The Chamberlain Group Inc Warranty Registration To validate your warranty you must complete the registration form online at gomerlin...

Отзывы: